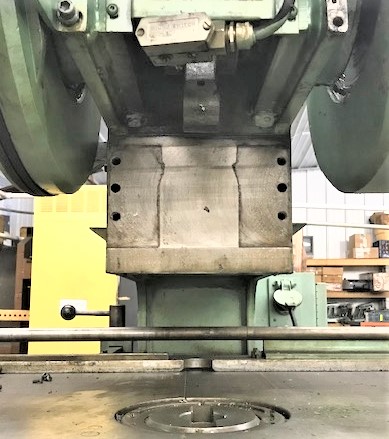
Strippit
Super 30/30 and Custom 18/30
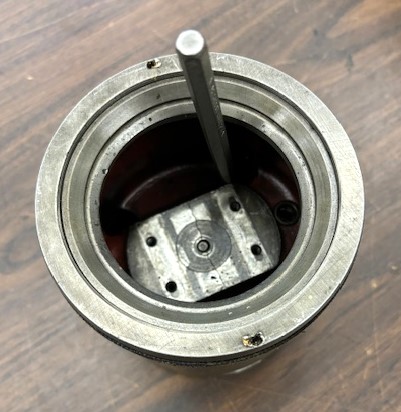
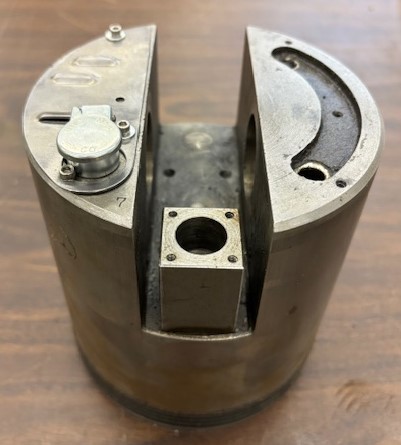
Punch-Head
Repair & Rebuilding Notes
Starting about 1960, The Strippit Co. developed their "Improved Electro-Hydramatic" Punch Head using a Electric Solenoid inside Punch-Head Piston to Close the Piston-Valve for a Punch-Cycle.
New Punch-Head was used on Strippit's Super 30/30, Custom 30/30, Sonic 15B, Sonic 18/30, Custom 18/30, Super 30/40-Mechanical, Custom 30/40-Mechanical, Super 30/30 AG (Auto-Gage), and Custom 18/30 AG Single-Station Punch Machines.
Before 1960, Strippit's Single-Station Punch Machines used Complex System of Air-Solenoid and
Air-Cylinder to Pull-Up a Steel-Rod that went down into Piston to Pull-Up & Close the Piston-Valve for a Punch-Cycle, as was used on Models like 10-A, 10-AA, 15A Punch Machines.
This Newer Electro-Hydramatic Type of Punch-Head is Reliable,
but as most of these Machines are now 30 to 60+ Years Old and
Most Shops do Little or Zero Maintenance, they of course, Develop Problems. Go Figure......
On this Web-Page, I will show a few Common Problems and some Repair & Rebuilding Tips,
But Certainly NOT Step-By-Step Repair Instructions.
First!,
Review All the Information I have Provided on my
Webpage, as there is Much Common
Problems and Repair Information Already Shown there!
Second,
Buy & Read The Operation & Maintenance Manual
for YOUR Machine if you don't have one!
1 --- If Machine Blows a Fuse when you try to Punch, Solenoid inside Piston may have
Burned-Out & "Shorted", or Cables to Solenoid may have Frayed, Rotted, or come-loose
Shorting-Out to the Machine. Some simple Ohmmeter Tests should determine what is bad here.
Most Model Machines have a "Nibble-Mode" Switch allowing Continuous-Punching which can
Burn-Out Solenoids and is Dangerous for Operators as it makes it Easier to Punch His Fingers!
Personally, I would Un-Wire the Nibble-Switch so Machine only works in Single-Punch Mode!
to be on Continuously, making the Machine Punch Continuously like it's in Nibble-Mode.
As your Knucklehead Operator Really Doesn't Care,
he keeps using it this way instead of having it repaired, until Solenoid Finally Burns-Out.
A Good Solenoid Coil Measures About 15 Ohms and is Easy to Check on Terminal-Strip behind Switch-Panel. A Bad Solenoid Coil is "Shorted" Close to Zero Ohms or "Open" Zillions of Ohms.
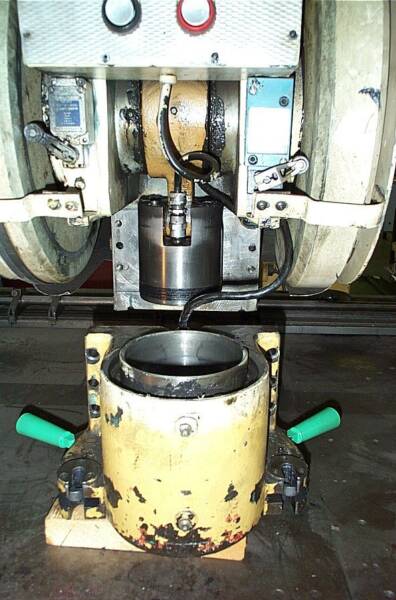
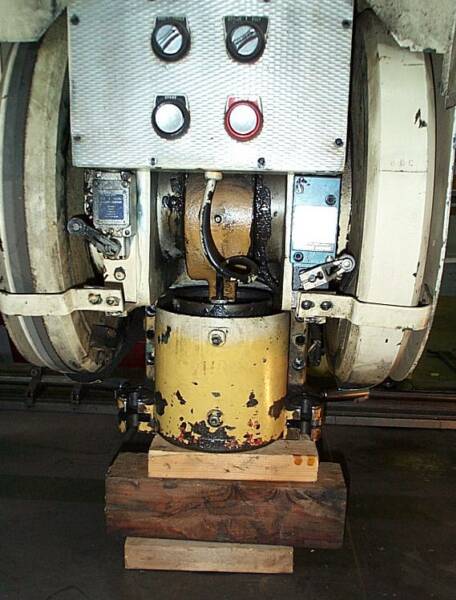
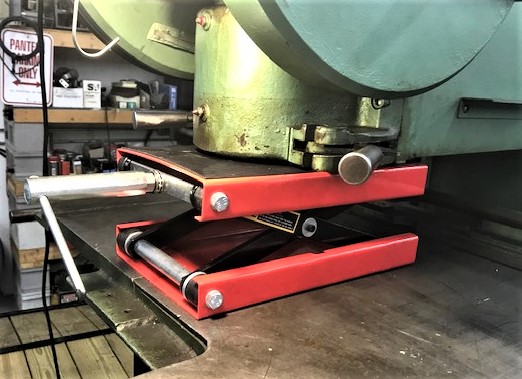
You have to Drop the Ram-Housing and Rebuild Punch-Head to Replace Coil, a Lot of Work!
If you have determined Solenoid is Bad, the Ram-Housing will have to be Dropped-Down to gain access to Piston. Ram-Housing is Heavy and Greasy, so block-it up with Wood so it does Not fall
as you remove Bolts & Dowel Pins. Be Careful doing this so that you don't Smash your Fingers
or Damage any Machine Parts which are No longer made or available anywhere!
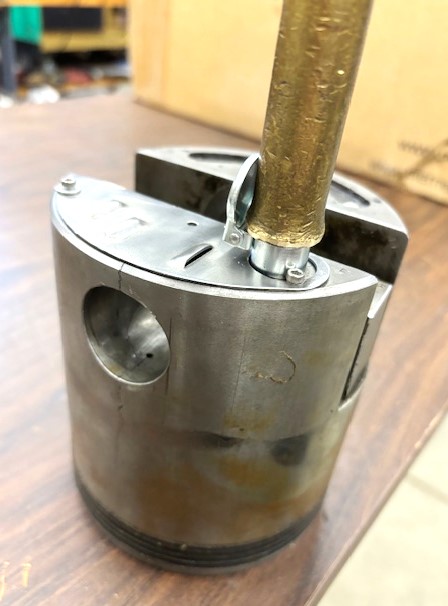
You can Rotate Flywheel to Top-Dead-Center Raising Piston.
Tilt Piston to Pop it out of Ram-Housing and Slide Housing out of the way.
Cable to Handle Interlock-Switch on the Back of Ram-Housing does Not have to be removed,
But Instead, remove the 2 Wires in Cable-End Behind Top Switch-Panel.
Make SURE you don't Damage the Interlock-Switch Assembly on Back of Ram-Housing
as these Parts are Very Hard to get & replace!
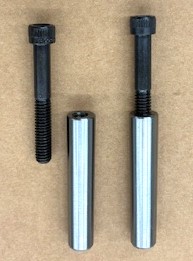
Carefully Pull 2 #62496-000 Special Tapered Pull-Dowel Pins with a Dowel-Puller so you
do NOT Damage the Pins as they are used to Re-Locate Assembly Back-To Factory Alignment!
The 2 Pull-Dowels have a 5/16" x 18 Inside-Thread to use with Dowel-Puller Tool.
Carefully Remove the 4 --- 1/2"--13 x 1 3/4" S.H.C.S. (Socket Head Cap Screws).
Carefully Lift Ram-Housing off Wood-Blocks and Slide it off to Side of Table out of your way.
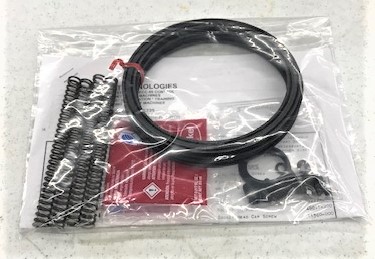
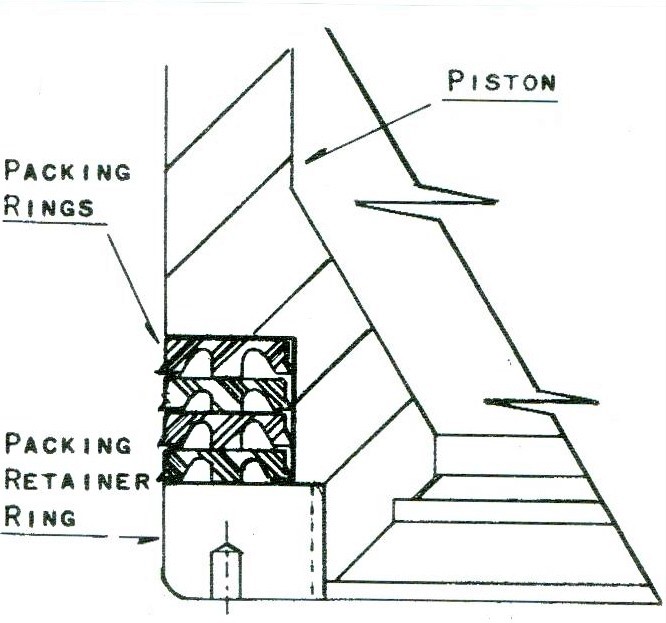
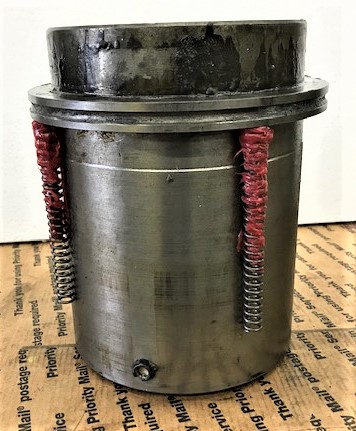
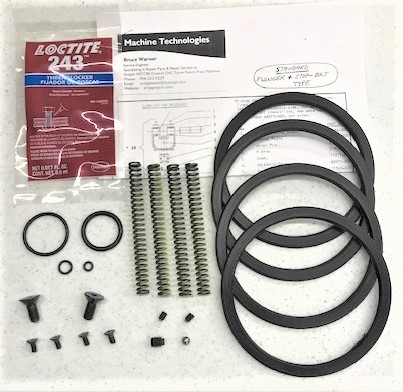
Now Install a NEW Set of Packing-Rings
from our Head-Rebuilding Kit, shown Below.
While tightening the Retaining Ring, have someone Hold the Piston
with a Wood-Rod Through Piston Wrist-Pin Holes, to keep Piston from Turning.


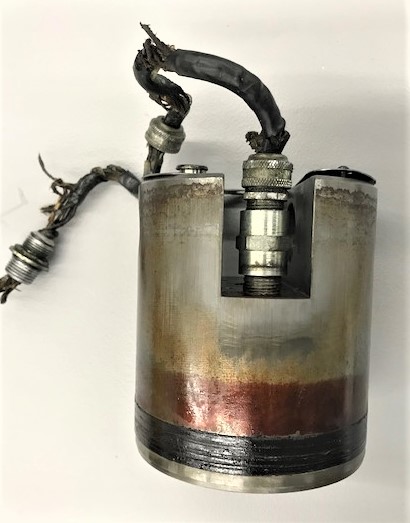
Strippit used an Expensive Pig-Tail Cable, in Left Photo Below, that costs a Couple Hundred Dollars, which is Totally Unnecessary! The Piston only has a Very Short 1-Inch Punch-Stroke,
so for many years now we have just used a Straight-Cable with a Just a Little Slack in it.
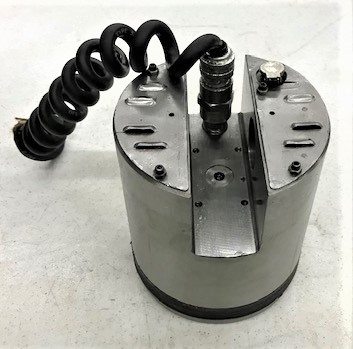
While we are on the Subject of Cables going to Solenoid inside Punch-Piston, Strippit seems to
have used 2 ways of Wire Connection to Piston, though there was probably some other
variations used over the 4-Decades Strippit built these Machines.
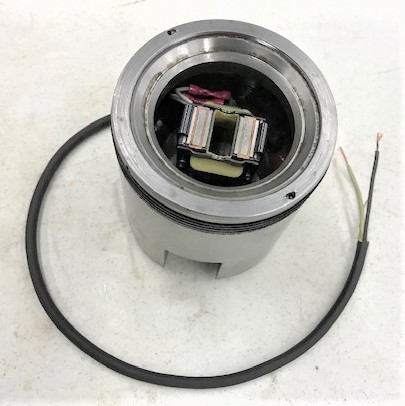
The 1-Type is shown on Above Left Photo. Top of Piston has Small 3/8" Pipe-Threads in which a
Pipe-Thread Stand-Off about 1 1/2" long holds a Cord-Grip. I don't think Stand-Off was necessary.
On this Piston, I Removed Stand-Off, remounted Cord-Grip directly to Piston,
and added a New Straight Cable Kit, as shown on the Above Right.
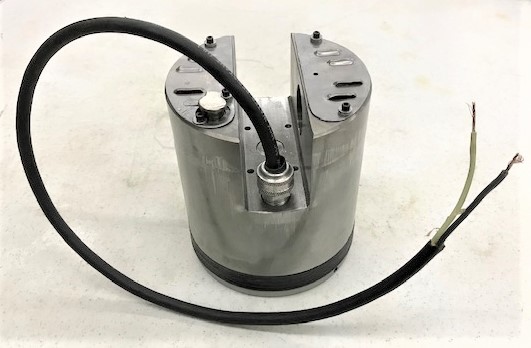
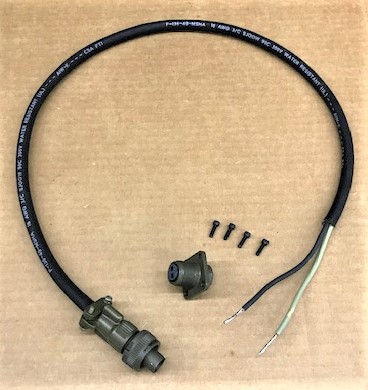
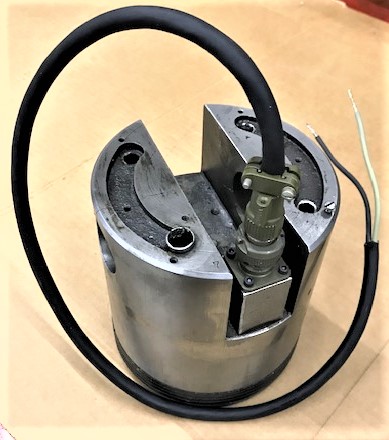
The 2nd-Type using a small Military-Type Connector is shown in Above 3 photos.
There is a 1 1/2" Stand-Off Pressed-in Permanently in to top of Piston.
Solenoid is Mounted inside Piston, then 2 Shortened Solenoid wires are pulled-through Stand-Off and Carefully Soldered into Connector's bottom 2 Terminals.
Make Sure this is Soldered Very-Well by someone who Know's How to Solder,
as if there is a Problem, You will have to Take Machine All Apart Again To Repair!!!
Connector is then mounted to top of Piston Stand-Off with 4 --- #4-40 x 3/8" S.H.C.S.
Straight-Cable is wired into Electrical Box and Lower-End is plugged-in to Piston Connector.
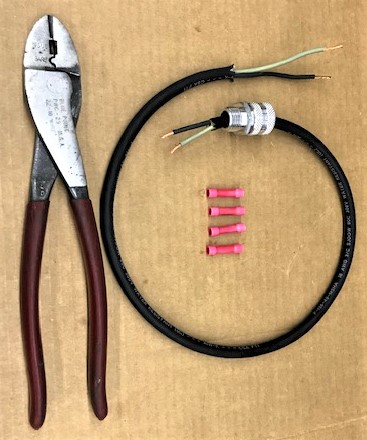
If your Cable & Connectors are Damaged, we have a
Kit of New Parts Available as Shown on Upper-Left of the 3 Photos Above.
Kit Consists of New Straight-Cable, New Male & Female Cable Connectors, and the 4 S.H.C.S.
Note, This Piston in above Photo has both Oil Breather-Baffle Plates removed
and the Oil-Filler Cap Broken-Off from Past Knucklehead Operator & "Maintenance".
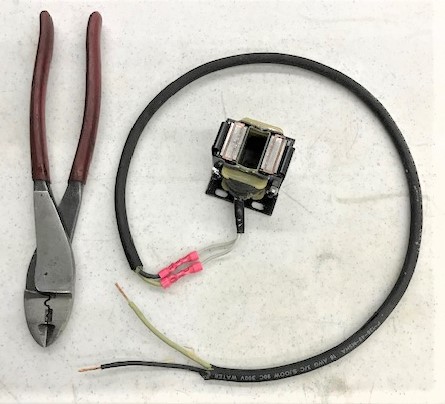
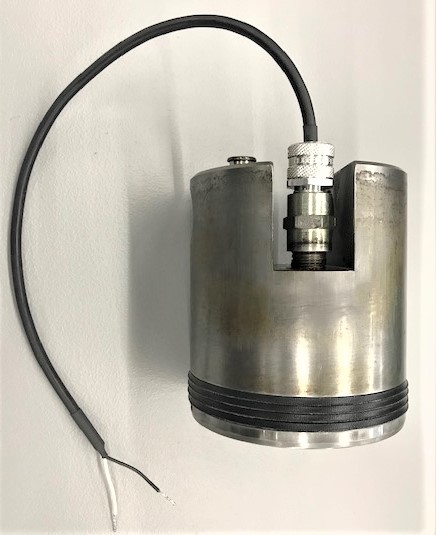
If your Cable & Cord-Grip are Damaged, we have a 2 Kits of New Parts Available as Shown on
Lower-Left of the 4 Photos Above & 3 Photos Below.
1st Kit Consists of New Cable, New Cord-Grip, and 4 Butt-Connectors to give you 2 Extra.
Electrical Crimp-Tool is Not included. Buy a Good Crimp-Tool at Lowe's or Home Depot.
You want Very Good Crimp Connections because if it Pulls-Apart,
you will have to take Machine All Apart Again To Fix It!
Shorten long Solenoid Wires if necessary, then Crimp-Well to new Cable. Push Cable up through Piston. Mount New Solenoid inside Piston with 4 --- #8-32 x 1/2" Socket Head Cap Screws using
a bit of Loctite 243 Thread-Lock on screw-threads. I sometimes also use #8 Flat Washers underneath Screw-Heads. Use a Long 9/64" Allen Driver-Tool to reach Screws, and have a long
Magnet-Tool Ready, to retrieve the Screws you will drop inside Piston.
Take Cord-Grip apart, slide Bottom Threaded-Part down the Cable and Screw it into Piston fairly tightly. Slide Top-Part of Cord-Grip down the Cable, position Wires & Cable inside Piston so that they are tucked out of the way, but also they need a bit of Slack so there is No Strain on any of the Wires. Now Tighten the Top of Cord-Grip to hold Cable Securely.
Make SURE you Install 4 Packing Rings Correctly!!!
Solid-Side of Each Ring Goes UP! Open Lip-Side of each Ring Goes DOWN!
Make SURE Retaining Ring is Screwed-On Very Tight to Compress Packing-Rings.
Use 2 Nylon-Balls & 2 Set-Screws or the New 2 Brass-Tipped Set-Screws in Our Kit
which work Better to Hold Retaining Ring in Place Without Buggering-Up the Threads on Piston!
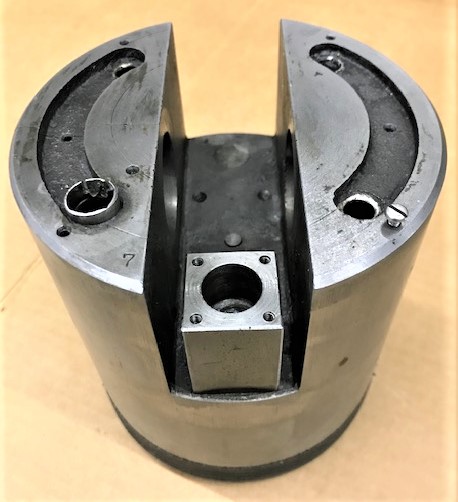
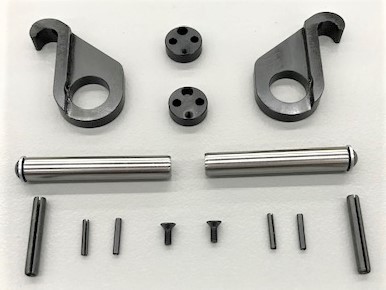
And Lastly, It's NOW EASY to Install our Hook & Handle Rebuild Kit with the
Ram-Housing Off Of Machine, as shown in Above 2 Photos.
It's NOW EASY to Drive-Out Old Roll-Pins and Drive-In New Roll-Pins
which hold the Hooks, because you have Lots of Room to Align-Up Parts, and
can Carefully Tap Roll-Pins In & Out with your Punches & Ball-Peen Hammer.
Also, I would NEVER Punch Very Thick Material like 1/4" Steel
and NEVER Punch High-Tonnage (Over 20 Tons) Holes with 30/30 or 18/30 Type Machines
as Sooner or Later, you will Break The Piston, and they are NOT Available Anywhere Anymore!
You Have Now Been Warned.....


This page was last updated: January 15, 2026


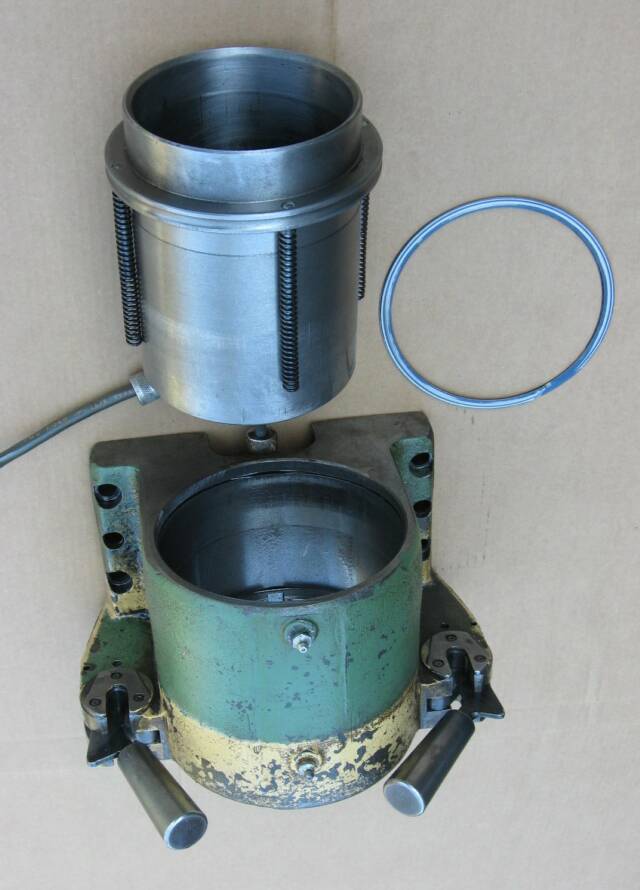
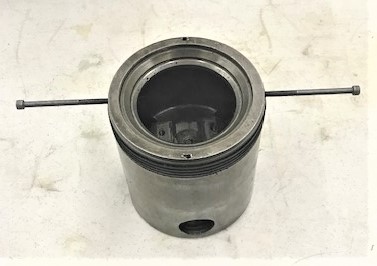
Now that Piston has been Repaired with a New Solenoid and New Packing-Ring Seals,
we Assemble the Ram with 4 New Springs over the 4 Spring-Rods
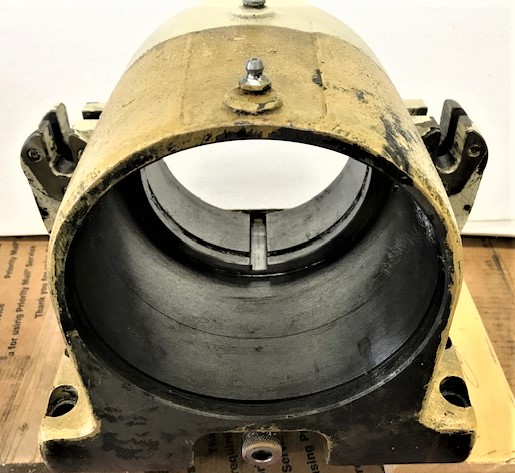
and Slide Ram back into Punch Housing.
Keep the Ram, Inside & Outside AND Ram-Housing, Inside & Outside, Very Clean!
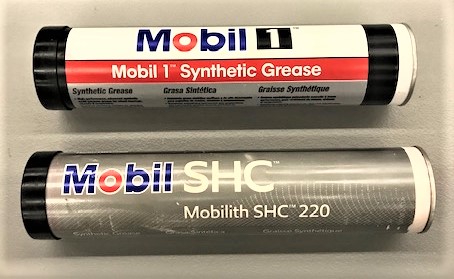
Coat the Inside of Ram-Housing with Grease, I use
as it stays Stable, Without Deteriorating, Much Longer than Standard Cheap Greases.
Coat the Outside of Ram with Grease.
Tip! Putting a Blob of Grease on End of 4 Springs will keep them from falling-off Spring-Rods
when you go to insert Ram back into Ram-Housing.
Make Sure you have the Pin on Ram Lined-Up with Groove inside Ram-Housing!
When finally installed back on Machine,
Pump a Lot of Grease into the 2 Ram-Housing Grease-Fittings.
And Make-Sure the 5 Crankshaft and Pitman Bearing are Well Greased Regularly!
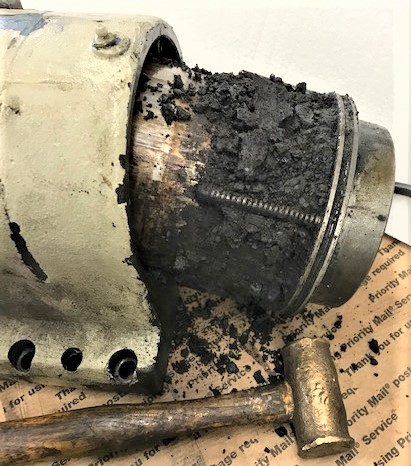
Here's what Happens when you
Don't Use a Good Full-Synthetic Grease!
I Guess this is 40-Year Old Grease, but it was like Chunks of Dry Asphalt!
Ram should easily be pushed-out by hand, after Snap-Ring is Removed.
BUT, I had to Start Pushing Punch-Ram out of Ram-Housing on my Hydraulic Arbor Press
then finished-up by Pounding Out Ram with my Large Brass Hammer!
And of Course, All 4 Ram-Springs were Broken into Pieces.
Unfortunately, Broken Ram-Springs is a Normal Problem
as Strippit did a Poor-Job of Designing Ram-Springs & Enough Space for the Ram-Springs.
We have been working with Spring-Engineers, and will have
New Custom-Made Ram-Springs Available End of January 2020 in our Punch-Head Rebuild Kits
which should Last-longer & Work-Better than the Original Ram-Springs.

I'm Always looking for New & Better Tools and Ways of Doing Things. Am trying-Out this
Motorcycle Scissors Jack to Support and Lift Up & Down the Heavy Punch Assembly.
It will be especially Useful for Lifting-Up & Aligning the Bolt & Dowel-Pin Holes on Reassembly.
You Will still have to Slide Assembly On & Off Jack to work work on it, but It will be a big Help!
It did Not work as well as I Hoped, so going back to using an assortment of Wooden Blocks.
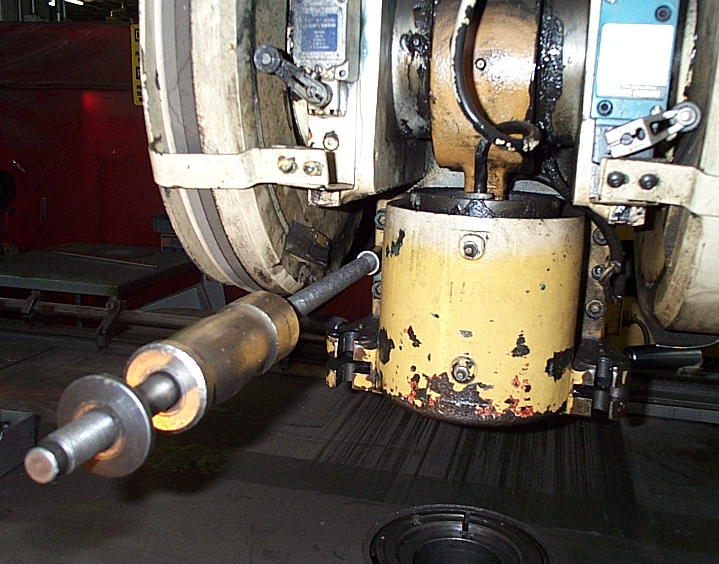
It is Very Difficult to Replace Solenoid & Solenoid Cables inside Piston while Piston is on Machine,
But It Can Be Done on Machine, BUT i would take Piston Out.
This particular Piston & Wiring are in poor Condition, so I am taking Piston off Machine.
Remove 2 Wire Connection from Electrical Box Switch-Panel.
Make Sure you Write-Down what Terminals 2 Wires went to as there are Different Versions!!!
Remove 5/16"-18 Set-Screw in Center of the Bottom of Connecting-Rod,
which fits into a Groove in Center of the Wrist-Pin, holding the Pin in Place.
Rotate Flywheel so Piston is at Bottom of
Stroke to give you a bit more room to work.
Remove 2 Flat-Head Bolts and take
Right-Side Flywheel Retaining-Plate
Off the End of Crankshaft.
With 2 Crowbars, 1 Front & 1 Back,
Pry & Slide Right Flywheel out about 1-Inch.
Do NOT side too-far and Drop Flywheel !!!
Now you have Enough room so that you
can Hold a Socket with
and with a Hammer, Carefully
Tap Right-Side of Wrist-Pin to the Left.
It should come-out Fairly Easily.
Put Wood Blocks or Scissor Jack under Piston so it does Not Fall & get Damaged
as the Pin is Tapped-out.
Now you can remove Piston from Machine and Easily work on it.
When Replacing Punch Solenoid you will
have the Machine Apart & Piston Out.
NOW is the Time to also
Replace the Worn-Out Packing-Rings and
Ram-Lifter Springs which are usually Broken!
So, I have New Punch Solenoids In-Stock
But I will NOT Sell Solenoid without also
a Punch-Head Rebuild Kit !
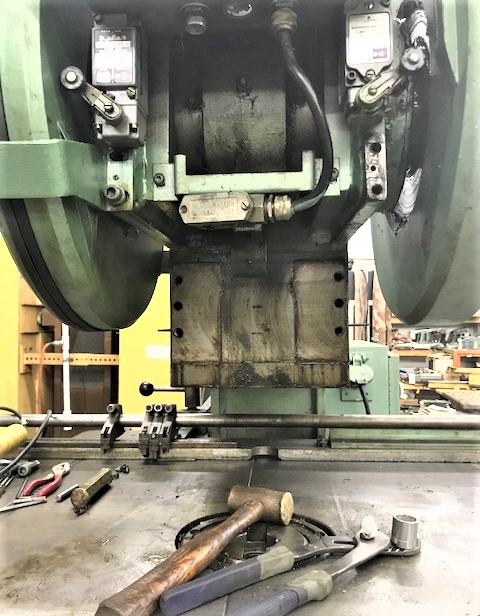
I'm Rebuilding this Strippit Machine.
The Solenoid is Good but the Cable to Piston Solenoid is Completely
Rotted and Shorting-Out.
It is too difficult to replace when Piston is on Machine, so I took Piston off.
This Piston is using a Cord-Grip Cable instead of the Military-Type Connector Cable Assembly.
I Removed old Cable Assembly and
Cord-Grip and Installed a New Assembly from 1 of the Cord Kits I Stock.
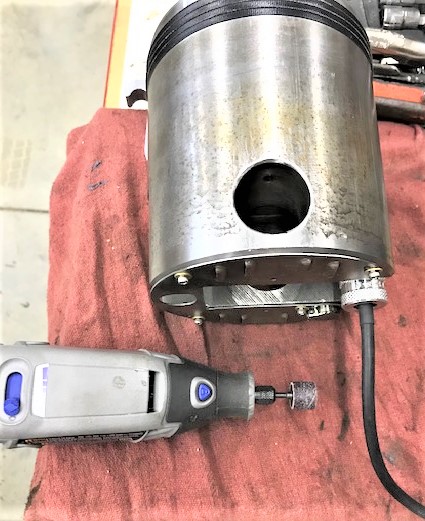
I Drag a Flat-File around Top of Piston and 2 Outer Wrist-pin Holes as there are often Burrs there that I want to remove.
Then with my Dremel Tool and a
Small Sanding-Drum I carved a
small 45-Degree Bevel into the
2 Outer Wrist Pin Holes as they were kind of rough from the Strippit Factory.
Drag a Flat-File around Top of Piston and the 2 Outer Wrist-pin Holes Again to
Make-Sure Everything is Smooth!
Remove 2 Set-Screw from Retaining-Ring and Remove Ring.
Carefully Remove 4 old Packing-Rings,
Do Not Nick or Damage Ring or Piston!
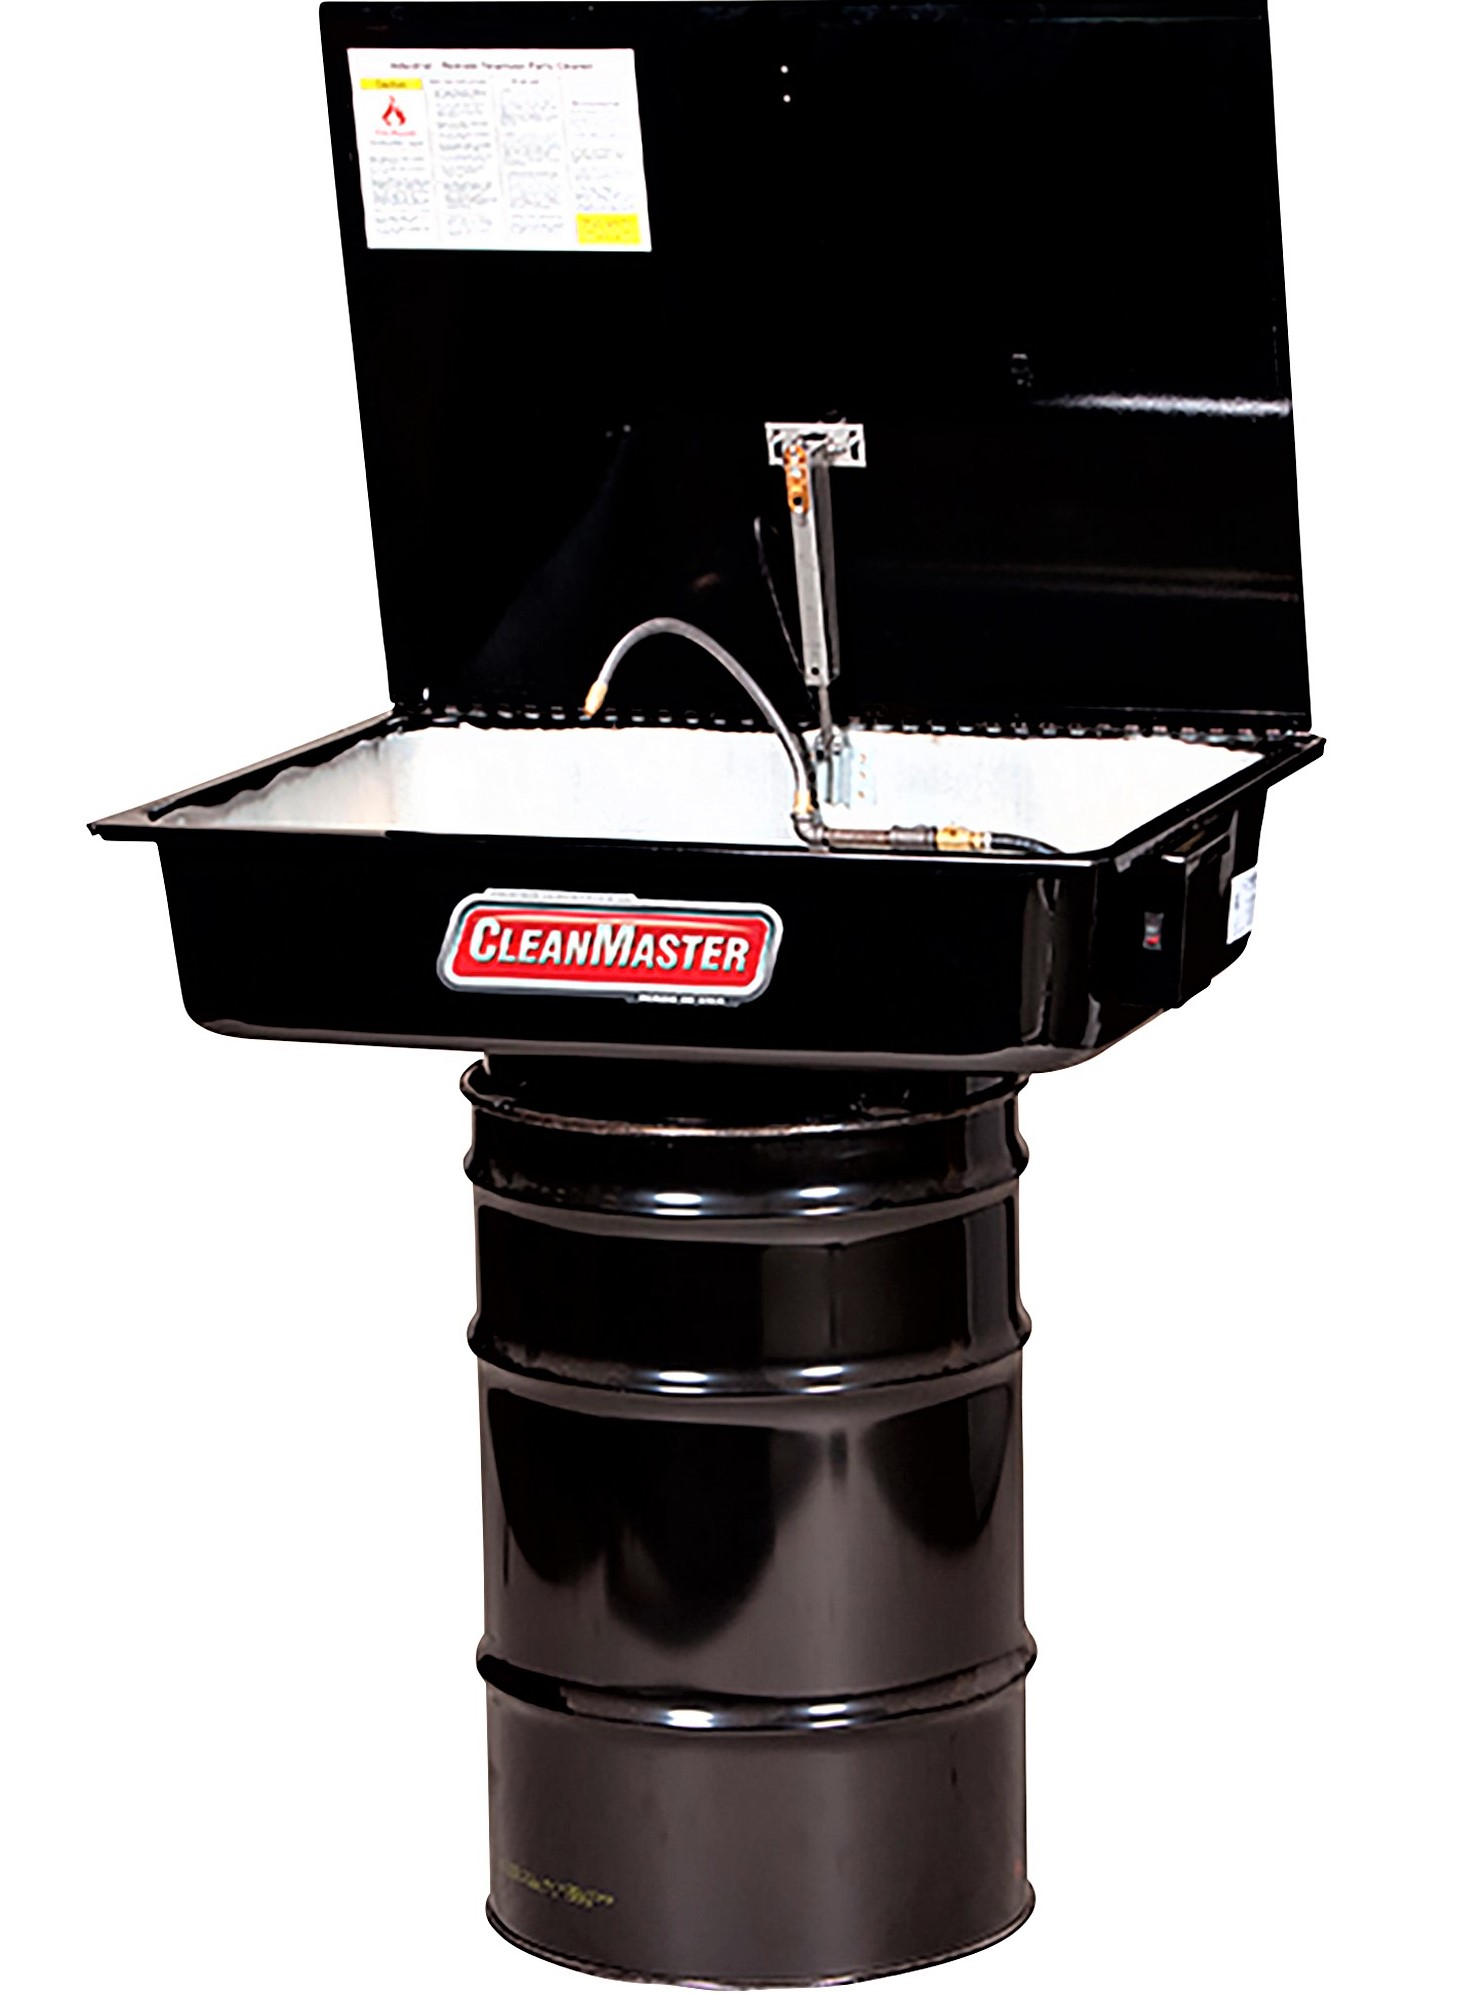
Then I Scoured-Clean outside of Piston
with Kerosene and Washed Thoroughly
in my Parts-Washer with Kerosene
to get All Grit & Dirt Off!
Set of New Packing-Rings are Installed.
Retaining-Ring is Screwed-On Very-Tight
and is Secured with 2 New Brass-Tipped Set-Screws instead of Old Strippit way of using Nylon-Balls in front of Plain Set-Screws. These Brass-Tipped Set-Screws are Now included with my Punch-Head Rebuild Kits.
Sheetmetal Baffle-Plate on Top of Piston was Loose so I replaced 4 Small
Button-Head Screws with New 4-40 Socket-Head Cap Screws & a Bit of Locktite 242 with 4-40 Washers underneath each Screw.
This Same Piston Looks Pretty-Good Now!
I like to go beyond Just Repairing Things, and to Repair them Like-New or even Better than Like-New, and so should You!
This is the way I do Things or I won't do them at all. Piston is ready to reinstall.
I Also spend a lot of Time Dragging a Flat-File all over the Backside of the Punch-Head Assembly
getting all the Paint and Burrs and Dirt Removed and
Also De-Burr & Clean Mating Surface of Machine because I want it all to go back
Perfectly with NO Alignment Problems.
When You Jack-Up Ram into Piston, Make Sure Piston Solenoid & Ram Solenoid-Plunger
are Aligned, or you could Break Solenoid if you Force it Up Ram Housing Misaligned!
When you Jack-Up the Head-Assembly back on the Machine , there is a
Shelf on Machine that will help hold Punch-Assembly while you carefully Tap-In the Dowel-Pins,
using the Proper 5/16" Bolts threaded into Dowels so they are NOT DAMAGED when Tapped-In!
Put-in Bolts and Cross-Tighten them several Times.

Since you have the Ram-Housing and Piston out of the Machine,
NOW is the Time to do Other Repairs, as it's NOW EASY with the Machine Apart!!!
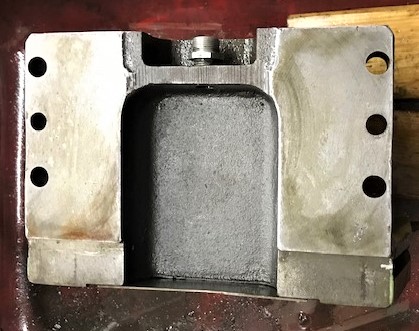
Start with removing the Packing-Rings Threaded Retaining-Ring as shown in Bottom of Piston Photo, and the Photo above. As nobody but me has a Tool to Engage the 2-Holes to remove Threaded Retaining-Ring, Everyone else used a Hammer & Punch to Drive Ring
Counter-Clockwise to Remove & Clockwise to Tighten Ring.
This, of Course, Buggers-Up & Ruins the 2-Holes!!! If Holes are Bad, Once Ring is off,
take Ring to a GOOD Machine Shop and have them Drill a Couple of Pairs of New Holes
180-Degrees apart. There is Plenty of Room to Drill Several Pairs of New Holes!
Then, for Extra-Credit, have Machine Shop Make you a Tool like Shown Above!
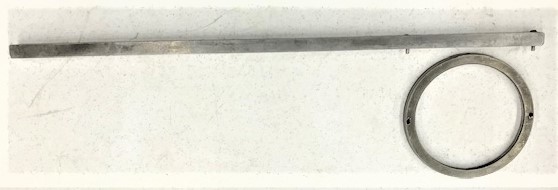
This one is simply a 5/8" x 1/2" x 19" Square Steel Rod with
2 --- .125" Dowel Pins sticking-up .200" and are Mounted 4.550" apart to Engage 2 Ring-Holes.
Another Way (But, is Not Quite as Good) to Loosen & Tighten Retaining-Ring is to
Take-Out the 2 10-32 Setscrews and
Screw-In 2 10-32 x 3 Inch Socket Head Cap Screws to use as Handles, as Shown Below.
If the 2 Tapped 10-32 Holes are in Bad Condition, Again, Take Retaining-Ring to a
GOOD Machine Shop to Drill and Tap a Couple of Pairs of New Holes!
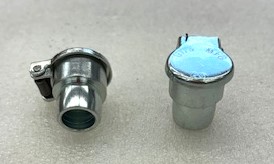
As I get many requests for New Oil-Filler Caps that are Broken-Off on Top of Piston,
I have been searching for a replacement part. The Company that made the Original Oil-Filler Caps that Strippit used, no longer has them available as their Tooling to make Caps was Damaged and they are not going to replace tooling to make more Caps.
However, they do have a Heavy-Duty Oil-Filler Cap that Fits the Drill-Hole in Strippit's Piston,
so I now have a Small-Stock of these New Heavy-Duty Oil-Filler Caps. The Following shows how
I replaced Old Broken Oil-Filler Cap, in only a Few Minutes, once Piston was out of Machine.
Spring-Loaded Cap-Tops get Broken-off by
Rough use of a Screwdriver to hold Cap-Open
so that Oil-Can Spout can be inserted to add oil.
Oil-Filler Caps are a Light interference Fit into
Drill-Hole of Piston.
So, you can Flip Piston Upside Down on a Block
of Wood with Oil-Filler Hole sticking out 1 Side of
Block to give Oil-Filler Body room to come out.
Using a Long & Thin-Punch,
Carefully Reach Down into Piston Drill-Hole,
Catch the Edge of Oil-Filler Cap Body, and
Tap-It-Out with a Small Hammer.
Oil-Filler Cap Bodies are NOT That Tight in
Piston Drill-Hole and Should Tap-Out Quite Easily! If you have to Hit it Hard,
You are doing Something Wrong!
The Old Broken Oil-Filler Cap Body
I Tapped-Out of Piston and the
Long & Thin-Punch I used to do it.
New Heavy-Duty Oil-Filler Caps
Ready to be Tapped into Piston.
I reinstalled the Top Baffle covers that
were removed, for no reason here,
in Prior Photos.
I used New #4-40 x 5/16" S.H.C.S.
Then I Pushed-In
New Heavy-Duty Oil-Filler Cap
into Piston Drill-Hole with my Fingers.
Using a 3/4" Brass-Rod over the
Oil-Filler Cap, with Spring-Loaded
Cover Held-Back, I Carefully Tapped-In
Oil-Filler Cap with a Hammer.
Again, This should Tap-in Fairly Easily!
If you have to Hit it really Hard,
Check to make Sure you are Not doing Something Wrong!
And here is our
New Heavy-Duty Oil-Filler Cap
installed on a Strippit Piston.
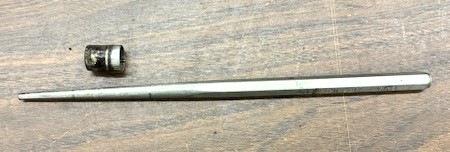
If you have Damaged or Lost your
2 #62496-000 Tapered Pull-Dowel Pins
we now have a Limited Stock
of New Custom-Made Tapered-Dowel Pins.
Pins are Sold in Pairs with 2 5/16" x 18 S.H.C.S.
which we use with Dowel-Puller to Remove Pins.
We also Screw-In the S.H.C.S.'s into Dowels
when Reinstalling Dowels back in Machine
so we Tap in Place the Head of the S.H.C.S.,
using a 3/4" Brass-Rod and Brass-Hammer,
and NOT the Dowel Pin Top
to make sure we do NOT Damage Pins.

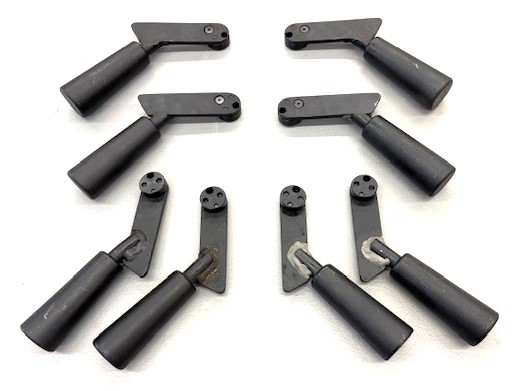
If Your Operator Managed to Break Your Machine's Handles
that Lock-In Swing-Arm Punch Holder,
We Now have a VERY Limited Supply of LEFT and RIGHT Handles
which come Fitted with New Delrin Cams.