New Hook & Handle Repair Kit Can be Installed
with Punch-Ram Assembly on Machine, But it is Difficult.
It is MUCH Easier with Punch-Ram Assembly off of Machine!
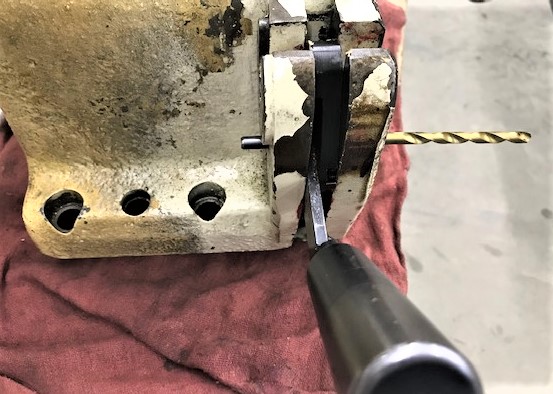
Use Short Pin-Punch & Ball Peen Hammer to Carefully Tap & Pound-out
1/8" Roll-Pins, I usually do these from the Top, driving them Down & Out.
Some Machines you can Punch from the Bottom, whatever works for you.
Next do 1/4" Roll-Pins. I usually do these from the Bottom Pounding them Up & Out.
Use the stout Short Pin-Punch to get it moving, then switch to longer Pin-Punch.
You do have a Full Set of Short & Long Punches, don't you?
If you don't have Punches, you can also use Drill-Rod held with Pliers.
McMaster-Carr #8893K147
Cut-Down to 3-inch long .120" Drill-Rod to punch-out 1/8" Roll-Pins.
McMaster-Carr #8893K201
Cut-Down to 3-inch long .242" Drill-Rod to punch-out 1/4" Roll-Pins.
After 2 Roll-Pins are Tapped-Out on each side, you should be able to Slide-Out the
Hook and Handle Assembly on each side of Punch-Head.
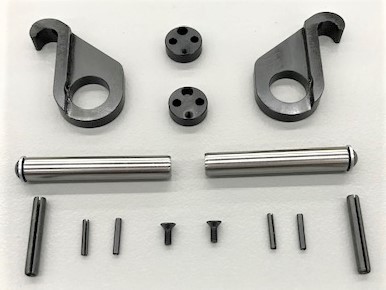
Keep Left & Right Hooks and Left & Right Handles Carefully Separated
so that you do Not become Confused when Reassembling!!!
Remove the Old Hooks from Handles.
Remove hold-down Screw and remove Old Cams from Handle Assembly.
Fit a New Cam onto Handle, put a Drop of Loc-Tite on Screw Threads,
and carefully install Screw into Cam.
Coat Cam Lightly with Grease
and
Very Carefully Tap Correct-Hook into
Correct-Handle with a Plastic-Hammer so that Cams are Not Damaged!
Cams will fit Very Tight into Handles!
Slide Completed Hook & Cam Assembly back into Punch-Head.
When you slide Hook & Handles back into Head,
use the Solid-End of a 15/64" Drill-Bit to
Center & Line-Up Cam-Hole with 1/4" Head-Hole for the 1/4" Roll-Pin.
You will need to hold on to Drill Bit with a Rag because
as you pound-in the Dowel-Pin from other side,
the Drill Bit will fly-out and you will lose the Needed Alignment!
If Cam & Handle & Roll-Pin are Not All Lined-Up Perfectly
you will Mangle & Damage New-Cam And the Thin-End of Handle
when you Pound the Roll-Pin back in!
I usually Grind a Small 45-Degree Bevel on to 1/4" Roll-Pin Ends on my Belt-Sander
to help start Roll-Pins going through the Holes.
If the Beveled End gets damaged, you may want to Re-Grind Bevel.
Tap 1/8" Roll-Pin in from Bottom,
it Only needs to stick-up 1/8" into Hook-Groove,
any more will only make it break-off sooner.
When, not if, 1/8" Roll-Pin Tip Breaks-Off again someday,
just tap-it up another 1/8" into groove again.
This can be done several times before you would need a new pin.
Extra Pins are Included in our Kit.
Grease everything, and Keep it Greased,
with a good Synthetic Black-Moly Grease to keep parts from wearing.
Strippit
Single-Station Machine
Hook & Handle
Installation Notes
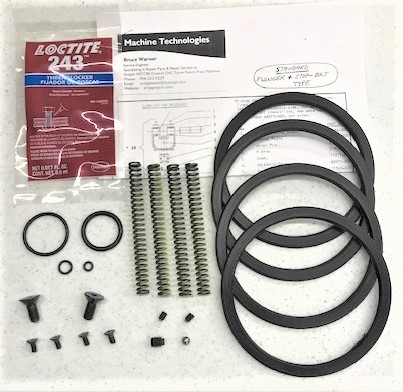
This Photo shows a
Hook & Handle Kit
that we Used to sell.
Note the
Left & Right Handles
which are
NO Longer Available,
So Don't
Mistreat yours
and
Break-Them!
Tips & Notes
for Extracting Roll-Pins
and
Installing Hook and Handle Repair Kit
The Following is NOT Complete Step by Step Instructions.
If you Need Detailed Instructions and do Not have Proper Tools,
perhaps you should Call a Experienced Serviceman instead.
Starting about 1960, the Strippit Company Up-Graded their Single-Station Punch Machines, such as Sonic 15, Custom 18/30, Super 30/30, & Super 30/40, using their New-Style Swing-Arm Punch-Holder. These Swing-Arm Punch-Holders used Strippit's New, at that time, Hook & Handle System to Lock Punch-Holders to Machine.
Hooks & Handles do Lock-In Holders well when New.
But, eventually they accumulate Wear, Especially because
Operators Never Lubricate them with Grease!
This Wear allows Swing-Arm Holder to Move & Deflect under Punch-Loading,
causing Poor Tool Alignment, Poor Punched-Hole Quality,
and Much Punch & Die Wear.
As Hook & Handle and Lock-Pin Wear gets worse,
Handles will Not even stay locked-in causing
Handle-Lock Limit-Switch to Not-Close, and the Machine Stops Punching.
Solutions is our Hook & Handle Repair Kit.


The Correct Way to Repair would be to
Replace Left & Right Hooks,
Replace Cams on Left & Right Handles,
and
Replace Lock-Pins on your 2 Swing-Arm Holders.
The Rocket-Scientists at some Shops put
Bungee-Cords on Handles to keep them closed,
as if Rubber Bungee-Cords would
Hold Tool-Alignment on a 30-Ton Punching Machine!!!
Very Stupid.
Then these Same Rocket-Scientists
try a bit of Weld on Hooks or add Shims to
Force Hooks & Handles to Lock-Up.
Then
The Rocket-Scientists are Surprised
when Hooks & Handles Break into NON-Repairable Pieces!
Now they have a Real Problem
as
Handles are a Precision Assembly that are
NO Longer Made or Available Anywhere!
SO,
Don't Even Think Of Trying That!
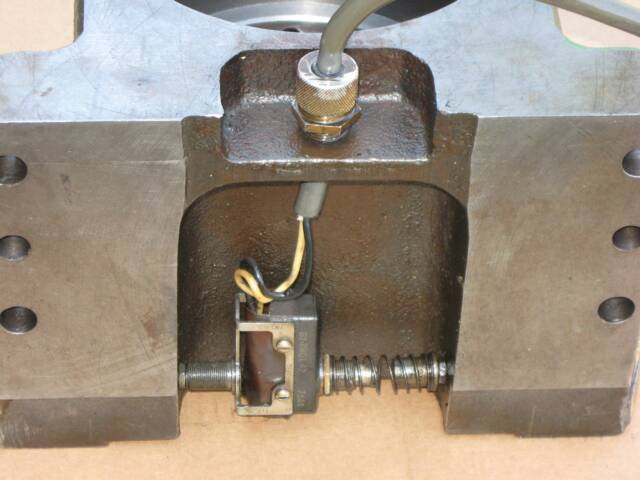
Handle-Lock Limit-Switch is located behind the
Punch-Head Housing Assembly.
If Handles do Not Lock-Up properly to Close this Switch,
Machine Will Not Punch.
When dropping-down this Punch-Head Housing Assembly
be Very Careful that you do NOT Damage these Parts!
I have some Switch & Spring Parts,
But Other Parts like 2 Rods, Barrel, Bracket, Etc.,
are Very Hard to get or just NOT Available!!!
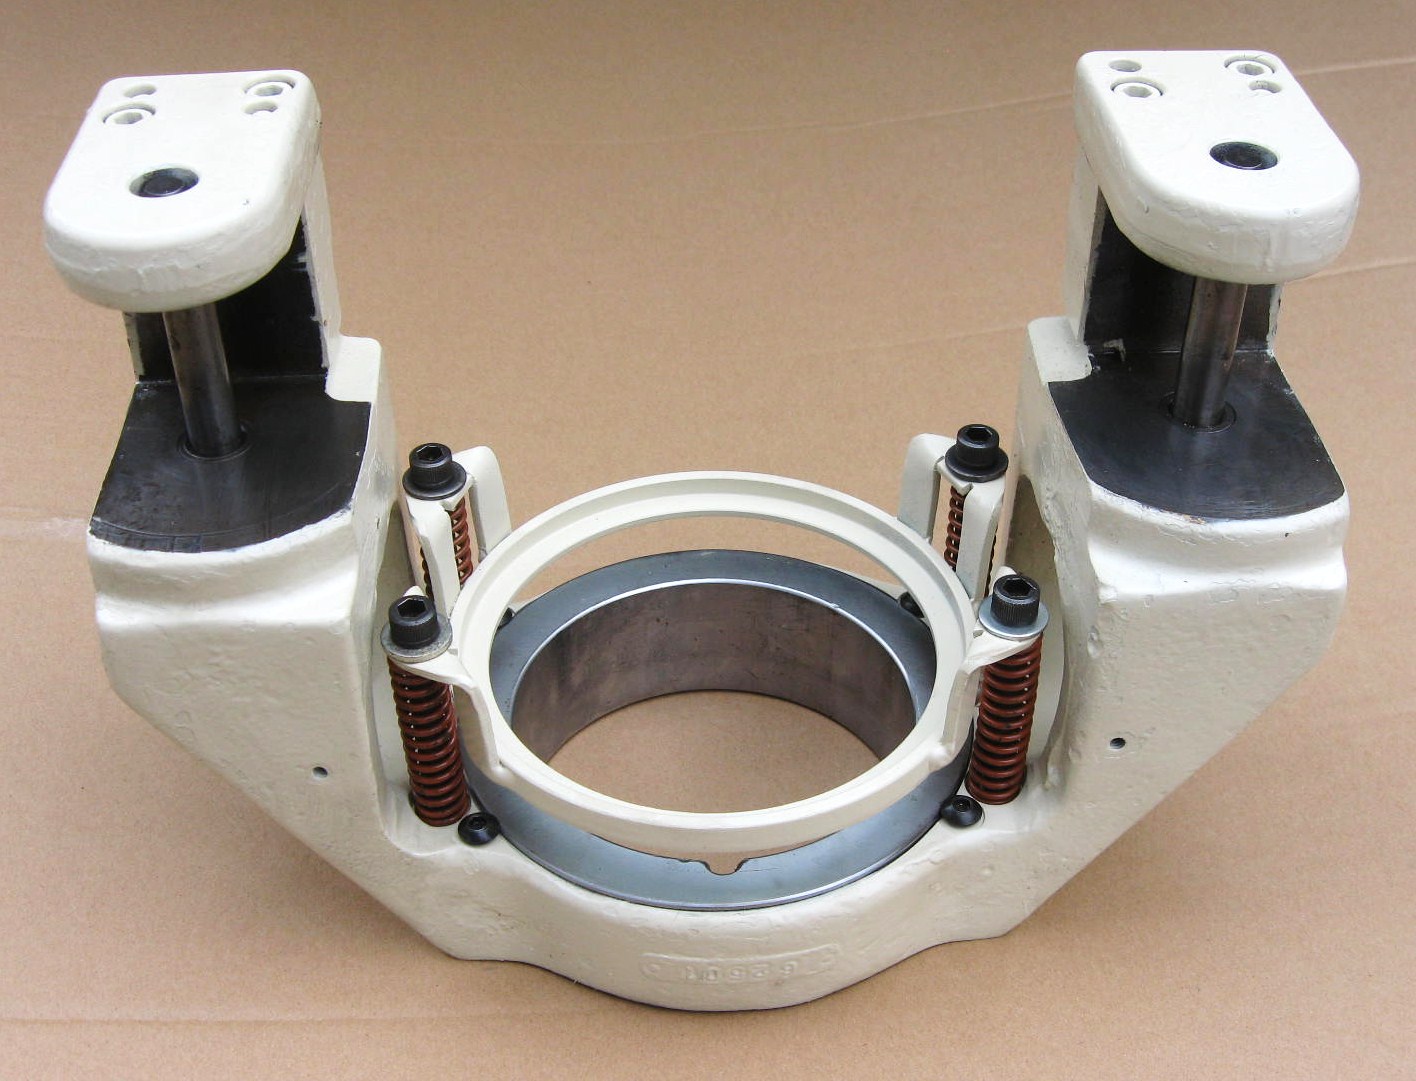
Photo above is a Strippit Super 30/30 Punch Machine
with 3 1/2" Swing-Arm Punch Holder, 1 1/4" Swing-Arm Punch Holder,
and a 3 1/2" to 1 1/4" Die Adaptor.
We now have In-Stock a
Very Limited Supply of
New Hook & Handle Rebuild Kits.
When they Sell-Out,
we are Not going to make more Kits,
so if you Need to Rebuild Yours,
Don't Wait Too Long!
1 Set of Lock-Pins come in the Rebuild Kit,
for 1 Swing-Arm Holder.
Order a 2nd Set of Lock-Pins
for your
2nd Swing-Arm Holder!
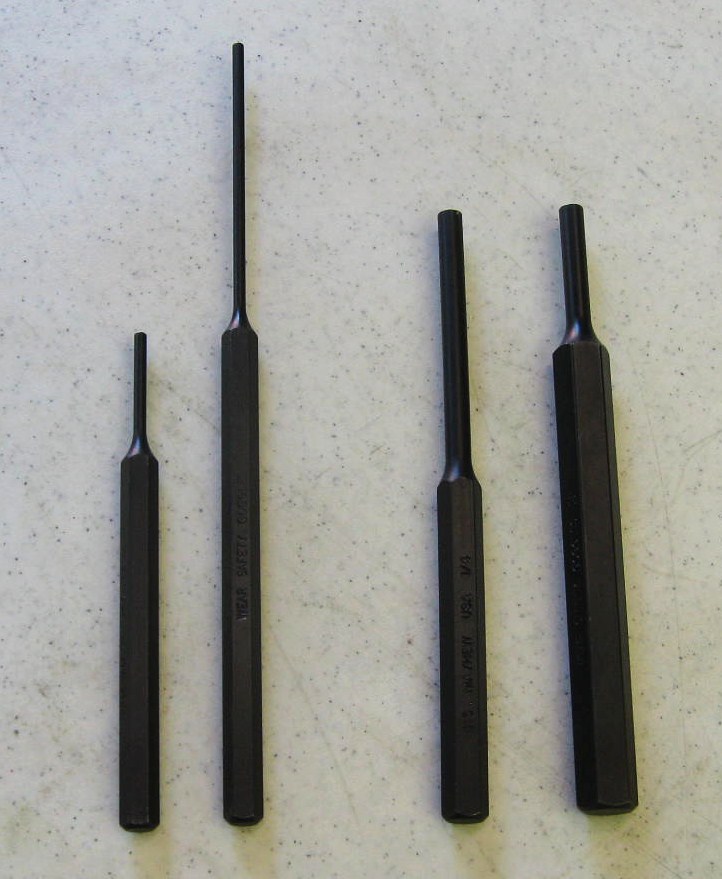
First, if you don't already have them, acquire
a Good Set of Pin-Punches. Here is a set of 4
that I bought from the Mcmaster-Carr Co.
1/8" Short Pin-Punch #3416A13
1/8" Long Pin-Punch #3416A24
1/4" Short Pin-Punch #3416A31
1/4" Long Pin-Punch #3416A4
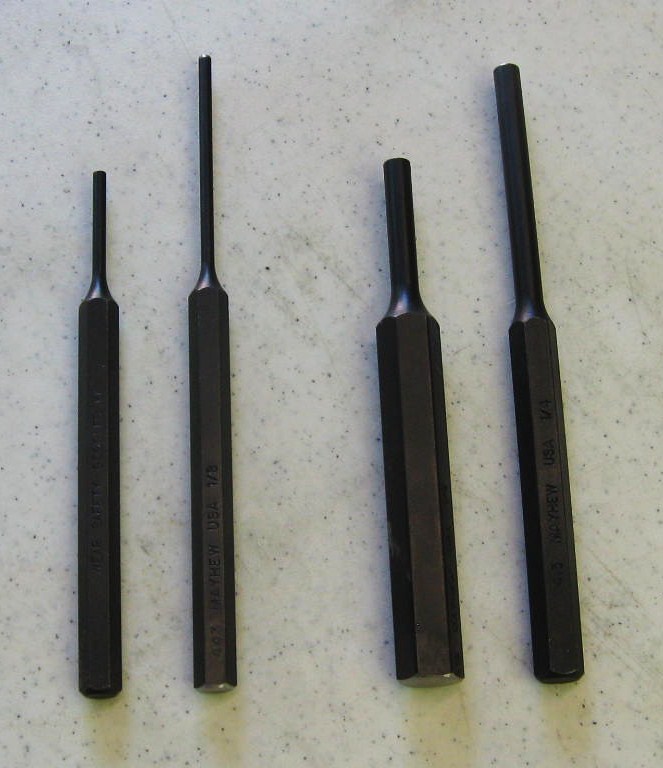
To rebuild Hooks & Handles, Punch-head does Not have to be dropped-down off Machine. But,
There is very little room to work-on Punch-Head Assembly when it is on Machine. Which is why
we have to Make Very Short Pin-Punches.
So using a Abrasive Cut-Off Saw
and a Belt-Sander to Dress the Ends,
I Cut-Down the Pin-End
on Long Punches to about 2 1/4",
and I also
Cut-Down Handle-End, the Shorter-The-Better
to also give me More Hammering Room.
I also Very Lightly Dress the Sides of Pins with
Belt-Sander so that Pin is slightly Undersize
and then will have Clearance to easily go into
the Drilled Roll-Pin Holes.
When using,
you can hold Very Short Punches with Plyers.

Pull-Out the 2 Old Lock-Pins
from your
1 1/4" Swing-Arm Holder
and
Throw them Away!
Lightly Oil
2 New Lock-Pins
from the Kit and
Insert them into Swing-Arm Holder.
Keep Pins Oiled to Reduce Wear.
1 Set of Lock-Pins come
in the Rebuild Kit,
Order a 2nd Set of Lock-Pins
for your Other
3 1/2" Swing-Arm Holder.


Remember,
If you are Dropping-Down
the Punch-Head for Any Reason
Always
Replace the Packing Rings
and Ram-Springs using the
Punch-Head Rebuild Kit!
And, if you have the
Punch-Head Dropped-Down
for whatever reason,
it's Very EASY to Install
Hook & Handle Repair Kit
with the Head-Down.
Note, be Very Careful
when pulling
2 Specially-Made
Tapered Dowel Pins
that Locate Punch-Head.
Special Tapered Dowels Pins
are No Longer Manufactured
so do NOT Bugger them up!
Use a Dowel-Puller to pull them!
Using a 5/16" Bolt S.H.C.S.
Threaded into Dowel-Pin,
Tap Dowel Carefully
Back in place with a
Brass-Rod & Hammer.
This page was last updated: May 18, 2025
Actually,
There Really Are Monsters
Under Our Bed.....


Punch-Head Rebuild Kit!


And a Word to The Wise.
I would Build a Strong-Rack with 2 Good Wood-Holders/Boxes
for my 2 Swing-Arm Holders, Right Next to my Machine,
Because Your
Knuckel-Head Operators
will leave the Other Swing-Arm Holder, that they are not using,
Sitting-Out on Machine Table,
and sooner or later, Will Knock it off Table
and
Cast-Iron Swing-Arm Holder will
Split-In-Two when it Hits the Floor!
Broken Swing-Arm Holders Can NOT Be Repaired!
Swing-Arm Holders are NOT Manufactured anymore so you Can't Replace it!


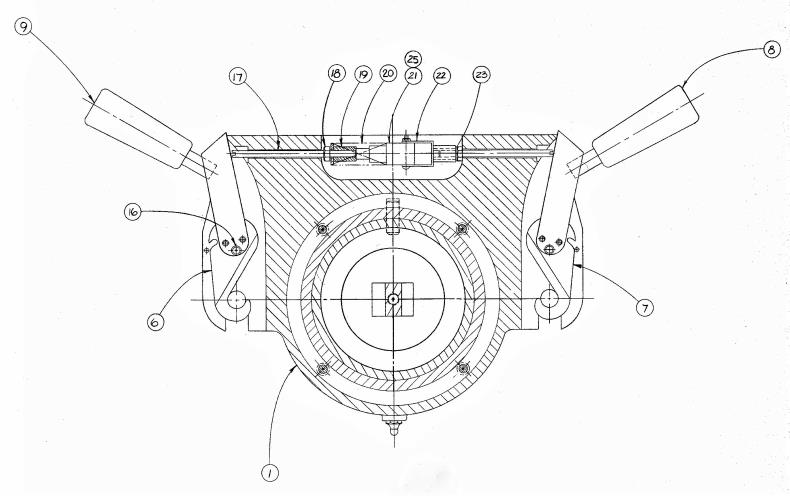
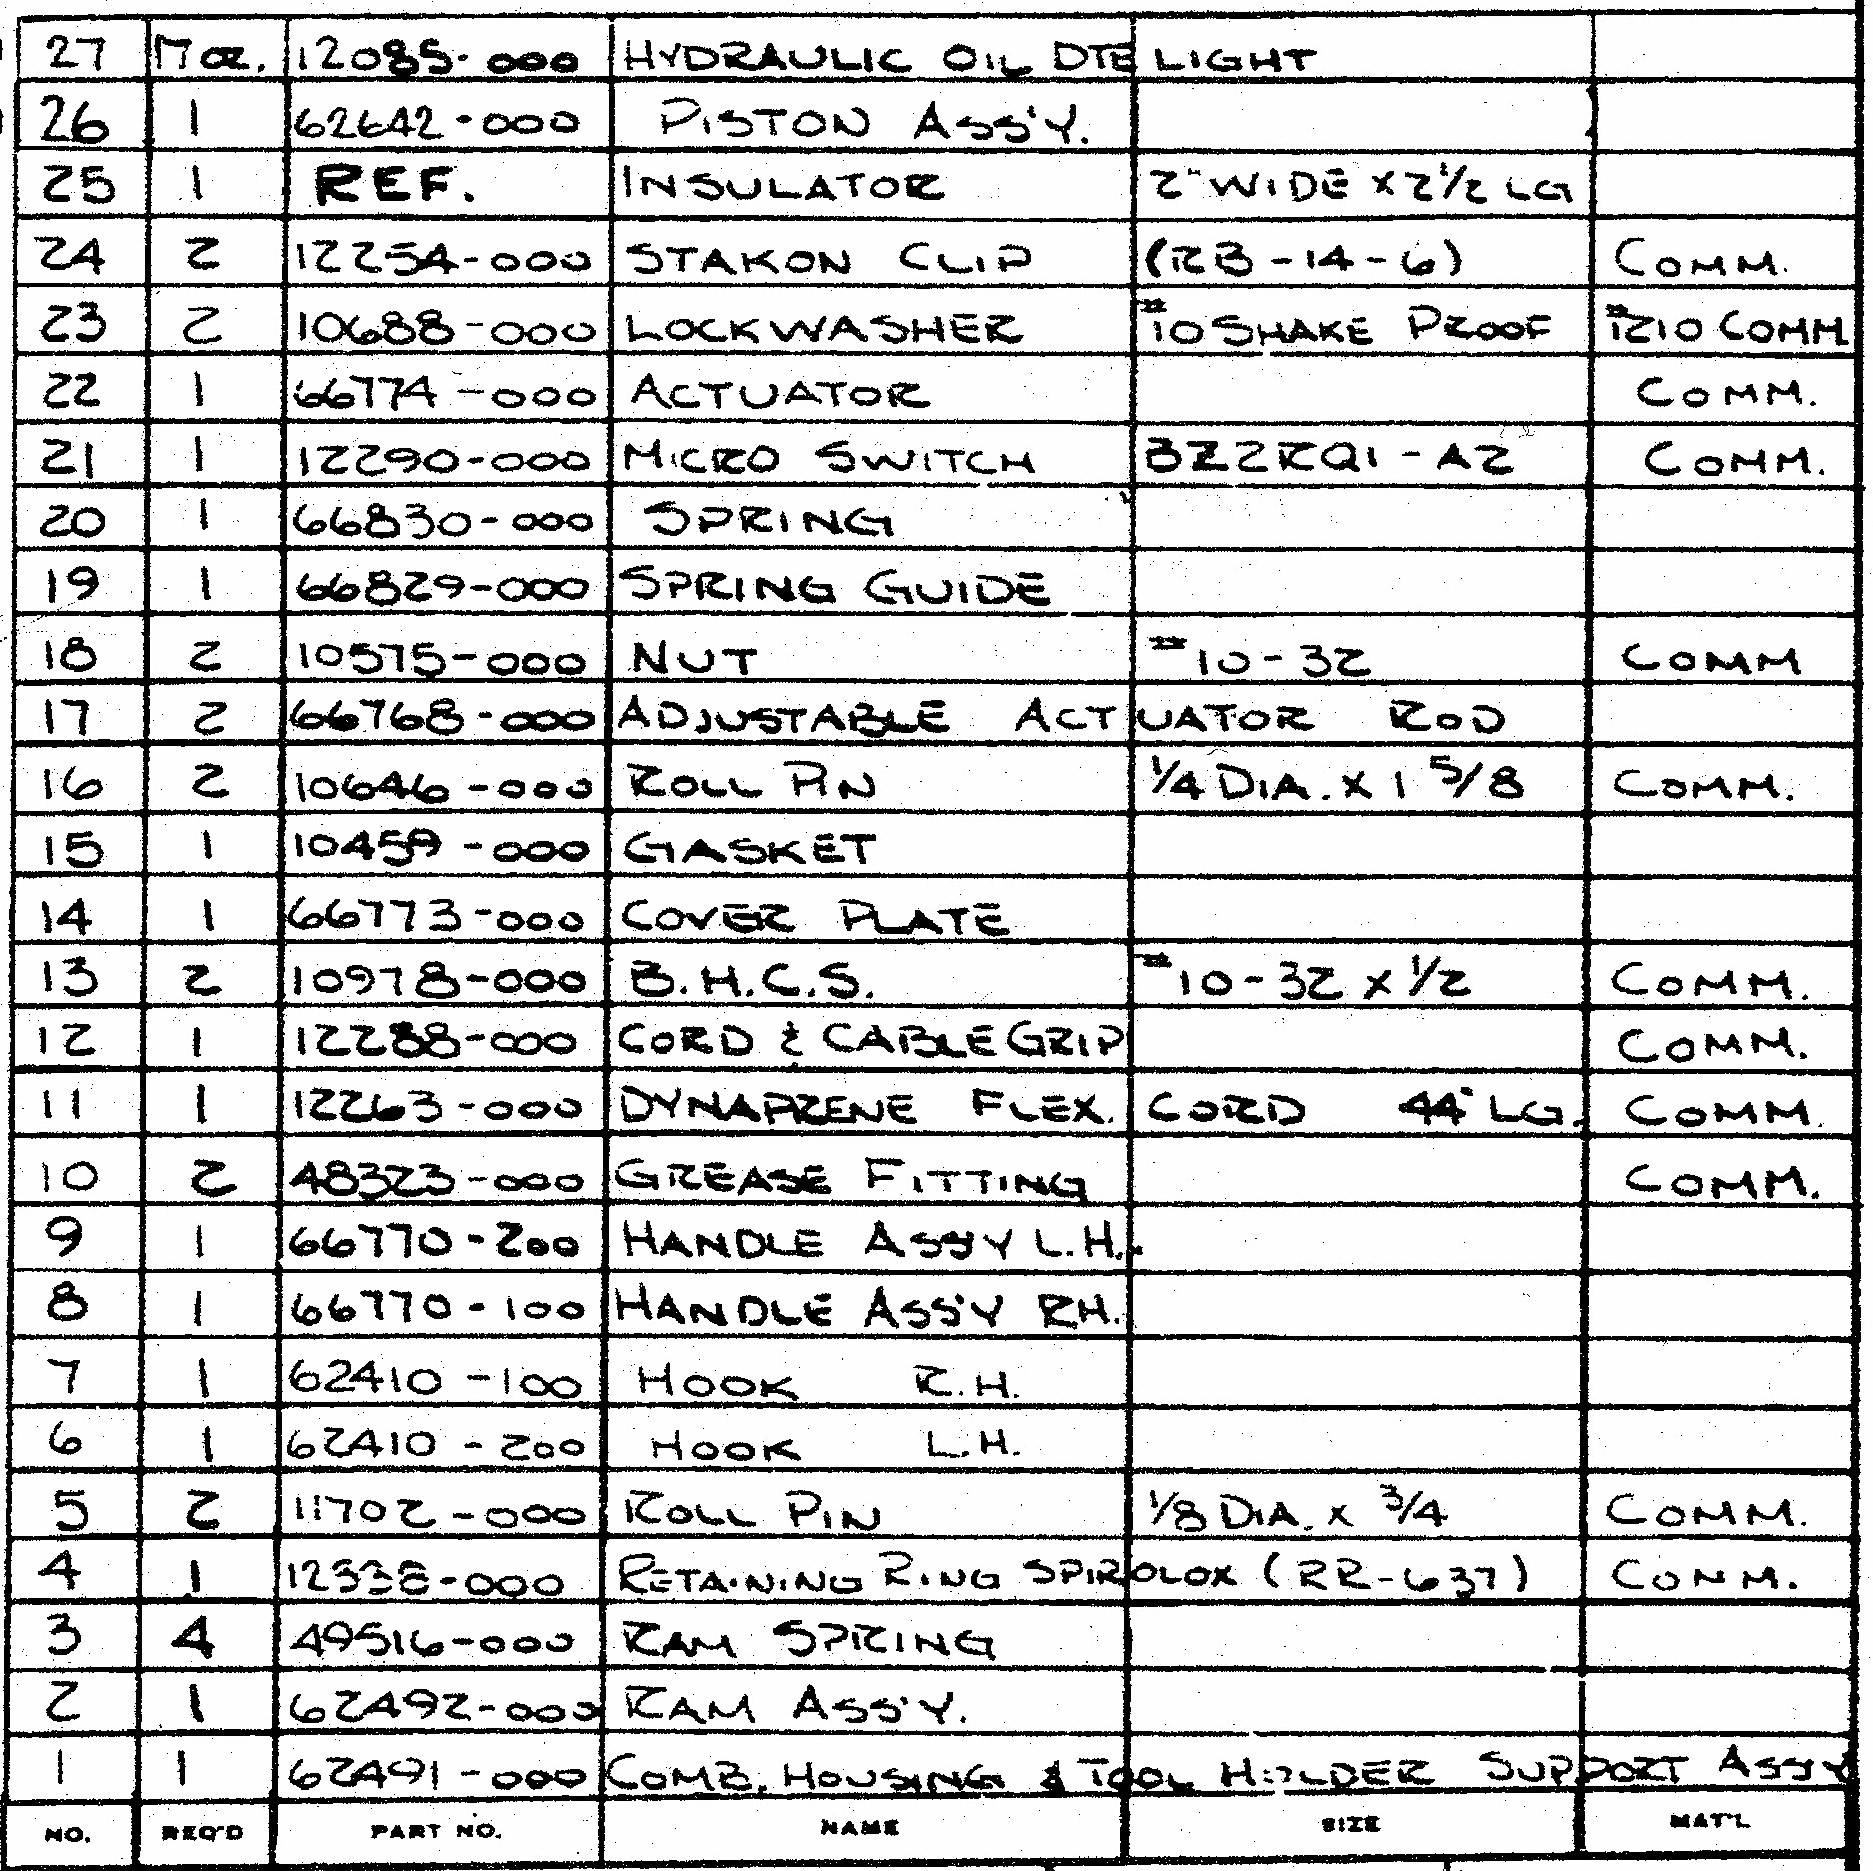
Above Diagram and Bill of Materials is for Reference only.
Many of these Parts are No Longer Available.