
Strippit Flywheel Bearings
All Strippit CNC Turret Punch Machines, from about Year 2000 on, use Hydraulic Rams.
But for Decades, from Early 1970's to Late 1990's, Strippit CNC Punch Machines used Mechanical Rams powered by Flywheels turning a Crankshaft. These 30-Ton Mechanical Press Drives were well designed and gave many years of good service with Minimum Maintenance. 20-Ton Press Drives on R-Machines were a Different Story with Many Problems from Crappy Grease-Lube System, But this Webpage is Not about them.
On occasion, there could be problems, such as Flywheel Bearings going Bad.
Bad Flywheel Bearing make a Growling Roaring Noise, and over time, Noise gets
Louder & Louder until is Sounds like a Freight Train going by! You can also Feel Vibration, Especially at Back of Machine Frame. At this point you Need to Replace Bearings. Machine will be damaged if you do not. Bearings can Seize and Destroy
Inner Diameter of the Flywheel, as well as Damage other Components.
I had a Customer that Ignored my pleas to replace his Machine's Bearings.
His Bearing Seized-Up, then Sheared-Off 6 Bearing Retaining Bolts on Clutch Quill,
and Flywheel & Clutch started to come Off this Machine while still running!
It cost him a Lot More Money to Repair at this Point, than if he had repaired it Sooner.
Strippit has Flywheel Bearing Replacement Procedures in their Machine Maintenance Manuals, and you would be Well Advised to Read It. But, Strippit's Repair Procedures Vary Greatly from Machine Model to Model, and even from the Year that that Particular Manual Version was Compiled. In addition, Machines Evolved over Time, and there were Many Undocumented Machine Changes that will Not be Mentioned in Manuals.
I don't really follow Strippit Manual Procedures.
The following is how I replace Bearings, and is Based on my Years of Experience.
And Good Advice from a Strippit Engineer, But who's Advise is somewhat Suspect
as he has been Known to Jump-Out of Perfectly Good Airplanes.
Procedures apply to Strippit Machines with HECC80 Controls that I Specialize in, such
as FC750, FC750/2, FC1000/1, FC1000/3, FC1000/3, and FC1250/30/1500 Machines
that all used Angular Contact Roller Bearings.
Procedures should also apply to FC1000S, FC1250S, and FC1250M Machines
which used an almost identical Press Drive as FC1000/3 Machines. Procedures do
Not apply to the "R" Machines, which used a Tapered Roller Bearing & Cone System.
These Repair Procedures are Not "Step By Step" Instructions. There are Many Variables and Unanticipated Problems that can Crop-Up and will Need to be Solved.
If you are Not Comfortable doing this Heavy Repair Work, Hire someone who is!
1 -- Remove all Sheetmetal and Supports from around the Flywheel area of Machine.
2 -- Get an Overhead Crane or a Chain Securely Attached to a Forklift. Using a Good Quality Hardened Bolt to Bolt End Link of Lifting Chain to 1 of the 2 Holes on Outer Diameter of Clutch. Unbolt and Lift Clutch off Flywheel, and set it down on a Strong Table. Clutch weighs about 150 pounds.
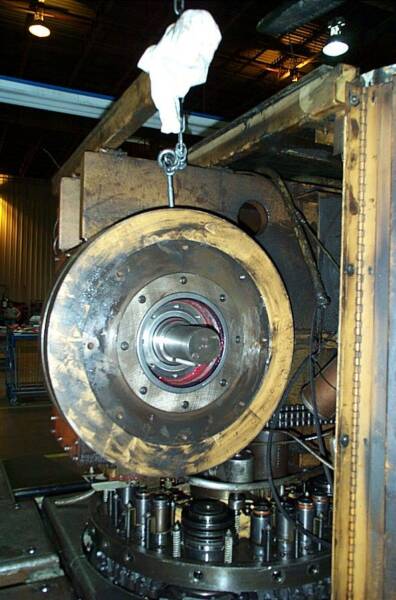
3 -- Flywheel is Drilled & Tapped for a 1/2"-13 Lifting Eyebolt. Using a Hardened Eyebolt that can take the 400+ Pounds of Weight, attach Chain to Eyebolt. Unbolt
Quill Bearing Retainer. Have some Tension (Not Too Much!) on overhead chain to
take-up some of the weight. Tap Flywheel Hard with a Long Wood 4x4 or Pry it on
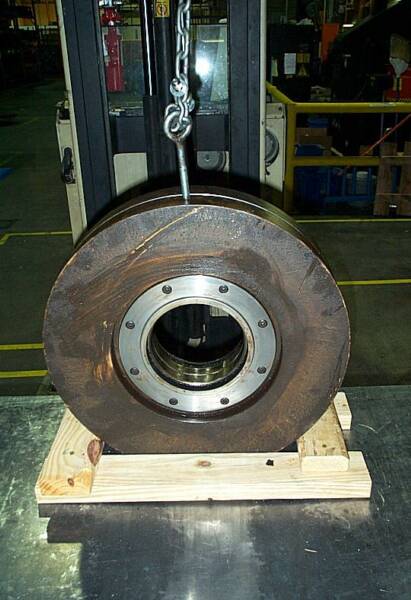
both sides with Long Prybars to Slide it off Quill. Set it Down on a Strong Steel Table
and Block it up Safely. I leave Overhead Chain on as a Safely to Prevent Falls.
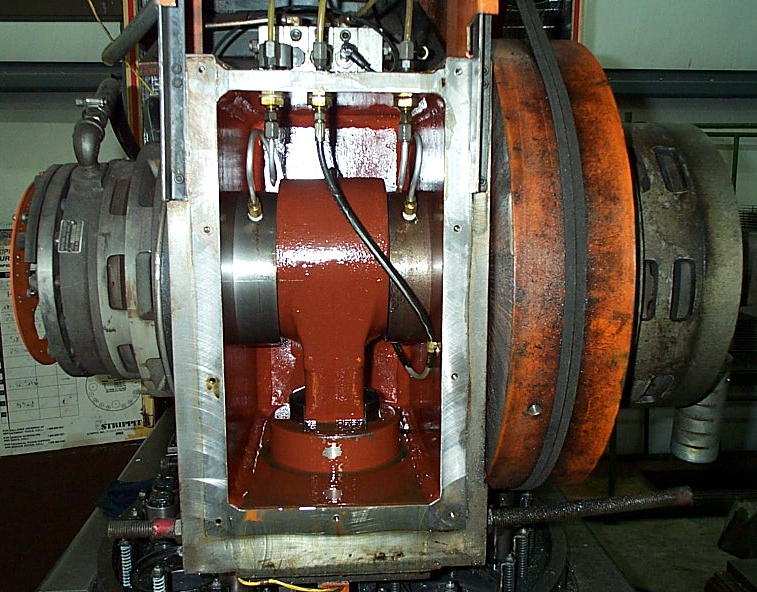
Above is a Typical Strippit Mechanical Press Drive on a 1980 Vintage FC1250/30/1500.
Air-Brake is on the Left. Air-Clutch is Mounted on Flywheel on the Right.
Note! When Replacing the 2 Flywheel Seals, Flywheel will get Hot Until Seals Wear-In and take a "Set". It is hard to believe, but Friction from the Inner & Outer Flywheel Seals will Generate enough Heat that you Can Not Touch the Flywheel with your Hand!
We, and another Serviceman, did Tests on 2 Machines. With 2 New Flywheel Seals Installed, Flywheel became Too Hot to Touch in about 30 Minutes.
We Let Flywheel Cool Down, Pulled it Off Machine, Inspected Bearings for Mounting "Errors" and found None, we then Removed Both Seals and Reinstalled Flywheel.
Flywheel Did Not become Hot, or even warm, when we ran Machine again,
Proving Seals were generation all the Heat!
So we now just let Flywheel & New Seals Run-In, and Ignore Heat as Normal,
and it gradually goes away over a few days, depending on usage.
Turn-Off Machine when not using it, and
Leave Hood-Doors Open for a couple of days to help let the heat out.
Caution! Caution! Caution!
I Have Seen Lifting Bolts Break And The Flywheel Fall & Crash!
NEVER Let Any Part Of Your Body Get Under Anything Being Lifted,
Or You Risk Severe Injury And Death!
And Make Sure Clutch, Brake, And Flywheel Can Not Fall Off Table!
Use Extreme Caution!!!
4 -- Unbolt and Remove the Inner & Outer Bearing Retaining Rings.
Flywheel Seals will be old, hard, and cracked, Will Probably Need to be Replaced.
If you need to replace Flywheel Seals, they can be Knocked-Out with a Large
Screwdriver & Hammer from the Inside of Retainer Ring. Do Not Scratch the
Retainer Bore! Also Inspect Quill Seal and replace if necessary.
Clean all Dirt & Grease from Rings. Apply a Thin Coat of RTV-Silicone on Outer Metal Diameter of Seal and Place it on Ring, which is Laying Flat on a Heavy Table or Floor.
Lay a Block of Wood across Seal and Carefully Tap & Pound it in with a Hammer.
Try Not to put Seals in Backwards, as they will not work that way.
It is Best to provide me with Actual Numbers Stamped on the Old Seals when
Replacing, as Strippit Used Many Different Sizes & Brands of Seals over the years!
FC1000/1's below about Serial #209, and FC1250/30/1500's below about Serial #006,
used a #17563-000 Inner-Seal and a #17563-000 Outer-Seal on Flywheel.
FC1000/1's & FC1000/2's above about #209, and FC1250/30/1500's with 20-Station
Turrets above about #006, used #18413-000 for Both Inner and Outer Flywheel Seals.
FC1000/3's and FC1250/30/1500's with 33-Station Turrets used #18222-000
for both Inner and Outer Flywheel Seals.
FC1000S, FC1000SXP, FC1250S, FC1250SXP, FC1250M all appear to be basically
same Press Drive as FC1000/3, and all use same Bearings and #18222-000 Seals.
5 -- Old Flywheel Bearings are Carefully Tapped-Out with a Brass Rod and a Hammer.
Be Very Careful that you Do Not Scratch The Flywheel Inner-Bore!
6 -- Flywheel Bearings.
FC1000/1, FC1000/2, & 20-Station Turret FC1250/30/1500 use #17562-000.
FC1000/3, 33-Station Turret FC1250/30/1500, FC750, and FC750/2's use #18221-000
Strippit has Experimented for Decades in this Area. Strippit has Tried Several Different Bearing Manufactures, has Specified Special Custom Bearings with Extra Internal Clearances Ground into Races, has used Standard Bearings with Assorted Spacer Shims, and has even tried Specifying Special Custom Internal Bearing Contact-Angles.
You can do this My-Way, Your-Way, or Strippit's-Way.
You Pays Your Money, and You Makes Your Choice. I Do It This Way;
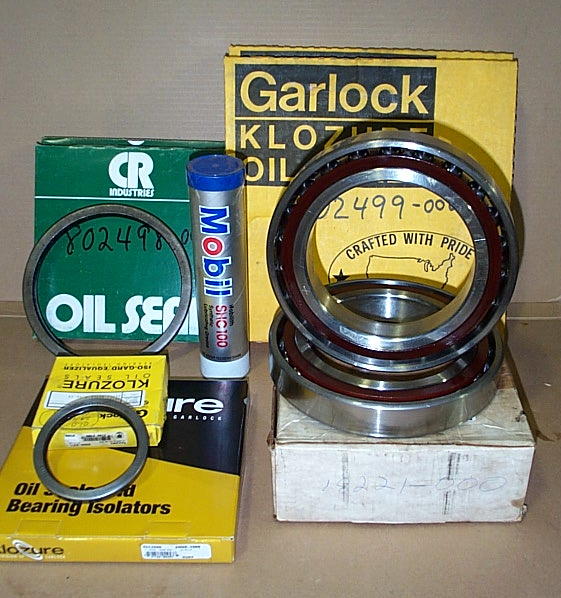
-- New Bearings are Hand-Packed with New Grease. Keep Bearings and Grease Clean!
-- Strippit Used Originally Mobil EP-1 Grease. This grease seems to always Oxidize,
Burn, and turn Black after a few years. I am Using Mobil Mobilith SCH 100 or 220
or Mobil-1 Synthetic Grease to try to Improve Grease and Bearing Life.
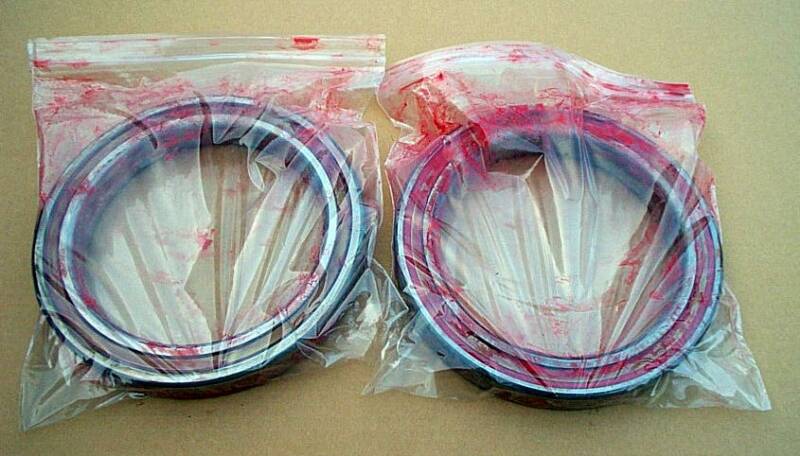
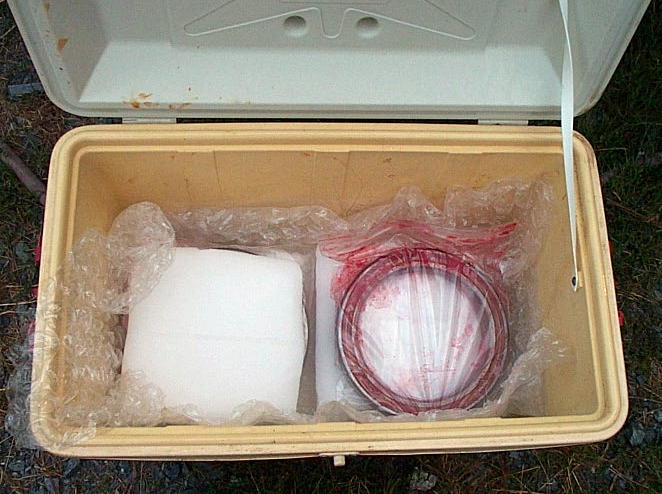
-- Bearings are Shrunk, then Dropped into Flywheel Bore, where they Expand to form a
I put Greased Bearings in Plastic Bags (to keep Frost Out) then Cover them in Dry-Ice.
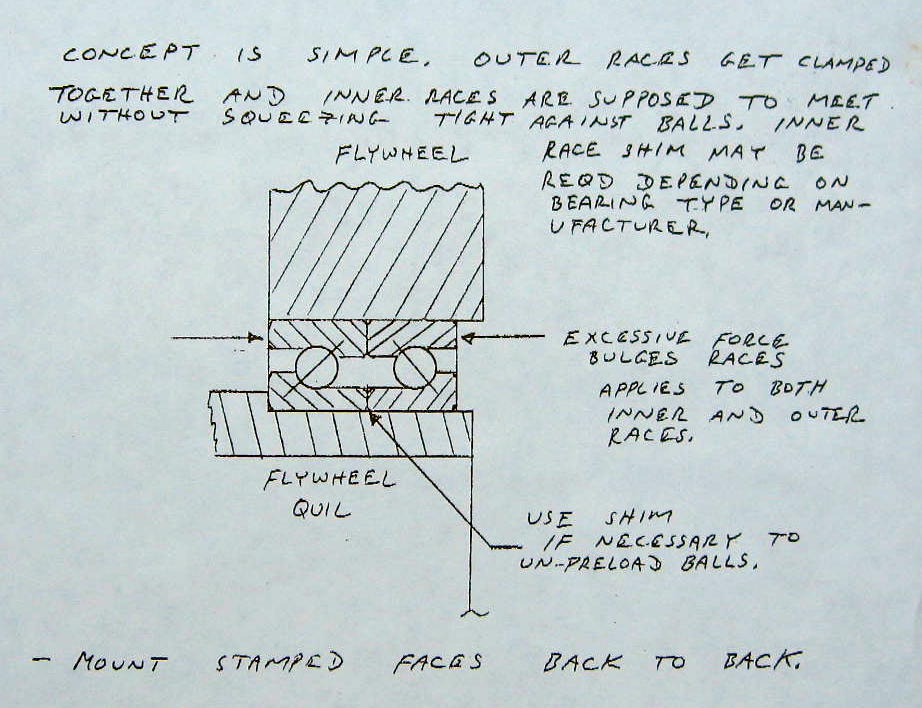
-- To Survive in this application, Flywheel Bearings MUST be fitted "Loose"
(Un-Preloaded). Bearings Will Fail If Not "Un-Preloaded" Correctly!
-- I use a .008" Brass-Shim Fitted Between the 2
Bearings at the Small-Diameter "Inner" Races to accomplish this "Un-Preload".
The "Outer" Bearing Races are Clamped together by the Bearing Retainer Rings.
The "Inner" Bearing Races are Forced Apart by the .008" Shim,
which leaves .004" Clearance in each Bearing, which has worked well for me.
-- A Drawing of this Type Bearings and Shim Installation is shown Below.
-- The 2 Flywheel Bearings are Installed with
Stamped-Faces "Back to Back" (Facing Each Other in the Middle).
Make Sure Both Bearings are NOT Put In Backwards, or They Will Fail!
-- Apply Locktite 242 or 243 Thread-Lock to 6 Bolts, and Bolt On Inner Bearing
Retaining Plate (Side that Faces the Machine Frame) in a Chris-Cross Pattern.
Using a Good Torque Wrench and Hex-Bits, Carefully Torque these 6 Bolts to
23 Foot/Pounds. Then Lay Flywheel Down Flat with this Plate on the Bottom Side.
-- Now take 1 of your Shrunken Bearings and put it in Flywheel Bore,
"Stamped-Face Up" so Un-Stamped Face will be Against Inner Bearing Retainer.
It should almost Fall-In, but Tap it Lightly in Place with a Brass Rod and Hammer.
-- Carefully Set and Center the .008" Shim on to Bearing.
-- Take other Bearing and put it into Flywheel Bore with "Stamped-Face Down".
The 2 Bearings should now have "Stamped-Faces Back-To-Back" with
Shim in between. Tap Top Bearing into place.
-- Cover Flywheel-Bore & Bearings with a piece of Bubble-Wrap or Towel to help keep
excessive Frost from forming. Let Flywheel & Bearings warm to room temperature.
-- Wipe Out any Frost Water.
Check that Shim is Perfectly Centered. Double-Check Bearings are Not Backwards.
-- Half-Fill Only, the remaining Space between Bearings and Retainers with Grease.
Do NOT Pack It Full of Grease! Too much Grease causes a Condition called
-- Put Locktite on the other 6 Bolts, and Bolt on Outer Bearing Retainer.
Carefully Torque Bolts to 23 Foot/Pounds in a Chris-Cross Pattern. Excess Bolt
Torque will Distort Bearings and Bearing Retainers and could cause Failures.
7 -- Coat Seal-Lip and Seal-Surface on Quill with a thin Coating of Grease.
Hoist Flywheel and get it Perfectly Aligned with the Quill. When Aligned
Properly, it Will Easily slide-on by Hand. Tap-It with your Wood 4x4 if Necessary.
8 -- Coat Seal and Seal-Surface with Grease. Using Locktite and same
23 Foot/Pounds of Bolt Torque, Carefully Bolt on Quill Bearing Retainer Ring.
9 -- Reattach the Clutch, Belts, Etc, and Machine it should be ready to Run.
Caution! Caution! Caution!
Liquid Nitrogen is Minus 320 Degrees Fahrenheit!
It Looks like Water, and is Fairly Easy to Handle,
But Much Care Needs to be Taken so that it is Not Splashed,
Not Ever Touched, and Not Ever Allowed to come in to Contact with Bare Skin,
As Instant Tissue Damage Will Result!!!
Wear a Long Shop Coat, Long Leather Welding Gloves,
and Safety Goggles Over Your Eyes!
Use Long Channel Lock Pliers to Handle Parts in the Nitrogen.
===========================================================
We also use Dry-Ice for Shrinking Bearings & Splin Hubs.
Dry-Ice is Frozen Solid Carbon-Dioxide, and is Minus 109 Degrees Fahrenheit!
Use All the same Handling Cautions Listed Above!
Always Use Extreme Caution!
We can Supply All Needed
-- Bearings,
-- Shim,
-- Seals,
-- Grease.
We do Not keep a large Stock of these Items.
You can Hear Bearings going Bad Long before Machine Breaks Down,
so
Do Not Wait to the
Last Minute to Order!
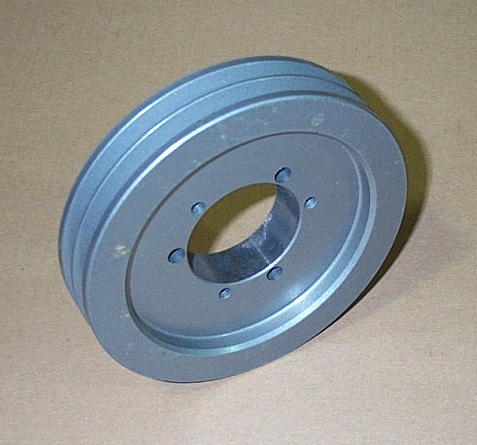
On Many Machine Models, we like to fit a
Smaller Motor Shive (Pulley) to Reduce Press Drive Speed about 10%,
Which you will Never Even Notice!
JUST DO IT! It's Best Thing you could do!
This Gives MANY Benefits;
-- Longer Clutch Life
-- Longer Brake Life
-- Longer Splin Hub Life
-- Longer Flywheel Bearing Life
-- Less Tooling Strip-Problems
We Stock these Shives.
Pretty Good Benefits for Only 80 Bucks!
So, Why Not Call & Get The Damn Thing?

This page was last updated: June 8, 2025


Drawing Courtesy of Strippit Engineer
Who Jumps Out of Perfectly Good Airplanes!