Strippit
Turret-Station Alignment
Besides 5 Decades of Working in CNC Machine Repair Field-Service, In an Earlier-Life,
I have worked in "The Pit" at Strippit where their CNC Turret Machines are Assembled.
I know How-To Install New Bearings in Turrets, Set Bearing Pre-Load, Install Turrets in Machine Frame, Level Turrets, Set Concentricity, Check & Fix Shot Pin Deflection, Set Anvil Clearance, Install & Align Top Turret Bushings, Align Lower Die Bases, Etc, Etc.
This is Way Beyond This Discussion and I am Not going to make you a Machine Builder.
This Discussion also does Not Apply to Auto-index Stations. Strippit has had Several Generations of A/I Stations, and each is Quite Different with it's own Peculiar Problems and Fixes. Call Strippit, or 1 of the Local Servicemen Listed on my
"Independent Servicemen" Web-Page to "Fix" yours as I don't work on A/I Stations.
By the way, Programmers tend to be Lazy and use their A/I Stations for Everything,
like Slotting-Out Parts on all 4 Edges. Eventually, A/I Station is Worn-Out and starts Eating Tooling. The Boss, or whoever writes The Checks, is then Shocked when he finds out that it could Cost $20,000+ or so, to Buy 2 New A/I Gearboxes and Bushings
to Rebuild just 1 Station!
IF IT WAS MY MACHINE,
I would put a 1/4" x 2" (Works Better than 1/4" x 3") Slot Tool at 0-Degrees in
1 Fixed-Station, and another 1/4" x 2" Tool at 90-Degrees in a 2nd Fixed-Station,
and Leave Them There Permanently for Your Common Slotting Punching!
Then use a 3rd 1/4" x 2" Tool in your A/I Station Just for Special-Angles, there by Avoiding Wearing-Out your A/I Prematurely! Pay Your Money, and Take Your Choice!
If you have Punch & Die Alignment Issues with Most or All Turret Stations, you had a Major Turret Punch Crash, such as Punching the Side of a Workclamp with a Large
3 1/2" Tool which caused so much Side-Thrust that 1 or both Turrets have "Moved" in some Unknown Directions. This does Not happen often, as Strippit Fastens each Turret to Frame with 4 Large Bolts on older pre-1985 Machines. On Newer Machines, Mr. Hampshire convinced Strippit to use 12 Large Bolts so that turrets would never move.
To Fix, you Need to find Serviceman who understands the Above Building Procedures,
and undertake a Partial to Total Rebuild & Realignment of Both Turrets and Stations.
This will likely take several Days to a Week, and will be Costly, depending on just how much Work & Parts are needed. Repair Cost is Difficult for Anyone to Estimate in Advance, and is Simply Time & Materials. So, You have 3 Choices, Live with Alignment Problems and Constantly Pay for New Tooling, Pay the Money and have it Fixed Correctly, or Pay the Money and Buy a New Machine.
But, if you have had Minor Crashes, which happen all the time, and you have just 1 or 2 Regular Fixed Stations that are giving you Punch & Die Alignment Problems, such as Punch & Die Hitting & Wearing on 1 Side, that Problem Can be Fixed without too much Effort, and is what I will show you here.
The Following is the 3 Step Process I use to Achieve Perfect Turret Station Alignment.
Caution!!!
All Alignment Work is Done with Machine A.C.-Power Off!!!
Lock-Out The A.C.-Power so that some Knuckle-Head can
NOT Turn-On Power and Kill You while You are Laying on
Machine Tables with Your Hands in the Turrets!!!
Obviously, You will Need Good Alignment Tools to do this work.
Wilson Tool Sells Alignment Tools, Mate Tooling offers their Thick-Turret Station Alignment System, and LVD Strippit, as usual, offers Nothing. Most Common LVD Strippit Turret Station Sizes are 1 1/4" and 3 1/2" of the "Thin-Turret" Type, however Strippit is Dropping "Thin-Turret" and is going to "Thick-Turret" Tooling Only.
A 3rd Type is the Old 2"x 2" Universal-Notch Station that Strippit Installed in
All Turret #1 Station from Late 1960's to Early 1990's when it was Discontinued.
A few Machines even had a 2nd Optional Notch Station Installed at Factory.
An old 4th Type is 5" Station that was installed on all FC51/30, FC51/40, FC1250/30, FC1250/40, and FC1250/45 Machines. These Machines are All Gone now.
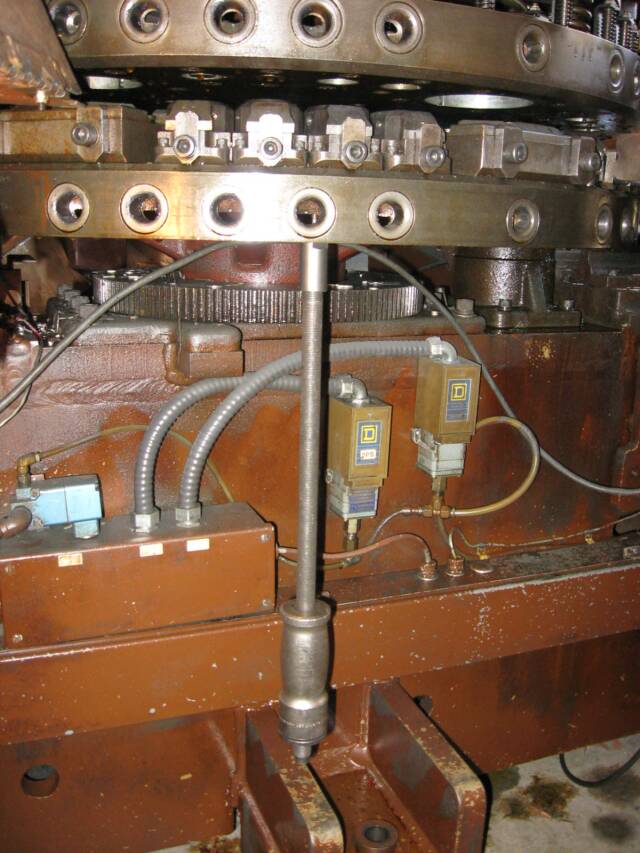
1 -- All Alignment Work is ONLY Done UNDER THE PUNCH-RAM With the Shotpins In!
You Can NOT Check or Align Anywhere But Under-The-Ram!!!
2 -- Sometimes, an Upper Turret Bushing will Slip and Rotate a few Degrees from a Minor Crash causing Corners of a Punch and Die to Hit.
Another Leading Cause of this Problem is Knuckle-Head Machine Operators that use Upper Turret Tool Stations as Vise to Hold Tool while he Tightens the Head-Nuts!
This causes Bushing to Slip, and now you have an Index Alignment Problem to Fix.
Buy a Tooling-Vise from Wilson Co. or Weld 2 Old Bushings ( I have some Old Bushings for sale cheap to do this) to his Work Table to Hold Tools while he adjusts them.
So we will try to Index Upper Turret Bushing to the Lower Die Base as a First Fix.
3 -- Clean Die-Holder and Die-Base of Every Bit of Dirt, Metal Slivers, and Metal Slugs. Put your Alignment Die into Die-Base, and Install it into Lower Turret Die-Base.
4 -- Put a small Piece of Cardboard (4" x 4") over Die. This is to keep Alignment Tools from Mating and becoming Damaged as you Rotate Turrets, By Hand, Back & Forth.
5 -- Clean Upper Turret Bushing of all Dirt, Grease, and Metal Slivers.
Coat Bushing with Light Oil. Coat Top Alignment Tool with Light Oil, and put into Bushing. It should Fall-Down Easily, Under it's Own Weight, until it hits the Cardboard Piece on top of Die. If it does not Move Smoothly, inspect for Burrs & Galling on
Tools or Bushing, and Rectify Problem until Tool Does Move Smoothly!
6 -- Put a Bar into a Shotpin Bushing and Rotate Turret, By Hand,
until Station you are Checking is Under The Ram.
Manually hit Activation Button on the Shotpin Mac Valve, and Fire Shotpins in.
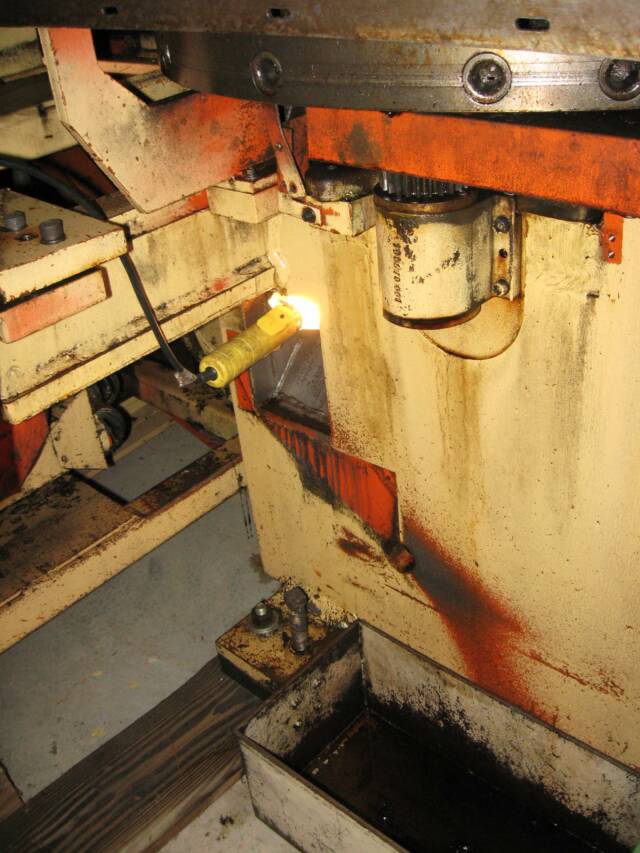
7 -- Shove a Work-Light with a 60 Watt Bulb up into Slug Chute of Machine.
This will Shine Bright Light Up through Chute, through Anvil, through Die Base and Die, and will allow you to see Light Patters on Mating-Edges of your Tools.
1 -- First, We will check Tool Bushing for Wear.
If Bushing is Worn-Out, it is Pointless to "Align It" as you are Only Fooling Yourself!!!
At Tool-Load Door Position, Clean-Out Grease, Dirt, and Metal Slivers out of Upper Bushing of Turret Station you are having Trouble with. Coat Bushing and Upper Alignment Tool with Light-Oil and Slide Tool in to Bushing. It should go in Smooth, if not, inspect Bushing for Galling or other Damage and Fix Problem or Replace Bushing.
Next, try to Rock Alignment Tool Side to Side, and Front to Back.
There should be Little to No Wear in Bushing so as to Not Allow any Rocking Action.
Try several different Stations to get a "Feel" for what is Normal.
Even Better, try Alignment Tool in a Brand-New Bushing to "Feel" Normal Tightness.
This is a Judgement Call, but Replace the Bushing if it seems Too Worn.
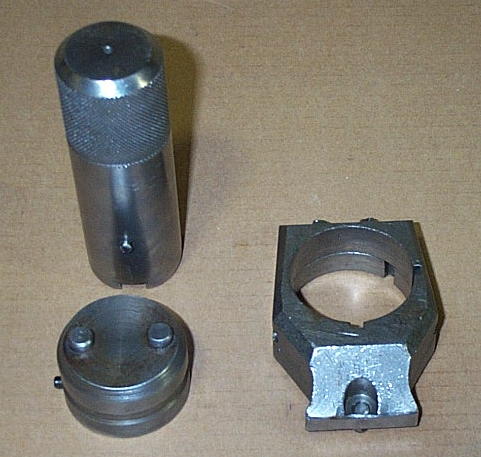
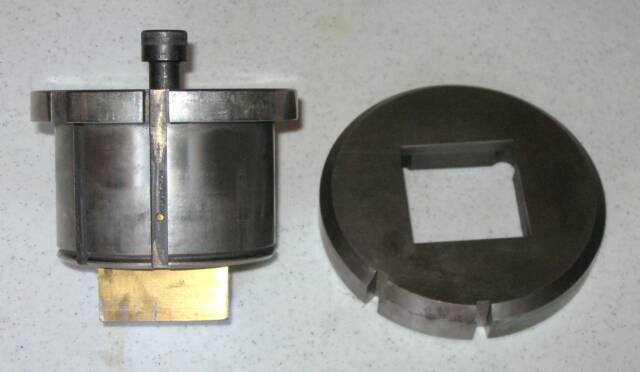
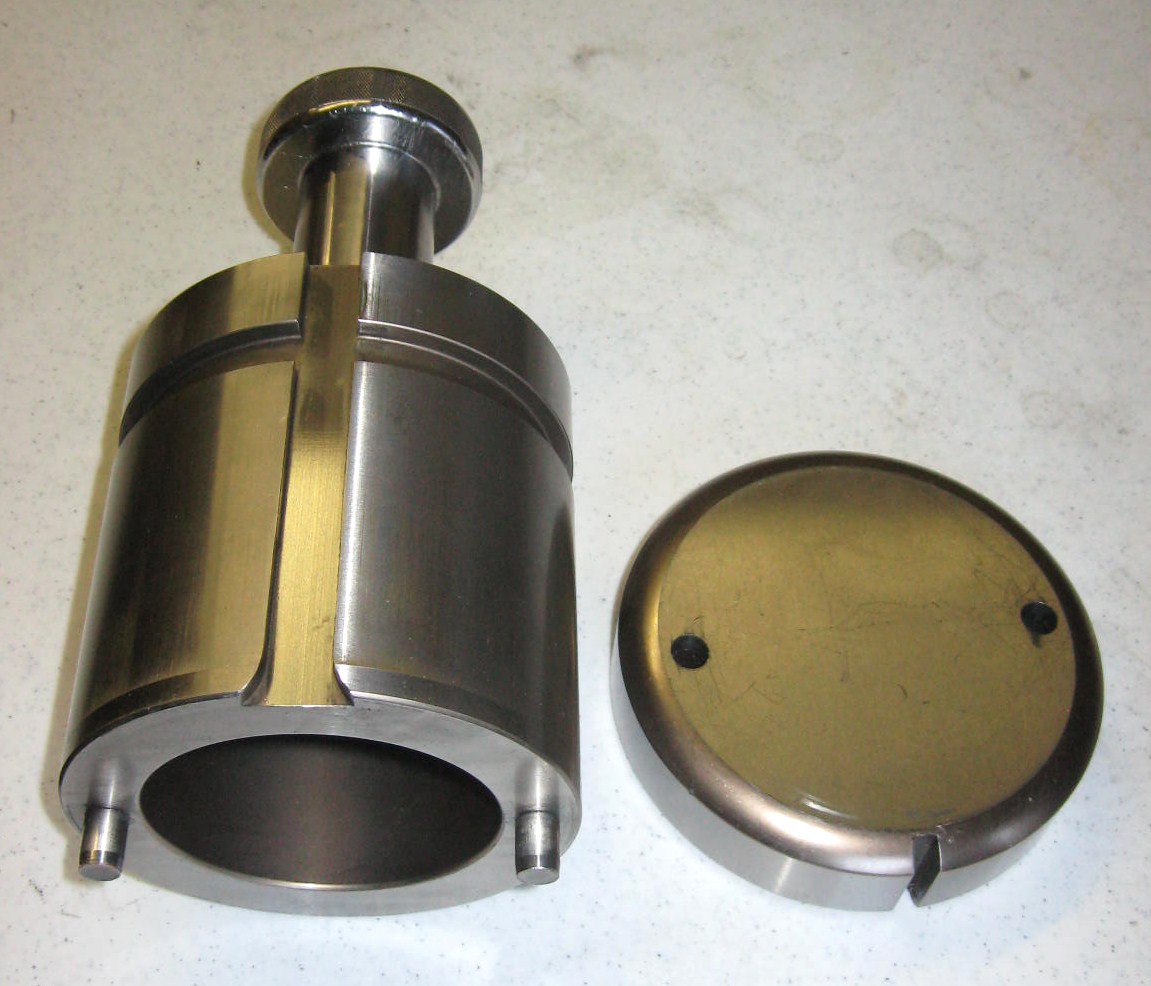
This is a Strippit
#200293-000 1 1/4" Index Tool Set.
It has a Slot in Bottom
of the Top-Tool.
It can be used for
Indexing Top Bushing,
But
Can NOT be used for
Station Alignment!
It is Only used for Indexing
a Top Turret Bushing to
the Set Degree Angel of a
Lower Turret Die-Holder,
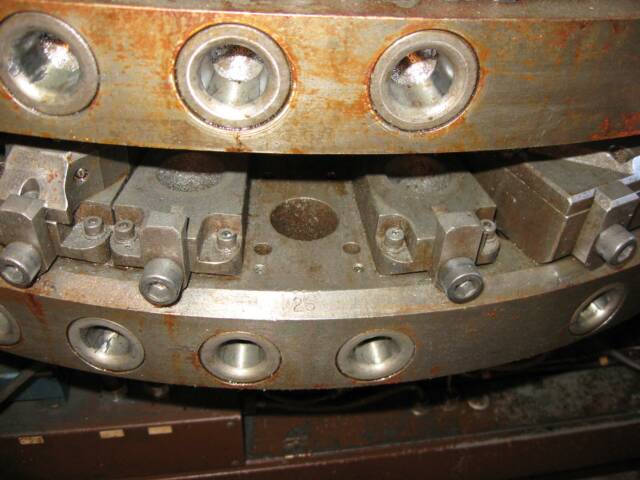
such as the Indexable Die-Holder,
shown at Left.
Go to "Dowel Pin" Page
and Make a Dowel-Puller,
like mine at Left,
and Pull your Pins Out.
If you try to Pry-Out Die-Bases without Pulling Dowels, you Risk Damaging Die-Base
and the Turret!
Note! You will NOT be
Reinstalling Dowel Pins later,
as they are NOT Necessary
and will NO Longer be useable after you Move the Die Base.
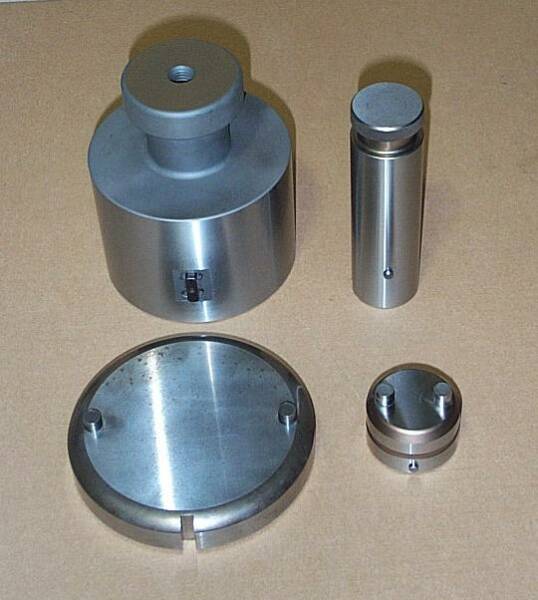
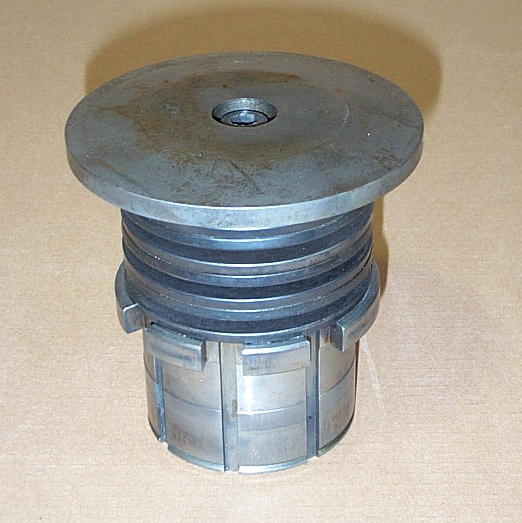
At Right is Wilson Tool Co.
#494 & #495 1 1/4" Tool Set and
#496 & #497 3 1/2" Tool Set
that CAN be used for Alignment
as Bottom of Upper-Tools have Holes, Not Slots, that Mate Precisely with Bottom-Tools.
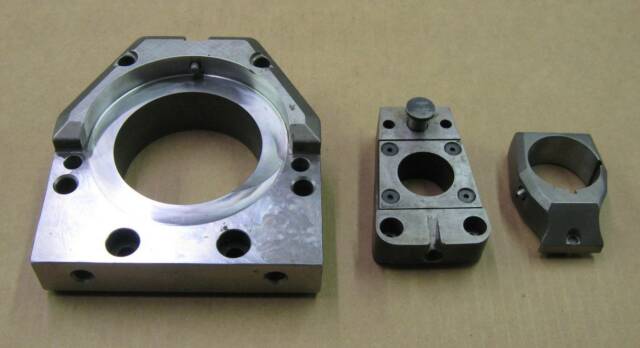
Below is a Strippit #90692-000
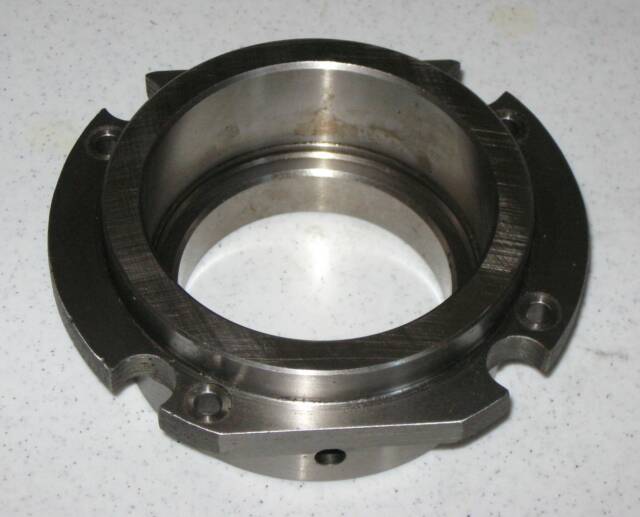
3 1/2" Index & Align Tool Set. An Especially Nice Tool Set as Die had Hardened Bushings for Punch Pins to Mate with and Die is Degrees-Etched. A 3 1/2" Indexable
Die-Base & Die-Holder Assembly
is shown to right of Tool Set.
I don't believe Strippit still makes Alignment Tools For-Sale.
Mother-Strippit's been Kind of Bitchy Lately, and we don't Talk
as much as we used to.....
I sometimes have New & Used Alignment Tools For-Sale
here at Machine Technologies.
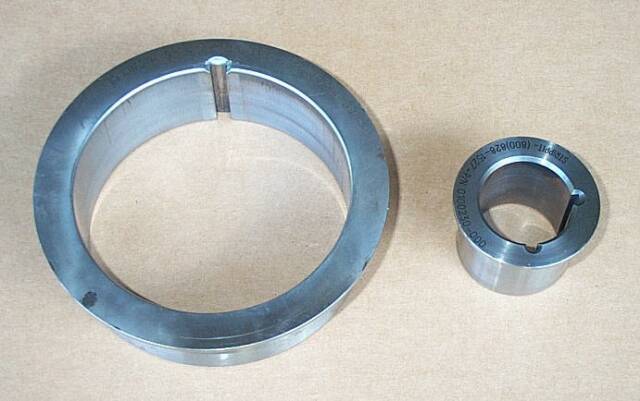
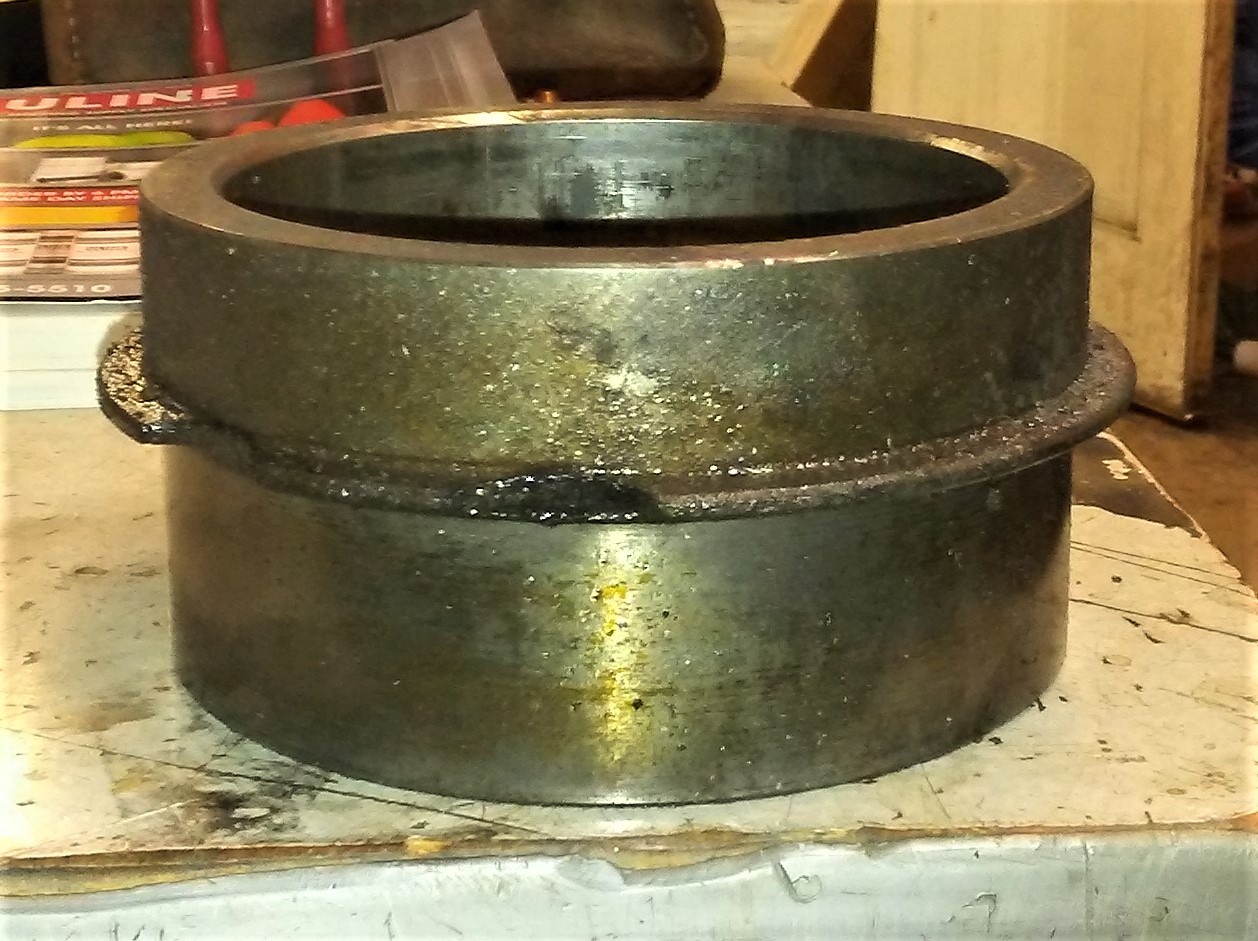
3 1/2" Turret Bushing on Left, Strippit Part #100734-000, Wilson Tool Part #277.
1 1/4" Turret Bushing on Right, Strippit Part #100230-000, Wilson Tool Part #471.
Note, "Sizes" Refer to the Maximum Size Punch-Tip that Fits into a Punch-Holder
that Fits into that Size Bushing, and is NOT Actual Inside-Diameter Hole in Bushing!
A 1 1/4" Bushing has an I.D. of 1 1/2", and a 3 1/2" Bushing has an I.D. of 4 3/8".

I have the Bottom-Pins of All my Upper Alignment Tools Ground-Flat.
When my Tools will Not Mate from Miss-Alignment,
with the Light I can Easily See Problems.
There is Bright "Light" on the Side of Punch & Die
where it is "Loose" with Too-Much Clearance.
And it is "Dark" on Opposite Side of Punch & Die where they are
"Tight" & Overlapping & Hitting with Too-Little Die Clearance,
which Stops the Light.
If you were not able to Index Upper Bushing to Achieve Alignment,
you will have to Proceed to Moving the Die-Base.
1 -- Remove Die-Base for the Station in question.
2 -- Die-Bases are held in place on Lower Turret by 4 S.H.C.S (Socket Head Cap Screw), 2 at the Front of Base going Downward to Turret, and 2 more Underneath Turret going upward to Base. Remove 4 Screws.
3 -- From 1960's to the 1990's, Strippit Also installed 2 Precision Dowel Pins through Lower Turret up into Die-Base after they Aligned the Base. Pins were for "Locating Alignment". They allowed you to Carefully Remove Base and Reinstall it Exactly where it was before. They also gave some Holding Power, but this was Not their Primary Function. Base would Still Move in a Bad Crash and I have a Nice Collection of Bent "S-Dowels" I have Pulled from Moved Crashed Stations.
Doweling was a Difficult Procedure to do Correctly, there was not a great benefit, and Strippit NO Longer Dowels Die-Bases on their Turret Machines. Amada Never did.
If your Base has these 2 Dowel Pins, Using your Special Dowel Pin Puller,
Pull them out now. Now You Know Why I have a "Dowel Pin" Web Page.
8 -- Put a Big Piece of Cardboard on Machines Tables, Jump-Up on to Tables, and Lay on your Belly so that you can Look into Turret Station. Hold-Up the Upper Alignment Tool with a couple of Your Fingers, Pull-Out Cardboard Separator, and
Carefully Lower Tool onto the Lower Alignment Die.
If You Have Good Alignment,
Tool Will Fall In Under It's Own Weight Without Hitting An Edge.
Do NOT Force Tool-In, Or Tap-In, Or Hammer Tool-In!!!
All Hammering Will Do Is RUIN Tools, And You Will Still NOT Have Alignment!!!
If Tool Will Not Fall-In, You Do NOT Have Good Alignment!!!
If it appears that Upper Bushing may have Slipped and Rotated a few Degrees,
(If you have a Post-2002 Machine, See "Glued Bushings" below & Good Luck to You!)
we can Loosen 4 Cap-Screws that Hold Bushing and then Index (Rotate) Bushing
Back & Forth to see if Tool will now "Fall-In" in to Lower Die and Achieve Rotational Alignment. You May have to Remove Tool-Lifter & Springs & Lifter-Studs to get
enough Space to do this.
If Tool will Fall-In, then Carefully Tighten the 4 Screws (Still Under The Ram!) in a
Cross-Pattern. Then Lift and Lower Upper Tool a Couple of Times to Recheck that it
will still "Fall-In" Without Hitting an Edge, Proving that you still have Good Alignment.
If you still have Good Alignment, then Lift Tool, put your Cardboard Separator back in, Fire Shotpins Out, Rotate Turret back to Load Station by Hand, Retighten all 4 Screws, take out Tools, and you are Done with this 1 Station.
If Tool Still Will Not Fall-In, You Do Not Have Good Alignment,
And You Will Have To Proceed To Step 3, Die-Base Realignment.
Glued Turret Bushings
One of Strippit's Advantages over Amada is that Strippit has, since the Early 1970's,
had Easily Replaceable Hardened Bushings in their Upper Turret Tool Stations.
If a Strippit Turret Bushing became Damaged or Worn-Out, you could take out the 4 1/4"-28 Button-Head Cap-Screws, Lift-Out Old Bushings by Hand, Pop-In a New Bushing, Line it Up under the Ram, and Tighten-Down 4 Screws.
Now your Upper Station is Like New, and it only took a Few Minutes!
Amada Upper Turret Stations are Just Holes Bored into Turret Casting. If a Station gets Scarred from a Tool Blow-up, Galled, or just Worn-Out, that Station becomes Unusable!
In Strippit's On-Going Program of Shooting-Themselves-In-The-Foot, Strippit decided to Cheapen Their Machines by No Longer Holding Turret Bushings in Place with 4 Easily Removable Screws. Starting about 2002, Strippit Now Glues Bushings In Place.
I believe Strippit is using Loctite "Green" #290 with Activator #7649 or #7471. Do Not use Loctite on Bushings without Using Activator. Type #7649 makes the Stronger Bond.
Now Henkel-Loctite and Strippit would call it a "Hi-Tech Industrial Adhesive".
But , You Know-What? It's Still Glue, and I would not use it to Hold My Hi-Tech CNC Punching Machine Together, with Constant Shock from Millions of Punch Cycles.
It is Not Quick & Easy to Align or Replace "Glued" Bushing. You need to make a Heavy Duty Gear-Puller and probably Still have to Heat Bushing with a Torch to get it out. Next get every Bit of Old Glue Out of Turret Station. You can try MEK-Solvent, but MEK has The Little Problem of Causing Brain & Nerve Damage. You can try Files, Sandpaper, Etc. Be Very Careful you Don't Damage the Turret Bore!
Then Coat Bushing and Turret Bore with a Thin-Coating of Loctite, Spray-On Activator, Put Bushing in Turret, Put-In Top Align-Tool, Rotate Turret to put Station Under Ram, Fire-In the Shotpins, Pull-Out your Cardboard Separator, Carefully Lower Upper Align Tool, and Index Bushing until Tools Mate. Leave Upper Tool In Lower Tool.
If it did Not Line-Up good enough to Mate with Bottom Tool, You have Die-Base Problems that will have to be addressed Later in Step 3, as you can only do 1 thing at a time. For now, Index Back & Forth the Upper Alignment Tool, and Center the
Upper-Tool as Best you can over the Lower Alignment Tool Die.
Work Quickly, as the Loctite will start to Set-Up in a few minutes.
Now, Do Not Disturb Your Work!
Walk Away from Machine for at Least an Hour while Loctite Glue Hardens!
You can remove Tools and proceed to next step later, After Loctite Glue Sets-Up.
Step 1, Check Bushing Wear
Step 2, Bushing Index-Alignment
Step 3, Die-Base Alignment


This page was last updated: February 18, 2023

The Lower Turret
after you have
Removed
Die-Base.
Clean and
Flat-File Smooth
the Base Position!
All Surfaces of All Components
Must be Smooth
and
Burr-Free!
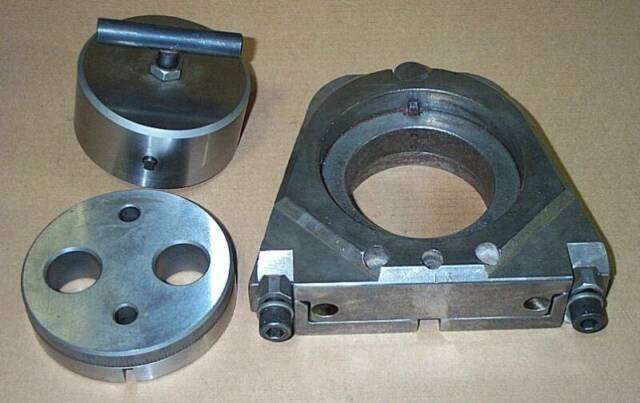
1 1/4" Die-Base on Left after Pulled from Turret.
Most 1 1/4" Bases have a Wear Plate on Top
held-down with 4 Flat-Head Screws. If Wear-Plate is Very Worn or Damaged, it could Tip Die while Punching and Cause Odd Alignment Problems. Replace it Now if not in Good Condition.
1 1/4" Die-Holder on Right.
3 1/2" Die-Bases do not have Wear Plates. Replace the Base if Damaged.
4 -- I Wash Die-Base to get every Bit of Dirt, Grease, and Metal Bits off of it. Then run a Flat-File over Bottom of Base to Remove All Burrs from Original Doweling Process. Clean it again if necessary. Bottom of Base should now be Perfectly Flat and Clean.
5 -- On 1 1/4 Inch Bases, make sure Top-Cap on the back #83639-000 Location Pin
is Not Broken, Press it out and replace if necessary.
6 -- On 3 1/2 Inch Bases, make sure Top-Cap on each side #87245-000 Location Pin
is Not Broken, Press it out and replace if necessary.
7 -- On 3 1/2 Inch Bases, 1/4" Die Location Pin is usally worn, so I always replace it. Using a thin hand-punch, punch-out 1/4 Inch Die Location Dowel Pin at back of Base, and carefully tap-in a New 1/4" x 1 inch Dowel Pin.
8 -- Now do same Cleaning Process to Lower Turret where the Base is Mounted. Remove all Dirt, Grease, and Metal Bits. Wash with solvent. Flat-File Turret to Remove Burrs. Wash again. Mounting Position should be Perfectly Flat and Clean.
Also Clean-Out 4 Screw Holes in the Turret.
9 -- Clean the 4 Mounting Screws, or Replace them if Damaged.
Put a little Loctite Type 242 Thread Locker on Screw Threads.
10 -- Put Die-Base back in Turret, and reinstall the 4 Screws. Run Screws down until they Touch Base and start to get Tight. Then Back Off 4 Screws about 1/3 of a Turn. You should now be able to Move Base, Smoothly, about .030" in Any Direction
which will allow us to achieve Alignment.
11 -- Put your Alignment Die in the Die-Holder, and install it in Die-Base.
Put your Cardboard Separator over Die. Put Alignment Tool in Upper Turret.
12 -- Rotate Turret, By Hand, until this Station is Under Ram. Fire Shotpins In.
13 -- Jump-Up on Table and lay on your Belly again. Support Upper Tool with a Couple of Fingers, pull-out the Separator, and Lower Tool. Again, When my Tools will Not Mate from Miss-Alignment, with the Light-Pattern I can Easily See Problem.
There is Bright "Light" on Side of Punch & Die
where it is "Loose" with Too-Much Clearance.
And it is "Dark" on Opposite Side of Punch & Die where they are
Overlapping & Hitting with Too-Little Die Clearance, which Stops the Light.
Move Die Base Forward & Backward, Left & Right, Until Tool will Fall-In to Die.
Raise and Lower Tool Several Times Until Tool will Fall-In With-Out Touching Sides
of Die at all! This is Perfect Alignment, and you can Achieve this if you do these Steps
Carefully, and at this Point, you should settle for Nothing Less than Perfect Alignment!
Carefully Tighten 2 Front Die-Base Hold-Down Screws. Check Alignment again.
If still OK, Pull Upper-Tool out of Die, Put your Separator back in, Fire Shotpins Out, and Rotate Turret back to Load-Station.
14 -- Tighten the 2 Lower Screws underneath Turret. Make sure all 4 Screws are Tight, but be Careful you do Not Strip-Out Threads in Turret, as Turret is fairly Soft Cast Iron!
Do NOT Put Dowel Pins back in Turret!
This will Move Die-Base and Lose Alignment if you do put them back-in!
Dowel Pins are NOT Needed and you will Never again use Dowel Pins on this Station!
You should now Rotate Turret back Under Ram and Recheck your Alignment Work.
If you have done this Alignment Process Carefully, you should now have
Perfect Alignment on This Station. If not, Repeat Alignment Procedures until you do!
There are Other Factors that can cause Odd Alignment Problems, Such As;
--- Worn Striker-Plate on the Bottom of Punch-Ram can "Kick" Tools when Punching.
Striker-Plate can be Removed, Measure it's Thickness, Surface Grind it Flat,
make Shims to put under Plate to Shim it back to Original Thickness, reinstall plate.
--- Old Worn Punch Tool-Holders can be Loose in Turret Bushing and will Move & "Tilt"
when Punching. Throw-Out Your Decades-Old Holders, and Buy NEW Holders!
--- Worn or Damaged Die-Holders can allow Dies to Move around while Punching,
repair or replace as needed.
--- Worn or Damaged Die-Bases can allow Dies to Tilt or Move,
repair or replace as needed.
If you Really Want Good Alignment, Correct All of these Problems!!!
Also, Never, Never, Dry-Punch Machine With-Out Sheetmetal!!!
Lets say you are using .008" dies, which means that there is Only .004" Clearance on each side of Die if Machine & Tooling were Manufactured Perfect, which they are Not.
So if you Dry-Punch with No Sheetmetal in Machine, Even 1 Time, you can Nick & Ruin a Tool on the Very First Punch! It is a Little-Known Fact that when you have Metal in Machine, there is a Self-Centering Action as Punch goes through metal that moves the Punch-Tip to Center of Die that Helps Prevent this "Nicking" and Dulling of Tools from happening even when there is Not Perfect Alignment. If there is no metal sheet
in Machine, you do Not get this self-centering action! Never Dry Punch with Tools!
And Of Course,
These Alignment Techniques can be used on Any Turret Machine, not just Strippits.


The 2" x 2" Notch Station
Top-Right
Typical
Special 2" x 2" Notch Punch
Holder Assembly
which goes Only in a
Special Notch-Bushing
Middle-Right
#200283-000 Notch-Bushing Assembly which was Installed in
Turret Station #1
of most Strippit Machines built from
middle 1960's to late 1980's.
Bottom-Right
In Late 1980's Strippit switched to #123049-000 Notch-Bushing
that had a Thin Round-Flange
instead of Old Thick-Flange
so as to use Less Turret Space,
so More Stations can be
packed-in closer together.
Above is the Notch-Station Align-Tool Set I put together about 30 Years ago.
You can Make a Set by;
1 -- Take Mushroom-Head & Springs off a Holder Assembly that is in Good Condition.
2 -- I Grould-Flat (No-Shear) Punch-Tip so I can see Align Clearance Light-Patterns.
3 -- Screw Bolt back in to the Punch-Tip, and lock it down with a Jam-Nut.
4 -- Order New Die with .002" Clearance. Wilson Co. Whined, but they made it for me.
Tool is Easy to Use. Punch Tip is Raised & Lowered into Die, by Gripping Bolt-Head.
All Strippit's Turrets
Are Bushed.
Here is Strippit's
Good Old-System
of 4 Easily Removed
Cap-Screws for Holding the Replaceable Turret Bushings in place.
Stupid New-System,
Bushings are
Glued in Place,
No Screws.
Just Try to
Index a Glued Bushing back into place.
Here is a
Amada Upper Turret.
Amada Turret Stations
are Just
Holes Bored in the Turret,
as
Amada Does Not Bush
Their Turrets!
When a Amada Station becomes Scarred,
Galled, or Worn-Out,
as Eventually they All Do,
you have
NO Way To Repair It!
We have some New & Used Die Bases, Die Holders, and other Turret
Repair Parts In-Stock should you need them.
Note, 3 1/2" Die-Base Pictured above does Not have the 2 Side-Pins Installed.


As an Aside,
(Sounds like 3 Weak-Sisters Holding Each-Other Up!)
now Only Offers Thick-Turret (Amada Long-Tooling Type) Machines,
and No longer Offers Thin-Turret Strippit-Tooling Machines
that Strippit Invented a Century ago.
While I Agree that Thick-Turrets and Thick-Tooling is Better than Thin-Tooling, Especially with Strippit's Hardened-Bushing Thick-Turret Version,
(Amada Turrets are Bored - NOT Bushed and are NOT-Repairable!)
it further Alienates Strippit's Customers
by telling them what they can and can not have.


Sudan
Click-On Photo or Upper Hot-Link to READ His Sad Story.
If Chinese
would use
instead of Ground-Up Rhino Horn to make their Dicks-Hard
Which Does Not Work
Rhino's
and Other Great Animals of Our World
would NOT be going Extinct
Alignment Tool Set
for
Strippit & Amada
Long-Tool Thick-Turret
3 1/2" "D" Stations