Strippit Houdaille
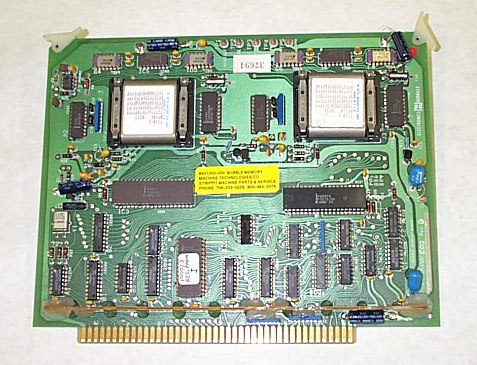
HECC80/3 Bubble-Memory Controls
D.C. Power Supply Adjustments
& Preventive Measures

This page was last updated: February 9, 2026
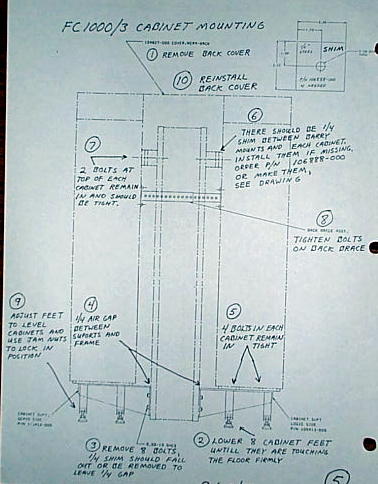
Above is a FC1000/3 Servo & Control Cabinet Installation Diagram, From a
Strippit Serviceman's News Letter I Published at Strippit Co. in the Early 1980's.
2 --- Make sure 8 foot Ground Rod is Installed & Attached Tightly to Machine's Ground-Strap!
3 --- Check Internal Control A.C. Voltage. This is Very Important!!!
It should be about 115 to 125 V.A.C., if it is Higher or Lower, have a Good
Technician Change the Transformer-Taps (in the Servo Cabinet) to Fix it!
Purchasing Dept. at Strippit bought some Transformers (To Save Money?) that
Did Not have Standard Plus & Minus Taps that we use to Correct High or Low Voltages.
Some Used Machines that I have worked-on were Installed where Incoming A.C. Voltage was Only 208 (Not 230VAC Machine was Wired for) and Control A.C. Voltage was only 101 Volts A.C., Way Too Low! Transformer Did Not have Voltage Adjustment Taps to Fix Low Voltage.
Customers Reported that Machine Always had Odd Intermittent Control Problems.
We Changed the Step-Down Transformer in Control for a New Transformer with Proper Taps for their Voltage. This gave us the Correct 120 Volts A.C. Control Voltage, and
Intermittent Control Problems All Went Away.
4 --- Locate All Welding & Plasma Machines Far From CNC Machine!
Especially Hi-Frequency TIG-Welders!
They Make All Kinds of Electrical-Noise That Causes Intermittent Control Problems
and Random Electronic Failures. Keep Them Far From Your Strippit Machines!
Installing a 8 foot Ground Rod on EVERY Welding Machine also sometimes helps.
5 --- Arcing CRT-Monitors Displays, and Crashing NO-Punch Zone Sensor can disrupt
12 volts to Bubble Board, and cause Problems. We sometimes Modify Control Wiring
and add a second 12 volt Power Supply for these Functions, but this is tricky work to
be done by a very Experienced Technician, or you risk Damaging Control.
We also sometime Add "CRT Isolator Board" Underneath the CRT-Cage to
Isolate Arcing Electrical Interference from Control Cardcage.
More information on this can be seen on "HECC80/30x Boards Types".
6 --- Do Not allow Too-Many Old Part-Programs to Accumulate in Memory!
Delete Old Programs to keep Total to 40 or so, and Always Under 60!
You can Clear Them ALL Out using DELETE *.*
7--- Make sure Program-Names are Always in Capital-Letters, or the Control will
make Nonsense-Files out of them, which are Very Difficult to Remove.
8 --- Front Panel Controller Board is in Slot #7, and has Ribbon-Cables going to it's
2 Connectors. The Inside Ribbon-Cable Rubs against Sharp Backside of Bubble Board
in Slot #6 and sometimes can Short-Circuit to it and Damage Both Boards!
Take a Roll of Black Electrical Tape, and Carefully Tape Around this Cable,
Starting at Inside-Connector and going Back about 4 Inches on Cable to protect
it from Sharp Pins on Back of Bubble Board.
10 -- Machine Technologies has Modifications that help Bubble Board Reliability.
Send your Board-In and we can do these Changes in Only 1 to 2 days!
11 -- I sometime fit a In-Line Fuse-Holder with a 1.0 Amp. Fast-Blow Fuse to Feed the
12VDC to 3LTB and 4LTB which Powers some Machine Switches. This way,
if you "Crash" a No-Punch Zone Sensor, you will Blow the Fuse, and Protect Both
Power Supply and Bubble Board from Failures. This work needs to be done
by a Good Technician as there are wiring variations from Machine to Machine.
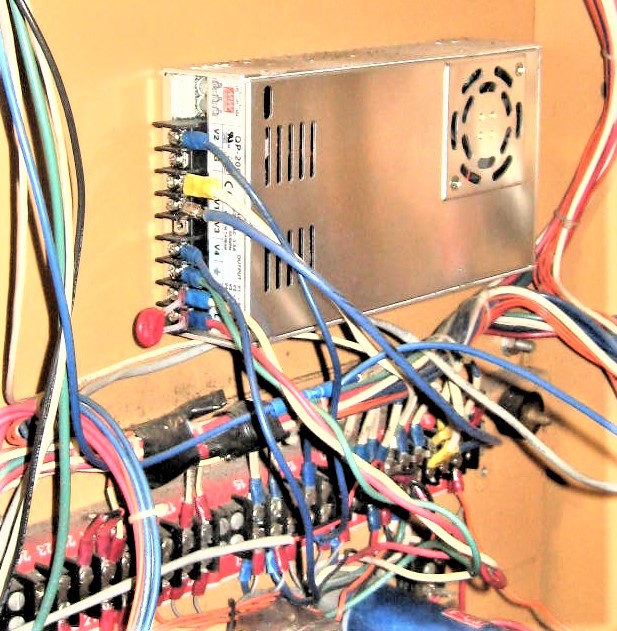
12 -- Sometimes LH Power Supply will Completely Fail, Control Shuts-Off, and has
a "Red-LED Fault Light ON" on the Monitor Board.
Usually the 12 VDC section goes Bad, but there are other Failure Modes.
Other times, the Supplies will just "Drift" and Not Stay at Set-Voltage.
This will also cause Intermittent Problems and "Drifting" Supplies Must Be
Replaced! New LH Supplies are No longer Available as the LH Company
No longer Exists. However, We Do Keep Rebuilt LH Power Supplies In-Stock!
13 -- Always "END" a Part-Program when you are Done Running Program!
Failure to Properly "END" Part-Programs can cause Programs to be Corrupted!
14 -- Remember, the Bubble-Memory Board is Really like a Disk-Drive.
Always give the Bubble-Board a Few Seconds to "Finish Ending"
or whatever Job you have it doing, BEFORE Shutting-Off Power to Control!
If you Shut-Off Control-Power or if A.C. Power to Machine Fails when Bubble-Board is
Still-Busy doing Some Activity, Like "End", you may Corrupt both Your Part Programs
And Corrupt the System-Programs that Run Control & Machine!
If this Happens, you will get Error Messages like #DF42 or "Bubble Read Errors"
and you will HAVE To Ship Bubble-Board to Machine Technologies for Repairs.
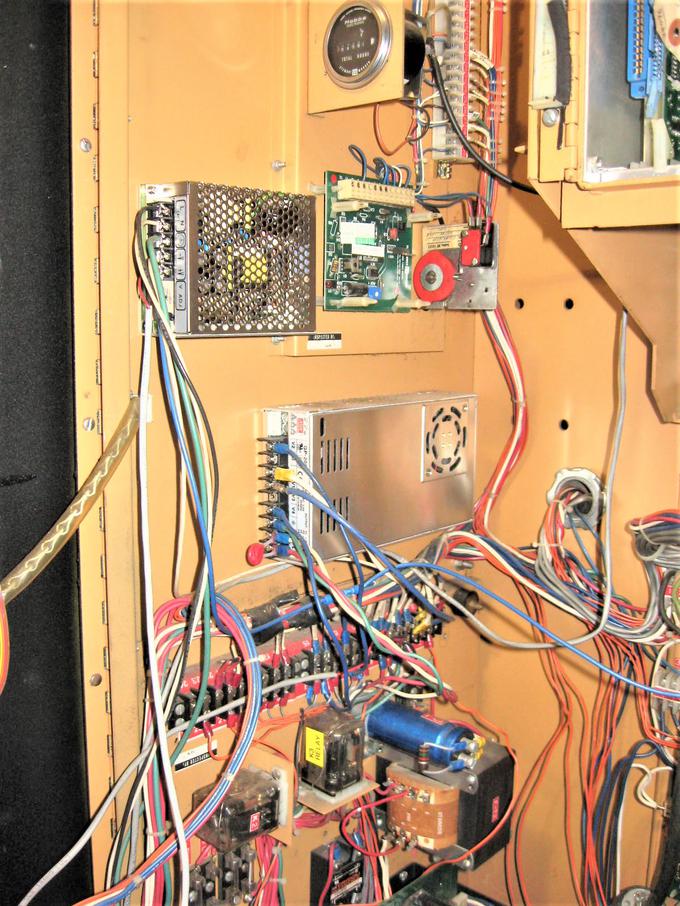
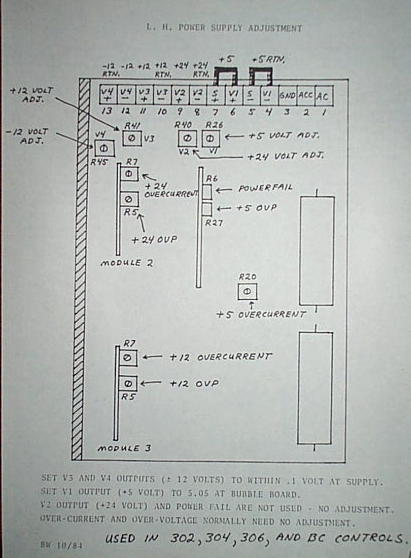
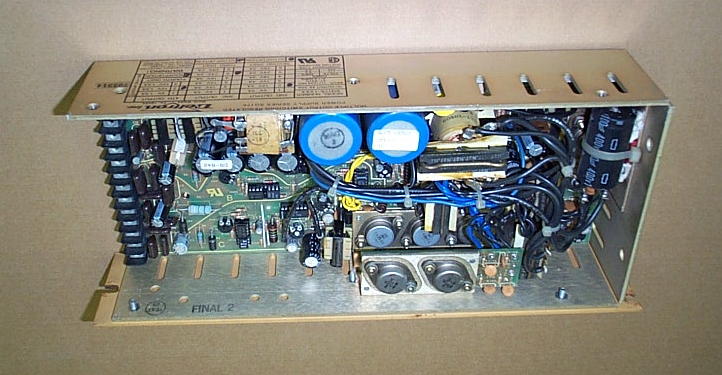
The LH Power Supply
1 -- Shut-Off A.C. Power to Machine and Lock-Out the A.C. Power so it Can Not
be Accidentally Turned-On while You are Working on Control & Machine!
2 -- This Step is Optional, But will Improve Voltages to Bubble Board, and therefore Board
Reliability. This Step can Only be Done by a Good Technician that Knows What He's
Doing, or Much Control Damage Can Result From Wire Errors!
I Often see Intermittent Voltage Problems caused by Crimped-On Spade Connectors on the
4 Heavy-Gage Wires going from LH Power Supply to FTB2 and TB1 Terminal-Strips.
These Crimped Connections have a Varying-Resistance that Causes Intermittent
Voltage-Drops which can Cause Bubble Board and other Control Problems.
To Fix, Remove the following 4 Wires:
LH Supply 4 (or 5) 5 VDC-Return to FTB2-4
FTB2-4 5 VDC-Return to TB1-3
LH Supply 6 (or 7) 5VDC to FTB2-3
FTB2-3 5VDC to TB1-1
Cut-Off Plastic Coverings around the Spade-Terminals at Each Wire-End.
Using a Hi-Wattage Solder Iron, Solder Crimped Terminals at Each Wire-End.
Then Flat-File and Sandpaper Each Terminal until they are Flat & Clean. Reinstall Wires.
Double-Check Wire & Terminal Positions, and that All Terminal Screws are Very Tight!
3 -- Pull-Up a Chair, and Tighten ALL Screws & Terminals in Both Control and Servo
Cabinets, which Fixes a Lot of Intermittent Control & Servo Problems!
Do This Before Making Any Power Supply Adjustments!!!
4 -- Use Only a High Quality Digital Voltmeter!
If it does not give Accurate Readings, it may cause more Problems than you fix!
I only use FLUKE (Model 87) Brand of Meters as they are The Best.
5 -- Use a Plastic Tuning Wand or Insulated-Screwdriver to lessen chance of Shocks.
6 -- Use Test Leads with Micro-Clips on the Ends, so you can Clip-On to
Test-Points, and have your Hands-Free to Safely make Adjustments.
7 -- Turn-On A.C. Power and Machine Control, and let it Warm-Up for a few minutes.
8 -- These Voltage Adjustments are made with Both Meter-Leads on Test-Points
ONLY On The Bubble-Board Itself! NO Other Places!
9 -- Set your Meter for D.C. Volts, and Clip the Black-Lead on GND. Test-Point.
Above it should be the 5V Test-Point, Clip your Red-Lead on it.
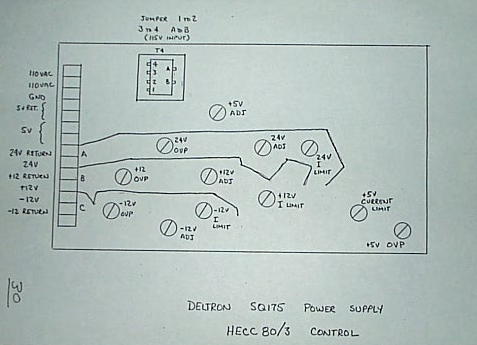
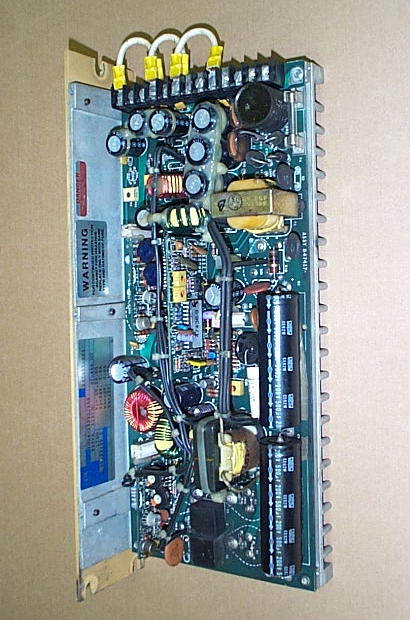
10 -- Most Controls have the LH Power Supply.
Early FC1000/3 Machines had Deltron Power Supplies, But Deltrons were
Discontinued as they were Not as Rugged as LH Power Supplies.
Most or all Deltron's were Removed in the Field, and Replaced with LH Supplies.
On the LH Power Supply, using V1-Pot. (R26),
Set the 5 Volt Supply to 5.080 to 5.100 Volts.
11 -- Move Red-Lead to the 12V Test-Point to Set 12 Volts. Some early Bubble Boards
did Not have this Test Point, so you may have to Clip-On to Bottom of
Capacitor C30 or other convenient place on Bubble Board, to Monitor 12 volts.
12 -- On the LH Power Supply,
using V3-Pot. (R41), Set the 12 Volt Supply to 12.200 to 12.300 Volts.
13 -- Do NOT Adjust any other Pots on the Power Supply!
14 -- Go back in 10 Minutes or so, and Recheck 2 Voltages to make sure that they have
not "Drifted", and to be Sure You Set Voltages Correctly! This is Very Important!
CAUTION !!!
There is 120 Volt A.C. Voltage On and Near the LH-Power Supply,
and Also
Hi-Voltage 200 Volts D.C. Inside the LH-Power Supply!
Use Extreme Caution, or You Can Shock, Injure, or Kill Yourself!
As You will be Dead A Very Long Time,
Try Very Hard To Avoid This!
Mistakes Could Also Damage Power Supply and Other Parts of Control!
Have an Experienced Electronics Technician Make the Adjustments!
The Strippit HECC80/30x Controls use a Bubble Memory Board for Both System and
Part-Program Storage. HECC80/30x Controls are Actually Primitive P.C. Computers
Board Acts as a 256K (NOT Meg!) Solid-State Hard-Drive for this System.
These Boards are Very Voltage Sensitive When they are Actually Accessing Data from
Bubble Memory Modules. It is Believed that Most Problems are Actually Caused by
Bad Power (Surges, Sages, Spikes, and Electrical-Noise in the A.C. Power to Machine)
or Improperly-Set Machine A.C. and Control D.C. Power Supply Voltages.
If these Voltages Fluctuate or are Not Set Correctly, Boards may Work Intermittently,
or Not at all, causing Loss of Memory and Various #DFxx Bubble Memory Failure Errors.
Using CNC Control with Bad A.C. Power or Improperly Set 5 & 12 Volts Power Supplies can Even Damage Bubble Chips on Bubble Memory Board, Requiring Expensive Replacement
of Bubble Chips or Bubble Board. Check A.C and D.C. Voltages Regularly!
The Deltron Power Supply
Machine Technologies
Strippit Repair-Parts & Strippit-Service
Phone 704
233-5229
Other Items to Consider for
Bubble Board & Control Reliability;
1 --- Most Used FC1000/3 Machines are Installed Incorrectly!
On Both Control & Servo Cabinets,
--- Each Cabinet is Jacked-Up Slightly using its 4 Leveling-Feet.
--- 4 Bolts at Bottom of Machine Frame (under Each Cabinet) are Removed,
--- 2 Bolts at Inside-Top of Each Cabinet are Removed
--- 2 Bolts at Inside- Bottom of Each Cabinet are Removed
--- Bolts at Cross-Bar Between 2 Cabinets (under back Sheetmetal Covers)
of Machine are Removed,
When this is done Correctly, the 2 Electronics Cabinets are Isolated from
Shock & Vibration of Punching because they are "Floating Free" on
Rubber Barry-Mounts Away from Machine Frame.
Failure to Install Correctly Machine & Cabinets will lead to Many Control
Hard-Failures, as well as Intermittent Control & Servo Failures.
Remember to Reinstall All Cabinet Bolts,
and Jack-Up Cabinet-Feet when Moving or Shipping Machine,
or
Control & Servo Cabinets Can (and will)
Fall-Off of the Machine Frame!


NOTE !
When Replacing a Power Supply, You have No Idea How the Voltages are Set-Up!
So, Before Turning-On Control, I Pull Bubble Board Out of Slot #6,
and Test 5 and 12 Volt Supplies with Bubble Board Out of the Cardcage,
so it can Not be Damaged if Voltages are Wrong.
Clip-On your Voltmeter Leads to CRT Controller Board in Slot #8.
Test Point TP6 for Ground, and TP5 for 5 Volts, and Set Voltage as Listed Above.
Repeat with TP4 for 12 Volts to TP6 Ground.
When Voltages are Set Correctly,
Turn-Off Control, Reinstall Bubble Board, and
Reset the Voltages AGAIN on the Bubble Board as Listed in Above Steps.

Note! As New L.H. Power Supplies are No Longer Available,
We Keep Rebuilt L.H. Power Supplies In-Stock.
We also have Brand New Replacement Power Supplies In-Stock,
But these usually take a Service Call to Install.
To Improve Reliability, we often Retrofit 1 or more Extra 12 Volt Power Supplies to Control.
This way, CRT-Monitor has it's Own Supply, Machine & Switches have their Own Supply,
and Bubble Memory Board gets It's 12 Volts from Main L.H. Power Supply
with No Interference from any CRT-Arcing or Machine Switch Crashes.
Strippit should Never had Bubble Board & CRT & Machine Switches on 1 Power Supply!


Control Power Supply Retrofit Kit
As the Detron and LH Power Supplies are No Longer Available
and are Very Difficult to Repair, We have Developed our Power Supply Retrofit Kit
using a New Advanced Power Supply to replace these Old Power Supplies.
In FC1000/3 Machine Controls, Strippit Located Power Supply in Bottom Left Corner
of Control where is was Very Difficult to get to for Adjustments or Replacement.
We use a Modern and Much Smaller Size Power Supply that we Install in the
Front-Middle of Back-Panel where is is Very Easy to Mount, Reach, and Adjust.
Installation is not Difficult,
But, Must be done Carefully by a Good Technician as there is Wiring to be Re-Done,
which Must be Done Correctly with 2 Small Changes on 2 Circuit Boards.