Strippit FC750 & FC750/2
Turret-Drive Fixes
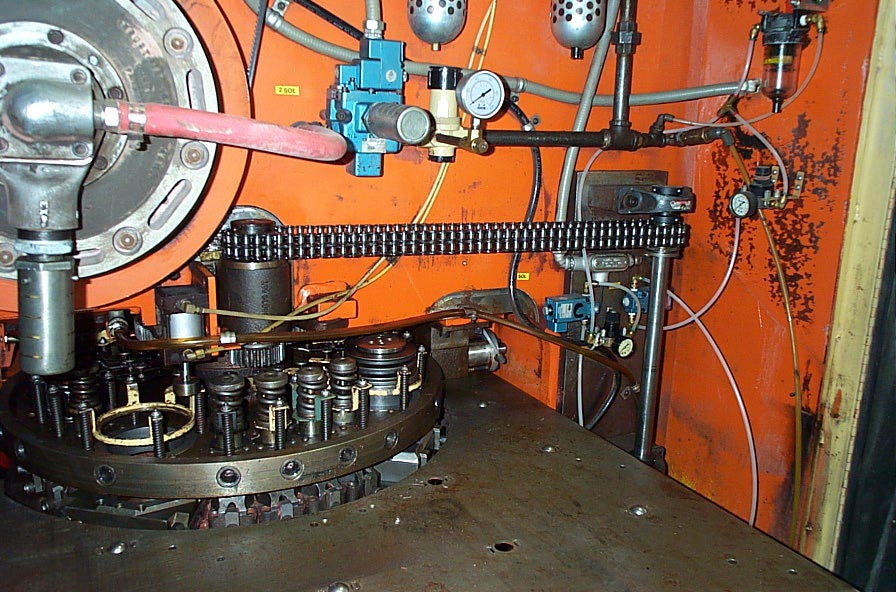
1 -- Remove all the Sheetmetal around Turret and Turret Drive Shaft System, and Throw it in your Scrap Metal Dumpster where it Belongs!
Look Closely at the 4 Photos Above!
This Sheetmetal is mainly Cosmetic, and will only be in your way. Get Rid of it!
Strippit finally woke up themselves, and Strippit Removed this Cosmetic Sheetmetal
that was always in the way of Service People, on the Newer FC750/2 Machines.
2 -- Take apart Entire Turret Drive System. Leave the Motor & Gearbox, and Shaft
Pillow-Blocks on Mounting-Plate, but take all other parts off. Clutch & Brake Unit,
Drive-Shaft, Sprockets, Chains, and 2 Turret Sub-Assemblies. Make a Dowel Pin Puller for use in removing 2 Sub-Assemblies. See my "Strippit Dowel Pin" Page.
3 -- Pull Gears and Sprockets off 2 Sub-Assemblies. The Keys are usually Worn or in Broken-Pieces from "Turret Crashes" caused when Your Operator puts a Too-Long Tool in Turret (because he Never uses the "Strippit Go No-Go Tool Gage" Does he?),
and Tool Crashes into Ram when Turret Rotates!
Make Custom .002" Oversize Keys on a Surface Grinder, and Press-Them-In, so they
are Extremely Tight. If Not Very Tight, you will already be adding Positioning "Slop"
into your Drive System. Replace Sub-Assemblies back on to Machine.
4 -- Replace the Clutch / Brake unit with a Brand New Unit!!!
While Rebuild Kits are Available, I have found rebuilding these Units to be So Difficult, that I will Not do it anymore. I only will use New Units now, and so should you.
Make sure the Keys on Clutch / Brake are Very Tight also!
This page was last updated: February 10, 2026

Our Small
Prox-Sensor
and
Adaptor-Plate
Retrofit
We keep these
Parts
In-Stock!
The Old FC750
Original
#400767-000
Shotpin Sensor
Note!
This Sensor is
Not used on the FC750/2 Machine!
Our New
Shotpin Sensor
Retrofit
for the
FC750
The Strippit FC750 & FC750/2 Turret Punch Machines with HECC80 Controls were built from 1979 to 1986. These were Compact Machines, with Control & Frame & Table Assemblies all Built-Together in a Easy to Move & Install 1 Piece Machine.
They were also Accurate, very Easy to Run, and Inexpensive.
This made them Popular, and about 200 of this Model Machines were built.
But they all have 1 Problem. Bad Turret Positioning.
The FC750 Machine was Strippit's "Lower Cost Entry Machine".
So to save money, Strippit did Not use a Servo-Drive for Turret-Drive System like on
the FC1000/2 Machine. They went Backwards In-Time, and used a Mechanical
Clutch & Brake System from the Old 1969 FC30/30 Machines.
This was Very Typical Strippit (and American, I am Very Sad to Say)
MBA-Management Thinking. Building Machines to a Marketing "Price Point",
Instead of building The Very Best Machines you can to
Develop a Valuable Reputation in Marketplace as the "Best" Machine Manufacturer.
This Bad Turret Positioning Causes;
--- Shotpins to "Bang & Clunk" as they Pull Turret to go into Shotpin Bushings
--- Shotpins to Miss the Shotpin Bushing Completely, Causing "Shotpin Timeout"
Hold-Errors which Stops Part-Production, and Drives Machine Operator Crazy!
--- Shotpins Breaking from Stress of Pulling-Turret and Banging into Shotpin Bushings
This is a Broken
#102270-000
FC750 Shotpin
Not to be Confused with a
FC750/2 Shotpin, Which is a
Different Part!
We have a few
Shotpins and Seals In-Stock!
The Turret Drive System actually worked pretty good when new,
but it Deteriorates as it Ages until it is Unusable.
But it Can be Rebuilt to Work Better than New, and to be even More Durable than New.
First, give up Your Silly Idea that you can just Change or Fix just 1 Part, and it will be
"All Better". Its a Turret Drive SYSTEM, and all Components in that
SYSTEM need to be Right, or the SYSTEM will Not Function Correctly!
Think like an Engineer, Not a Bean-Counter!
Second, its going to Cost about $4000 in New Parts, and 2 days of work to rebuild
everything Correctly. This is a Small Price to pay to return to good service a great little Machine. Don't be Cheap like Strippit, do it Right, so you never have to do it again!
Third, I am not going to give Explicit "Turn This Screw" Instructions.
I am already giving you Years of Valuable Experience for Free.
If you can't figure out how to do the work yourself, then you need to hire
a capable Serviceman to do the work for you.
I have been Servicing Strippit FC750 Machines since the Very First One
was Built in 1979, and the Following is what I do when
I Rebuild a Turret Drive System on a Customer's Machine.
Note! This Kit is For FC750 Machines Only, NOT for FC750/2 Machines.
FC750/2's used a Dowel-Pin Inserted in Each Shotpin with a #17441-000 Magnet on end. The Magnet activated 2 -- #18122-000 Sensors for the In and Out Signals.
FC750/2 Shotpin Sensors work good, and do not have the FC750's Problems.
15 -- Grease the 2 Pillow-Blocks Once. Wipe off all Excess Grease around Bearings. THEN TAKE OUT THE GREASE FITTINGS! When Machine Malfunctions, the first thing People do is get out the Grease Gun, and Grease-The-Hell out of Everything, as if this would fix anything. In fact, all this Excess Grease Separates over time, and
Oil from Grease Runs-Down Shaft into the Clutch / Brake Unit, and Ruins-It!
Grease Pillow-Blocks again in 5 Years or so, Not before!
Grease the 2 Shotpins Regularly though, every 4 to 6 Months is good. Synthetic (RED) Grease is Best Grease to use as it is much more Time & Temperature Stable.
16 -- Adjust the 2 Flow-Control Valves that are on your Shotpin In & Out Mac Air Valve,
so that Shotpins Travel In & Out Smoothly with Out Hitting Hard.
17 -- On Short 1 Station Moves, Turret will have Tendency to stop Short.
On Long Station Moves, Like T-Home, Turret will tend to stop Long. This is Normal.
Adjust T-Recognition Sensor to Balance Between these 2 Stopping-Point Extremes.
If you Rebuilt everything Correctly, your Turret should Now
Position, Stop, and Fire-In Shotpins Better than when it was New.
If Not, Go Back and Analyze what is Not Working Correctly, and Redo it Correctly!
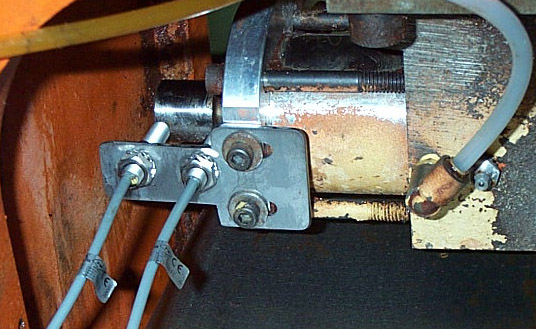
14 -- FC750 Machines used 2 -- #400767-000 Shotpin Sensors to tell HECC80 Control when Shotpins are In or Out. Sensors had Problems causeing them to be Unreliable;
1 -- It is a Optical Sensor. Grease, Oil, and Dirt Accumulate on it, causing
Sensor to become Intermittent, and to Eventually Stop Working.
2 -- It Wears Out! Over time, the 2 Infrared-Emitter's Output Decrease on each
Sensor, which then becomes intermittent, and to eventually stop working.
Typical Symptoms are "Shotpins Timeout" Errors,
even though the Shotpins Went In or Out as they were suppose to.
Because of these Problems, We have Developed our own "Sensor Retrofit Kit" to replace these Unreliable Sensors, and it should be Installed at this Time.
Retrofit kit is Immune to Grease, Oil, and Dirt. And it does NOT Wear-Out over time!
Installation and Wiring Directions come with the Kit.
9 -- I Replace the 2 16-Tooth Chain-Sprockets on Shaft with 14-Tooth Sprockets. This reduces Turret-Rotational Speed 12% which you will Not Even Notice. This makes a Major Improvement on Turret Positioning Accuracy, and Wear & Tear on Drive System.
10 -- Replace Both Blue MAC-Valves which go to Turret Clutch / Brake Unit.
I Stock Special Hi-Wattage Type Valves which are More Consistent that Your Original Valves, which will Improve Positioning Accuracy and Reliability.
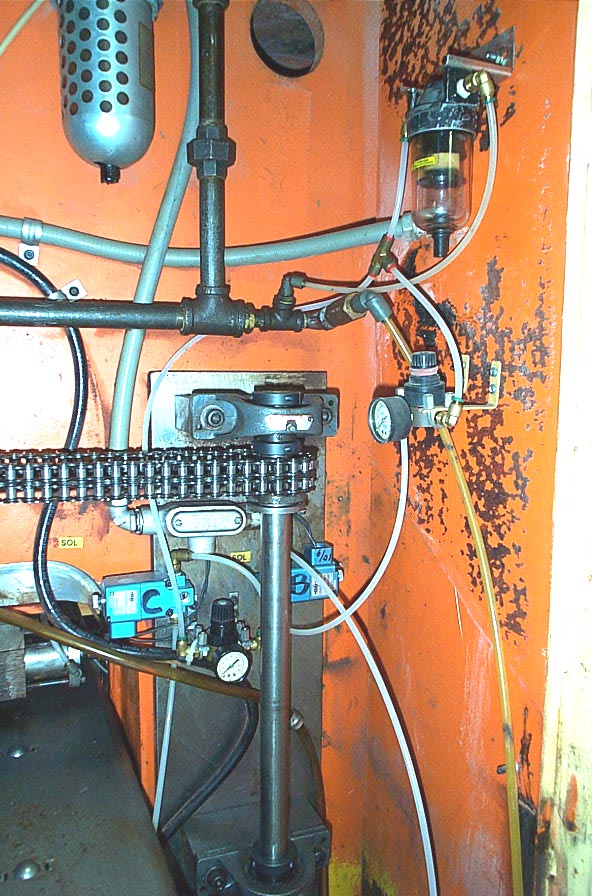
11 -- Some Machines shipped from Factory with a small 1/4" Air-Regulator on Clutch Valve. Some shipped with Regulator on Brake Valve. I add a Second Air-Regulator
so BOTH Clutch AND Brake have a Regulator. Set both Regulators to about 50 PSI.
12 -- Add a 1/2" Air-Filter above 2 Mac Valves, and Plumb this Filtered Air-Supply through Regulators to the 2 Valves. This keeps bits of Dirt, Rust, and Water from causing Valves to Stick and become Inconsistent. And Keeps Water Out of
Clutch / Brake Unit so it does Not Rust and Lock-Up.
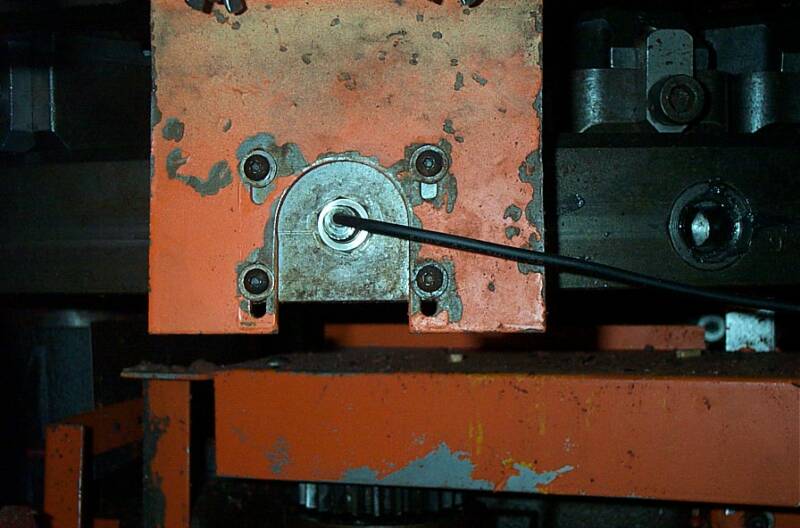
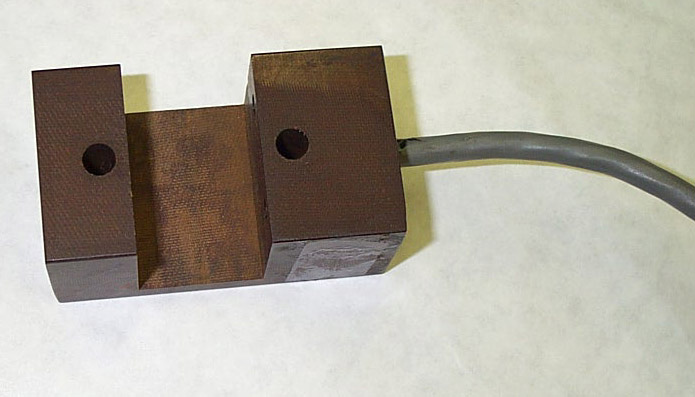
13 -- Some Strippit Engineer Speced a Huge 30mm Proximity Sensor for the
"Turret Recognition Sensor" which Counts Shotpin Bushing-Holes so CNC Control knows when to Fire-In Shotpins. A 30mm Sensor is great for Counting
Tin-Cans going down some Conveyor-Belt, but is Way Too-Big for this Application.
I use a Adaptor Plate, and fit a Smaller 12mm Sensor which much more Precisely Detects the Shotpin Bushing, and therefor the Final Turret Positioning.
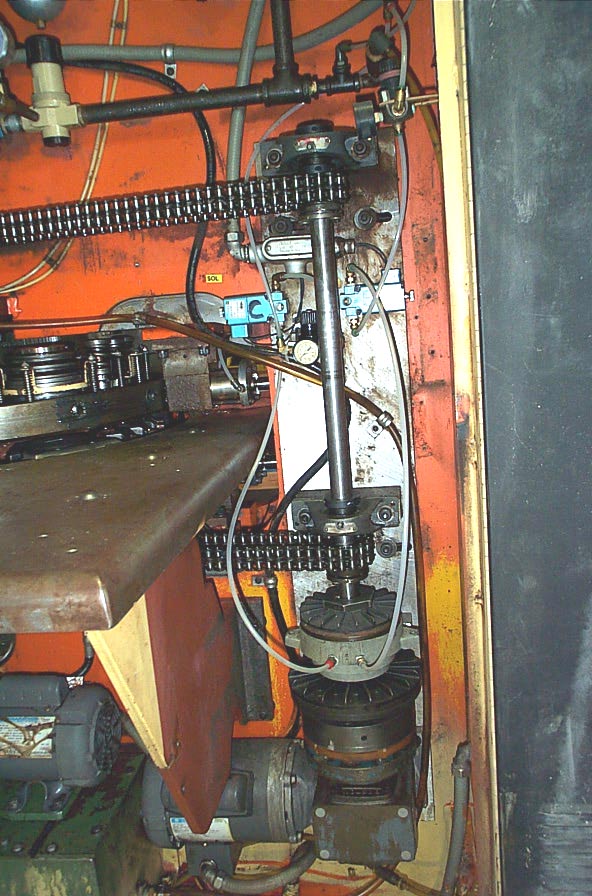
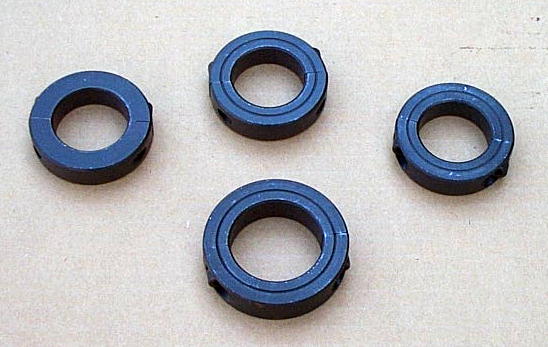
8 -- Just Set-Screws hold Clutch / Brake Unit Position on Shaft, and just Set-Screws hold Shaft Position on Bearing Pillow-Blocks.
Over time, these Set-Screws will Not hold Positions, and will allow Shaft &
Clutch / Brake Unit to move up & down.
To prevent this, I add a 1.5" Split-Shaft Locking Collar under Clutch / Brake Unit to prevent it from sliding down and losing my
.150" Gap over the Anti-Rotation steel-block.
Add 3 More 1.250" Collars, 2 Over & 1 Under Pillow-Blocks to Prevent Shaft from Moving up or down. Study Photos Below Carefully, and you can see these 3 -- 1.250" Collars on Shaft.
5 -- Unfortunately, the Manufacture of these Units now makes Cooling-Fins 1/2" Higher than they used to. So you will have to have a Machine Shop Mill-Off about .200" off
Bottom-Front of Steel-Block Mounted on Turret-Drive Mounting-Plate that has Dowel-Pin
in it, that is used to stop Clutch / Brake Unit from Rotating.
The last FC750 that I Rebuilt, I still had to put a 45-Degree Bevel at Front Bottom of
Steel Block so the Cooling-Fins would Clear.
Much time was spent making Sure that Cooling-Fins would Clear Bottom of the Block, AND that Clutch / Brake Anti-Rotation Tab Floated above Block about .100" to .150" ! Spent the Time and get it Right!
6 -- Also have Machine Shop Mill-Off .150" around Top of the Block where Dowel-Pin Sticks-Up. Clutch / Brake Unit's Tabs MUST "Float" over the Steel-Block and Not "Rest" upon it, and this will provide more Clearance.
In other words, The Notch in back of Clutch / Brake Unit Engages Dowel-Pin to keep
Unit from Rotating, But Must NOT Rest On The Steel-Block Itself!
When I am Reassembling System, I put a piece of Sheetmetal under Notch so as to Maintain .150" Gap Over Block, then Remove Sheetmetal Piece when Finished.
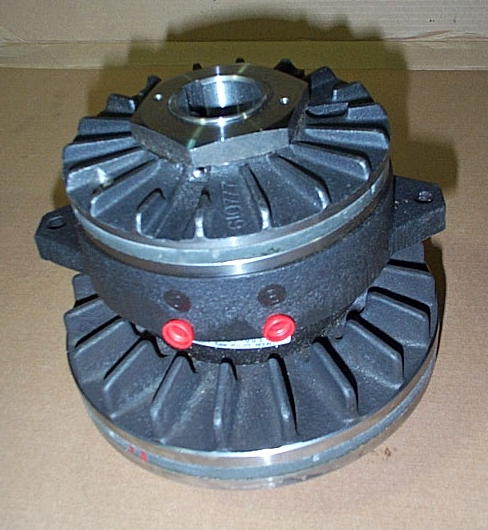
Front-View of
New
#18307-000
Turret-Drive
Clutch & Brake Unit
We Can
Provide these
and Other
Turret-Drive
Repair Parts!
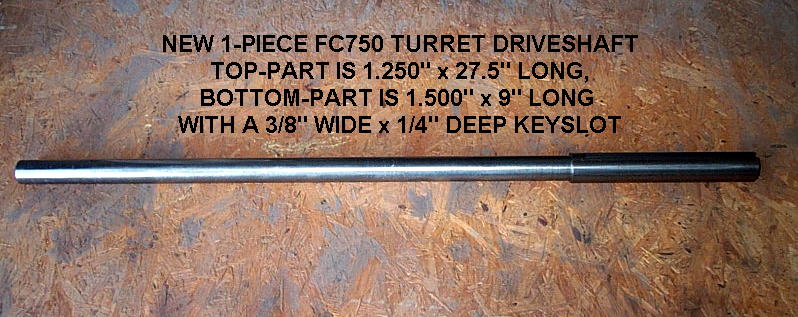
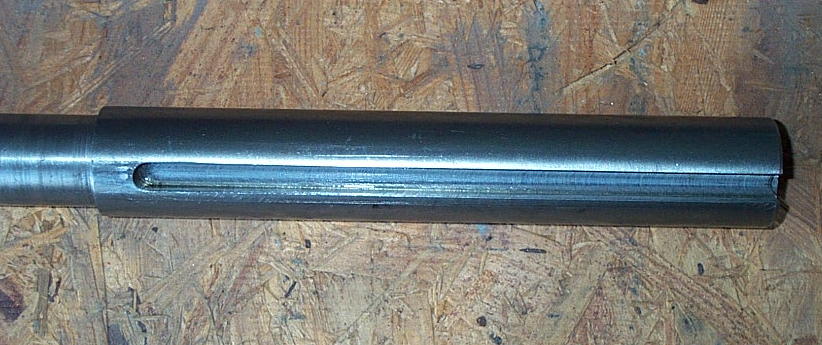
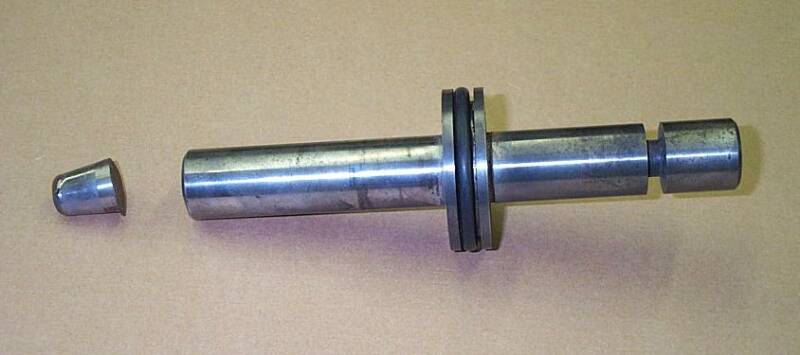
7 -- The Clutch / Brake unit is made for a 1.500" Shaft. For some Unknown (Cheapness?) Stupid Reason, Strippit used a 1.250" Shaft, and then used a
Sleeve-Adaptor inside Unit to allow it to fit their Shaft.
If you really want to do a Great Rebuilding Job, Make a New Shaft that is 1.500" at bottom for Clutch / Brake, then Tapers-Down to 1.250" for Pillow-Block Bearings and Chain-Sprockets at the Top, which will allow you to get Rid of Spacer and it's Slop,
and will also allow Easier Reassembly. Also make New Shaft about 1" Longer than Original, which will give you more Room to fit Chain-Sprockets on Top.
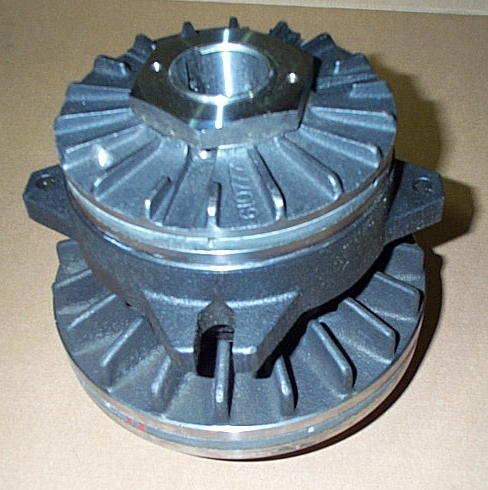
Back-View of
Turret-Drive
Clutch & Brake Unit
to Show the
"Notch"
that MUST
"Float"
.100" to .150"
Above Steel-Block,
and
Not "Rest"
On the Steel-Block!

In Your Strippit FC750 Manual, There is a Cut-Away Drawing of the Turret Clutch / Brake Unit.
At Bottom of this Unit,
There is a Coupling,
that Couples the
Clutch / Brake Unit
to the Gearbox.
This is
Item #21 in that Drawing,
"Coupling-Center"
This Part is Very Durable,
but after many Years of Use,
the Coupling-Center Will become Brittle and
Break into Pieces.
We have this Part Available
When Needed.
Note! Over Time, Many Gearboxes Slowly Leak All their Gear Oil,
Drip by Drip, Until the Gearbox is Empty.
Then, Your Gearbox will Slowly Grind its Gears and Bearings to Metal Dust.
Check the Oil Level Yearly,
More Often If Your Gearbox Leaks!
Fill Gearbox with a Good Grade of 90-140 S.A.E. Weight Gear Oil,
Synthetic Gear Oil is the Best!


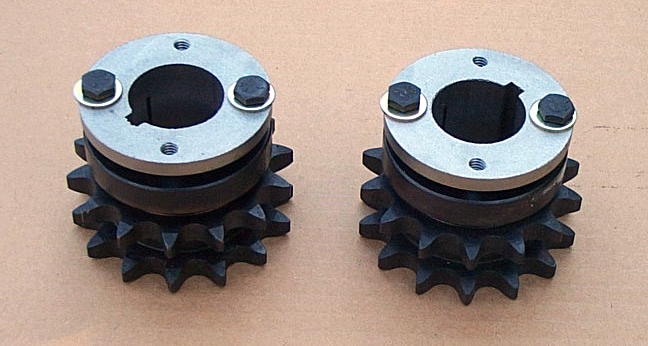
New
14-Tooth
Taper-Lock
Chain Sprockets


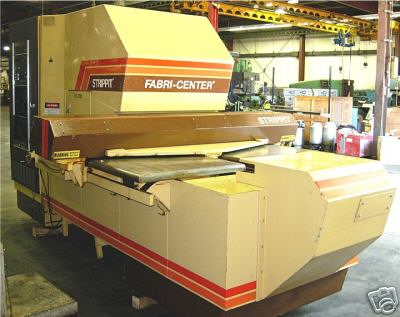

The Early
FC750 Machines
had Sheetmetal "Skirts"
all around the Machine Because
Strippit Management thought it made the Machine Look "Pretty".
Strippit "Management"
was Always
"Pretty Clueless".
All this Cosmetic Sheetmetal & Brackets
& Frames Cost a Fortune. So Strippit Quit putting Skirts-On Late FC750's
and
All FC750/2 Machines.
Strippit Painted
Bottom-Half of Machine Dark-Brown like the FC1000/3 Machines.
All this Sheetmetal Prevented Access to Machine for Maintenance & Repair, so we Servicemen were Happy to see it go!
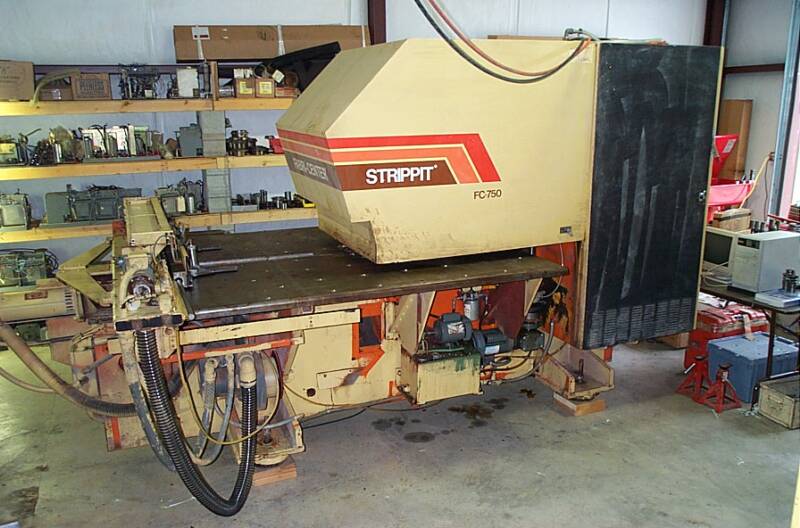
Photo Above and to the Left is a FC750 that We Removed &
Threw-Away all the
Crappy Sheetmetal that Always Prevented
Proper Maintenance
and Repairs.
You can Leave-On Covers over Turret Driveshaft Area if You Wish.
I Did Not, as this Area Needs Good Access!


Machine Technologies
Can Put Together All Repair Parts Necessary
To Do This Turret Drive Rebuild Job.
Call Us With Your Needs!
Phone 704
233-5229
We recently Designed a New
FC750 Turret-Drive Up-Grade that Greatly Improves Positioning Accuracy when Rotating to Tool Stations
using New Technology!
If you are Interested in Improving your FC750
Give us a Call for Details!