
Rotary-Motion of a Servo Motor to Linear-Motion required to move CNC Machine Tool's Axis.
Strippit Machine
Ballscrew Care and Replacement

Ballscrews are Manufactured in many Different Types, Grades, Pitches, Sizes, Etc.
CNC Machine Tool Ballscrews are generally Precision-Ground Assemblies Built to
Ten-Thousand of an Inch (.0001") Tolerances and usually have 2 Ballnuts Bolted and
Lightly Preloaded against each other so that there is Zero Slop & Backlash in Assembly.
The Strippit Company, with a only a couple of Exceptions like the FC24/20 and FC75/30,
has used Precision Ballscrews on all of their NC & CNC Punch, Laser, and Plasma Machines built over the last 55+ years. Strippit-LVD has used Ballscrews Manufactured by
Sergeant, Barnes, Warner Precision, Beaver Precision, RBC, PGM, PSI, NSK, and Other Companies as Strippit-LVD really just Can't make up their Mind what to use.
Your Company Should take Very Good Care of your Machine Ballscrews Because;
1 -- Each X & Y Axis of Every Machine Strippit has Ever Made used it's Own Unique Ballscrew.
So there has been Hundreds of Different Ballscrew Models used, most of which are
Not-Stocked, No Longer Made, or Available anywhere. So, You may Not be able to Quickly
and easily get a replacement! A Custom Made Ballscrew takes 2 to 3 Months to Build!
I now see Wisdom of Trumpf Co. that uses Stock Pieces of Precision Rack & a Pinion Gear
(which they make in their Own Swiss Factory!) to Build Any Length of Axis Travel on any
Machine Tool they wish! They Don't Need to Stock Hundreds of different Ballscrews.
2 -- If available, it will cost about $6000 to $10,000 to Replace a Worn-Out Ballscrew with a
New Ballscrew, 4 End-Bearings, 2 Hug-Nuts, Lube-Fittings, Coupling Ring-Fedders,
Seals, and Professional Installation.
If Properly Maintained, a Ballscrew can Last for Many Years, or even Decades!
To Maximize Ballscrew Life;
1 -- Keep Ballscrew CLEAN! A New Ballscrew will Shine like a Mirror! Keep it that Way!
2 -- Keep Ballscrew Oily! If your Machine has an Automatic Oiler, Check All Ballscrews Every
Week to make Sure it is Working! Often Oiler System is Not-Working Correctly or Oil Line
is Broken, and your First indication of a Bad Lube Situation is when Ballscrew starts
making a Howling Noise because it's Already Ruined!
I Advise Oiling Both X & Y Ballscrews By-Hand, Every Day!!!
If your Machine does Not have a Oiler System, Make it Operator's Job to Oil All Axis by
Hand Every Day! Use a Long-Handle 2 Inch Wide Paint-Brush with a Tin-Can filled with Oil,
and "Paint" Ballscrews with Oil. This Oils Ballscrew and Loosens Dirt, and keeps
Ballscrew Clean by Flinging-Off Excess Oil and The Dirt with it.
Caution!!! Make Sure Machine is "OFF" !!!
NEVER Stick Your Hands & Arms into ANY Machine that is "ON" !!!
3 -- A Good Clean Oil like Mobil DTE-Heavy ISO-100 Weight Lube Oil is Best
You may have this Oil already as it is used in the Pressure Lube-Tank of older Strippit
Machines with Mechanical Press-Drives. I also think Straight 30W Motor oil is acceptable.
4 -- Do NOT Use Grease on the Ballscrew! It is Not Widely Known, but Grease on Hi-Speed
Ball Bearings will cause Balls to "Skid" instead of Rolling which will cause Rapid Failure
of Ballscrew Assembly. Grease will also Attract and Hold Dirt & Dust forming a
Black Grinding Compound that will cause Rapid Wear of Ballscrew assembly.
5 -- Do Grease the End-Bearings! Ballscrews are usually supported by 4 Bearings Mounted
inside 2 Castings with Grease Fittings at each End of Ballscrew. Grease these Bearings
once or twice a year. Strippit recommends Mobil EP1 Grease, but I use Mobil Mobilith
SCH 100 or SCH 220 Synthetic Grease as it withstands Heat & Oxidation Much Better.
6 -- Reduce the X & Y Axis Speed! I prefer that Programmers put Commands into Each Part
Program to Slow Axis Speed so as to take this Out of Hands of your Operator-Of-The-Day.
In a HECC80-Control FC750, FC750/2, FC1000/1, FC1000/2, FC1250/45, FC1250/30/1500
I would Insert a F12 Code in Block of Code where your First X Y Move & Punch-Hit is.
For a HECC80/3 Control FC1000/3 Machine, use a F2 Code in Same place as above.
Fanuc Controls can also have their Part Programs Modified with a Speed Reducing Code
or have Operator Adjust Speed Control on Control-Panel to Easily Reduce Axis Speed.
Bearing-Loads go up at Square-Root of Speed Increase. So, for Example if you Reduced
Axis Speed to Half-Speed, you do Not Reduce Load by Half and Double Ballscrew Life,
you actually Reduced Load by a Factor of 4 and Increased Ballscrew Life by 4 Times!
So Reducing Speed has a Huge Influence on Ballscrew Life!
You also Benefit with Longer Servo-Motor & Servo-Drive Life, Less Tooling Problems like
Bad Punch-Stripping and Slug Pop-Up, and Increased Part Accuracy.
7 -- Promptly Repair Axis Slowdown Switches, Limit Switches, Resolver Feedback Packages,
and Encoders that can cause Axis to "Run-Away" and Crash causing Damage or Breakage.
And make sure Axis-Bumpers are on Machine and in Good Condition!
8 -- If Ballscrew is Replaced, make Sure it is Properly Installed & Aligned by an
Experienced Technician, as Improper Installation can cause Very Rapid Failure.
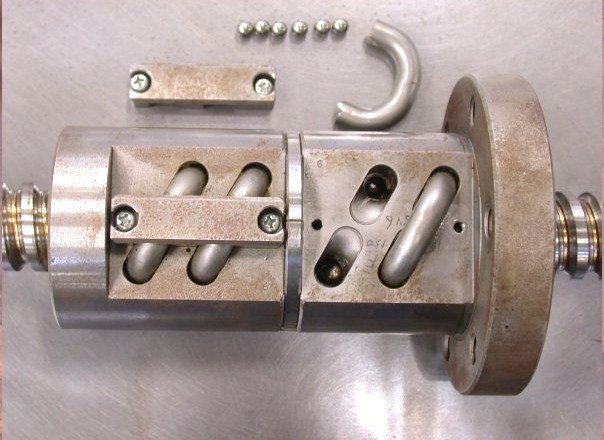
Ballscrew Assemblies
consist of many Parts, Such as;
-- The Ballscrew
-- 1 or 2 Ballnuts
-- Recirculating Ball Bearings
-- Ball Pickup Tubes
-- Mounting Hardware
-- Preload Shims
-- Dust Wipers
Precision Ballscrews Assemblies are Carefully Assembled in a Factory Environment, and
Individual Parts are NOT
Replaceable at a Customer's Shop!
Worn or Damaged Assemblies
Must be Returned to a
Rebuild Facility to be Repaired,
or Replaced with a New Assembly.
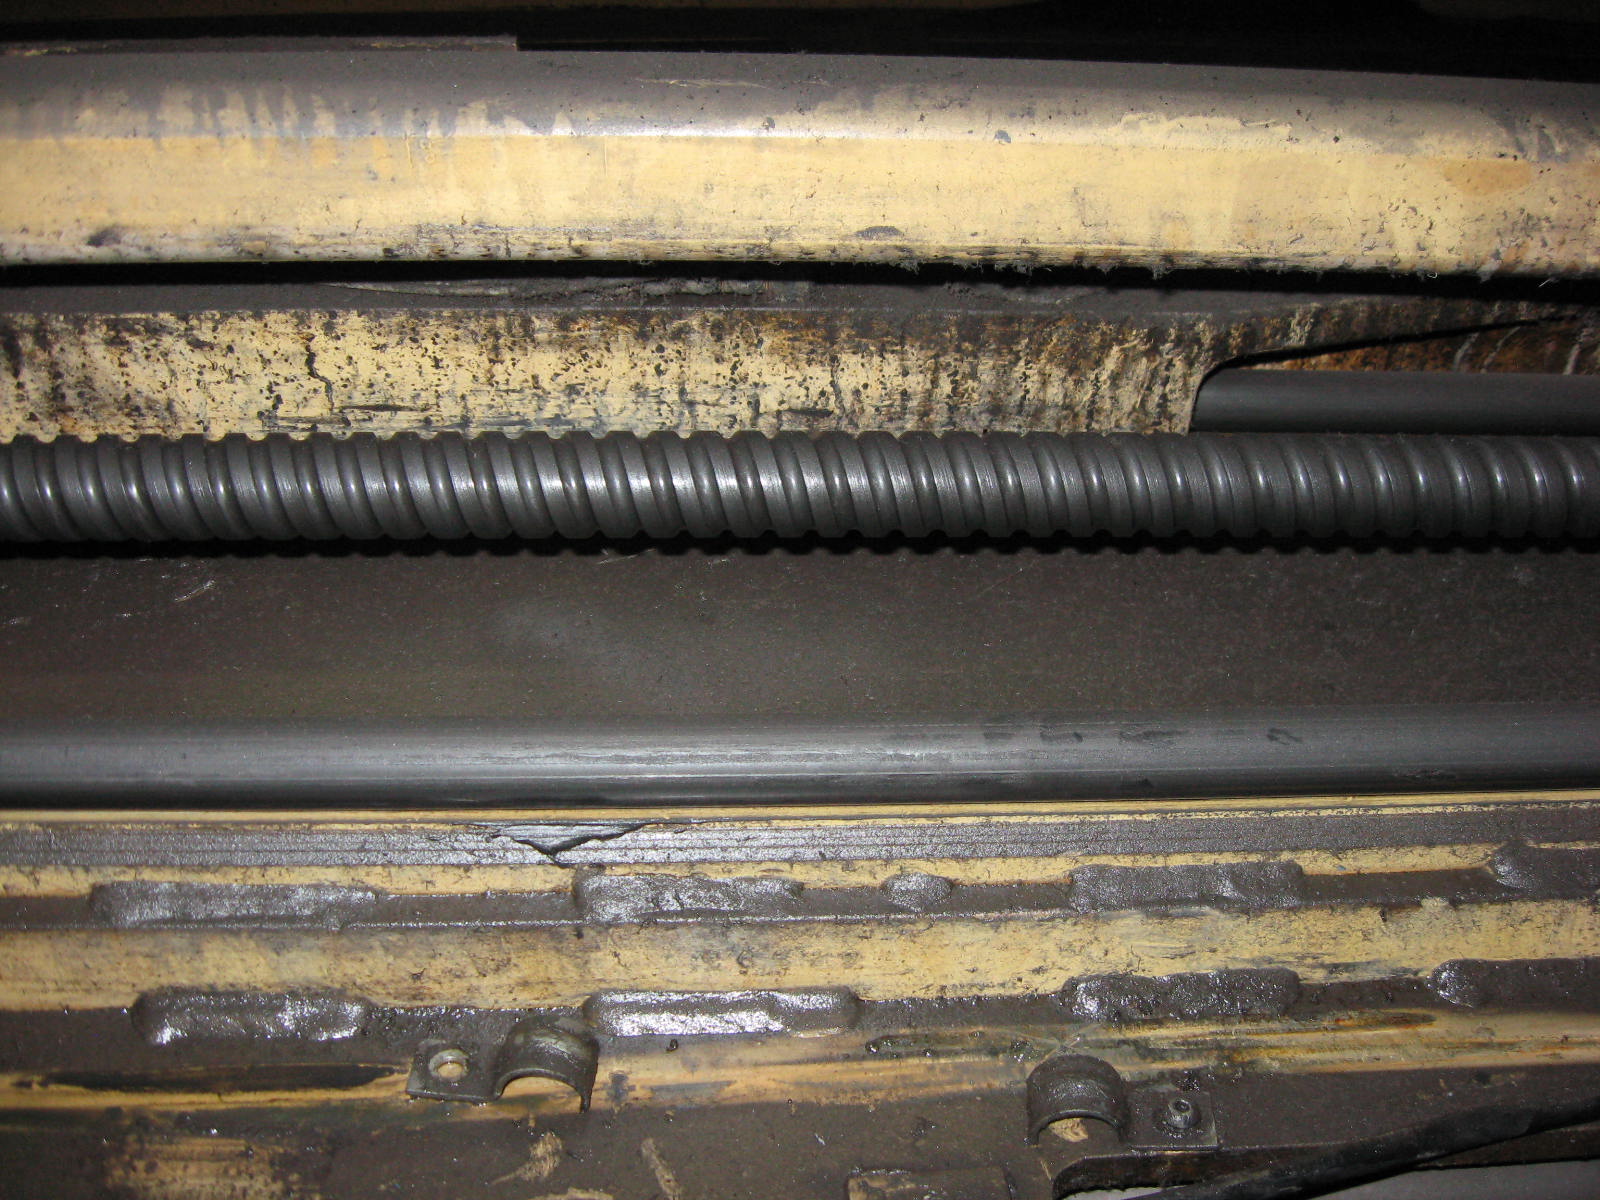
Above Ballscrew is Covered in Dirt & Grime Mixed in Old Grease to form a Nasty
Black Grinding-Compound that is Rapidly Wearing-Out Ballscrews & Way-Bars on this Machine.
I've tried to get Operators and Management to take care of Machine, but they Don't Care.
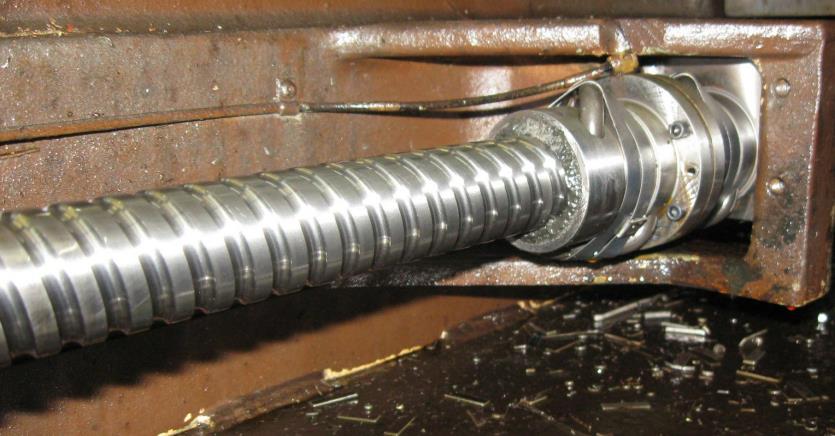
I replaced this Ballscrew 2 years ago and it still Shines and looks Brand-New because this Shop listens to me and makes Machine Operator take Proper Care of Ballscrews. You Should Too!
Ballscrew Replacement Tips
I am Not going to Present a Step by Step Ballscrew Replacement Procedure, but I am going to give you some Undocumented Installation Information that is Not in Strippit "Manuals".
1 -- Do NOT try to reuse End-Bearings and Bearing Retaining "Hug-Nuts". Always Replace with New Bearings and Hug-Nuts. On some 1250 Machines, I even install 2 Hug-Nuts at Motor End
of Ballscrew as a "Crash" can Loosen 1 Up, and allow Ballscrew to Float Back and Forth.
Also Add some Locktite Thread-Lock Compound to Motor-End Hug-Nut and Ballscrew.
2 -- There are 2 End-Bearings at Each End of Ballscrew, and Bearings are almost always Mounted "Back-To-Back" which means Stamped-Faces of Each Bearing
Faces each other.
Look Carefully and Write-Down (Take Photos!) how Bearing were Oriented on Old Ballscrew
when you took them off (they be Wrong, I have seen Bearings Installed Wrong more that once!)
and Consult your Strippit Mechanical Manual. The "C" Size Assembly Prints from Strippit are even Better, but LVD-Strippit is Paranoid and Rarely sends Prints out anymore.
3 -- Precision Ballscrew Grooves & Ballnuts are Ground to Ten-Thousand of an Inch Tolerances, but Overall Ballscrew Length is Not Controlled that well, and Ballscrew Lengths Vary by a few Thousands of an inch or more. Strippit Factory Aligns Ballscrews to Run Parallel
to Guide Bars .002 of an Inch or Less, then Dowel-Pins Bearing Mounts at Both Ends.
A Replacement Ballscrew Will NOT be the Same Exact Length as Old Ballscrew,
so Dowel Pin Holes Will NOT Align,
and you Can NOT use Old Dowel Holes, even if it looks like it to you!!!
If you Cram-In Dowel Pins into Old Dowel-Holes,
you will Stretch or Bow-Out the New Ballscrew and cause Rapid Wear & Failure.
You Have to Realign New Ballscrew just like Strippit Factory did or Risk Early Ballscrew Failure!
-- Remove Servo-Motor & Motor-End Bearing-Mount & Ballscrew. See Removing Dowel-Pins!
-- Do NOT Remove the Turret-End Bearing-Mount or it's Mounting Bolts & Dowel Pins!
-- Remove Old Bearings and Hug-Nuts from Old Ballscrew so that you can Remove the
2 Bearing Retaining Plates and 2 Urethane Bumpers that you will Mount on New Ballscrew.
Replace Bumpers if Damaged. Reassemble Retaining Plates, Bumpers, Bearings, and
Hug-Nuts in the Correct-Order and Facing Correct-Directions! Use 2 People with
2 Pipe Wrenches to Tighten 2 Hug-Nuts on Ballscrew-Ends at the Same Time.
-- Install New Ballscrew into Turret-End Bearing-Mount and Install Motor-End Bearing-Mount
into the other end of Ballscrew and Very Lightly Snug Mounting-Bolts.
But Do NOT Tork-Down Mounting-Bolts and Do NOT Install Dowel-Pins!
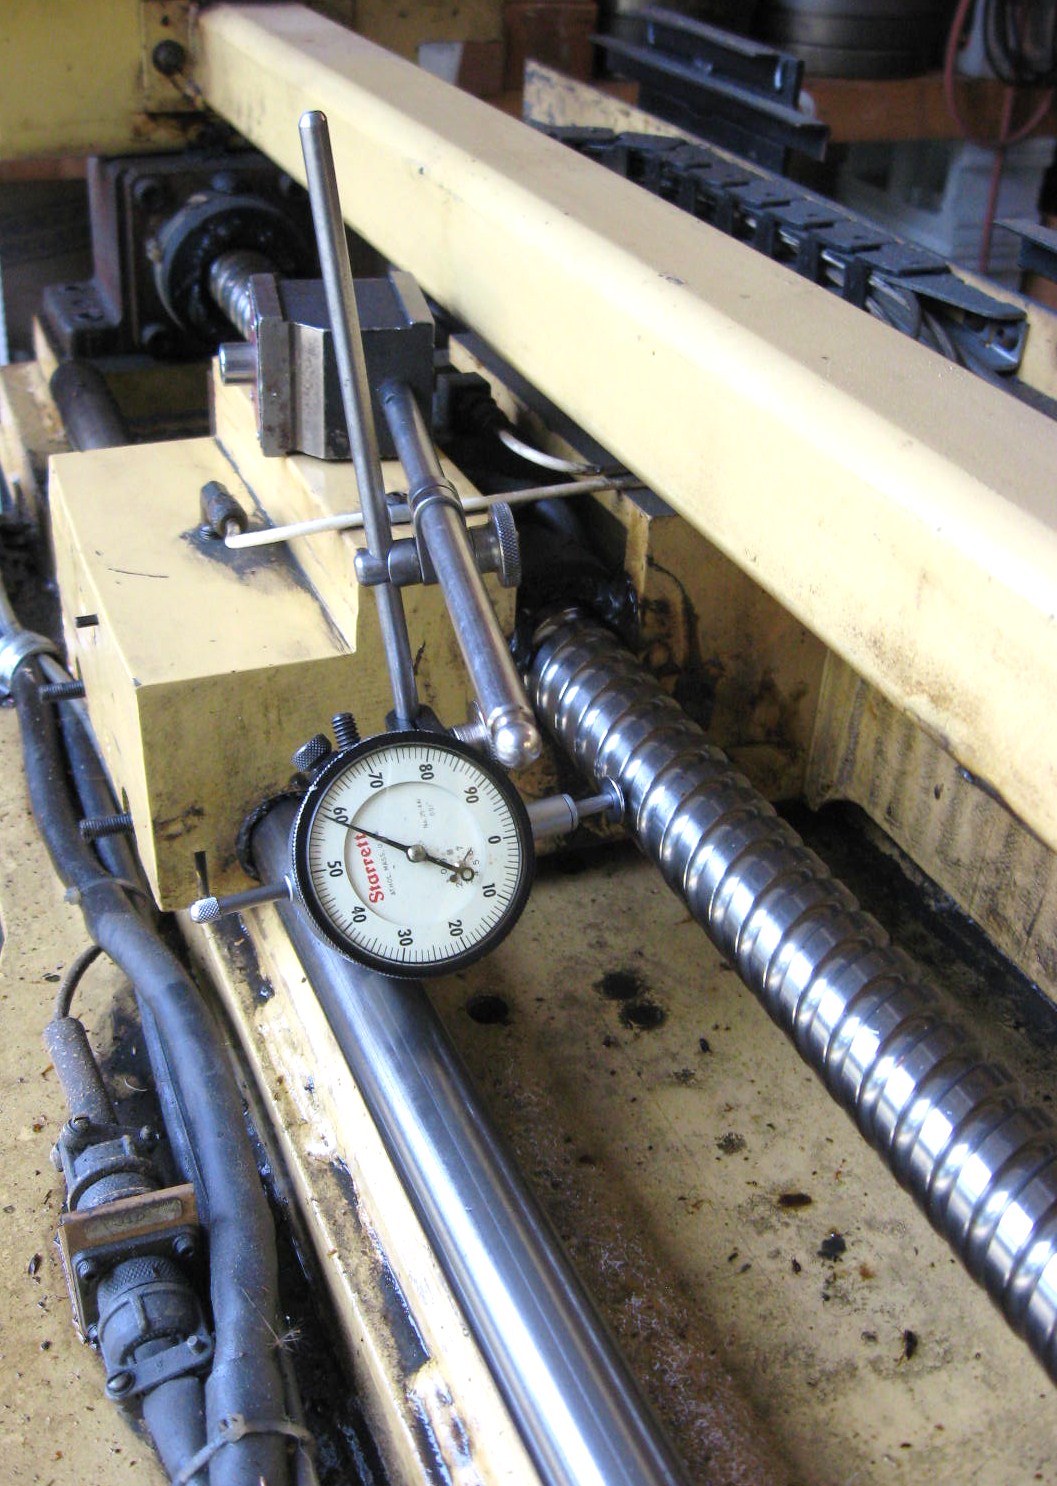
-- Depending on how this particular Machine-Axis and Ballscrew-Flange are Orientated,
By-Hand, Rotate Ballscrew until the Ballnut is at 1 End of Ballscrew. You should now be
able to Push By-Hand Machine Carriage Back & Forth Full Length of New Ballscrew.
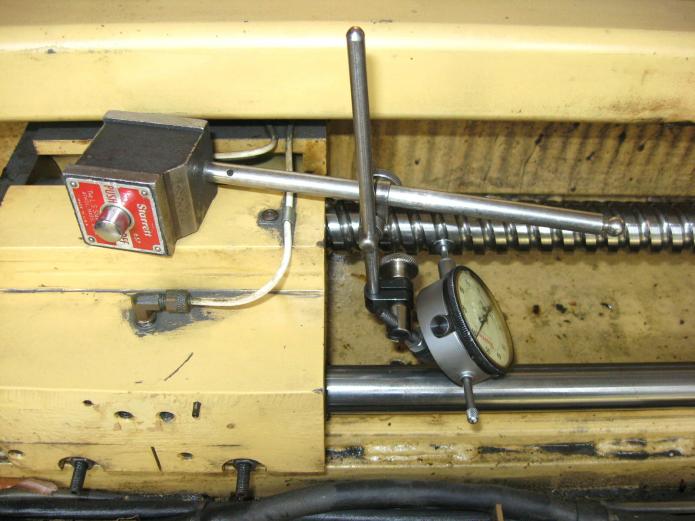
on Carriage so that Tip will Skip along Side of Ballscrew.
Push Carriage to 1 End of Travel and "Zero" Indicator. Push Carriage slowly to other end
of Ballscrew travel and you will see that Ballscrew and Guide-Bars are Not Parallel.
With your Brass Hammer, Tap the Motor-End Bearing-Mount Sideways to Align it.
Tighten Bolts a bit to hold Mount Position.
Repeat Pushing Carriage Back & Forth, adjusting Mount Position, and Tightening Down
Bolts Until Ballscrew is Parallel to Guide Bars to .002" or Less, and Bolts are Tight.
See 2 Photos Below.
-- Tighten Down Mounting Bolts to Maximum Tork to Hold Mount in Position as you probably
do not have Tools and Expertise to Re-Dowel Motor-End Bearing Mount. It can be Difficult!
Because of Difficulty, I usually Do NOT Re-Dowel Anymore, Just Tork Bolts to Maximum!
When I do Re-Dowel, I Sink 2 New 3/8" Dowel Pin Holes as it is about the Most I can Drill in
Steel by Hand. I first Drill a Deep 1/4" Hole through Mount and into Carriage beneath.
Then Re-Drill Hole with a 23/64" Drill Bit. Then I Ream Hole with a .373" or .374" Reamer.
Ream Very Quickly and as little as possible or your Holes will be Oversize and Installed
Dowel Pins will be Loose. Finally I Pound In 3/8" (.375") Pull-Dowel Pins with a
Brass Rod and a Hammer, Pins should go in Tight!
-- Because of Gravity, Ballscrews Sag Downward in the Middle as much as .100" or More.
If you Bolted Ballnut-Flange Tight to Carriage in the Middle of Travel where it is
Sagged-Down, Carriage & Guide-Bars will Hold Ballnut Rigidly in that Vertical Position.
Now when you Drive Axis to Either End of Travel, Ballnut will be Held-Down by Carriage
that .100", and as it approaches Vertically Higher End-Bearings, Something is going to
have to Bend or Break! Usually Ballnut will Tear itself apart, with Ball Bearings scattered
all over the Place. Now you will need to Buy another Ballscrew and Start Over Again.
So you Only Bolt Ballnut to Carriage at Either End of Ballscrew Travel!
I usually Bolt Ballscrew Flange to Axis-Carriage about 6 Inches away from the Motor-Mount
End-Bearings. This way, End-Bearings and Ballnut are in the Same Vertical-Plane, and as
Ballnut travels through the Middle-Sag area, it simply Lifts-Up Ballscrew as it will easily
flex-up in middle as needed.
-- Reinstall Motor, Cables, Etc. When Finished, I Build a Program that Runs New
Ballscrew Back & Forth the Full Length of Travel at a Very Slow F0500
(500 Inches Per Minute or less) Feedrate to Break-In New Ballscrew Slowly, much like
you would Carefully Break-In a New Car Engine. I do this for 20 - 30 minutes or so,
and Watch and Listen for Odd Noises or other Indications of Binding-Up or other Problems.
I also Squirt a Lot of Lube Oil onto Ballscrew as it is Moving Back & Forth.
Put Sheetmetal Tables back-on and Re-zero Axis, and you should be back in Business!
If your current Machine Ballscrew is getting Sloppy, and it is not in too bad Condition,
Get it Rebuilt Now! I can have it Rebuilt in about 2 TO 3 Weeks.
If you do Not have Ballscrew Rebuilt when it is getting a little Sloppy
(say, About Less than .005"), But Let-It-Go Until Assembly has a Lot of Slop
(say, like about .010" or More) in Assembly, Ballnut will have been Slamming against the Ballscrew like a Slide-Hammer causing Both Ballnut and Ballscrew to be Damaged Too-Much to be Properly Rebuilt or Not be Rebuildable at all. So Ballscrew will Need to be Replaced!
I used to also Carry New Ballscrews, but with Demise of American Machine Tool Industry,
the Ballscrew Manufacturer that I and Strippit had used for Decades has Closed.
I have other Manufactures that will Custom-Make any Ballscrew, but Cost is Very High,
and Lead-Time is Very Long at 2 to 3 Months, so you are better-off to Purchase a New
Ballscrew from Strippit, if available from their Current Vendor, the NSK Company.
Note, Ballscrews for Strippit Machines are "Proprietary"
and NSK will Not Sell you a New Strippit Ballscrew Direct.
This page was last updated: June 15, 2025